• Skip to main content
  • Skip to primary sidebar

The Papery Craftery

Quilling and Other Fun Paper Things

  • Quilling Basics
  • Quilling
    • Tutorials
    • Free Quilling Templates
    • Quilling Tools and Supplies
    • Papercraft and Quilling Videos
  • The Crafty Life
    • Crafting Printables
    • Paper Crafting News
    • Other Fun Things
  • Shop My Favorite Supplies
  • About & Disclosures
    • Privacy Policy
    • Cookie Policy
  • Contact

Patriotic Paper Wreath

June 10, 2017

The Craftery household got a new front door last week.

It’s pretty exciting because our door hadn’t opened smoothly since we bought our home a year ago!

The new door is a simple craftsman style that lets tons of light into our entryway, and I just love it.

But still, I think nothing makes a front door look as finished as a wreath.

So I set out to make up a quick patriotic paper wreath to hang all summer long!

This post contains affiliate links. If you click on the links below and make a purchase, I may receive a small compensation to help me finance this site and keep coming up with awesome tutorials and tips! There’s no cost to you and I only ever include links to companies and products that I trust and work with on a regular basis. 


Patriotic Paper Wreath ~ Grab some flag napkins to whip up this red, white and blue stunner that can dress up your front door all summer long! || www.thepaperycraftery.com

I was completely inspired by these American flag paper napkins I found at the Dollar Tree.

If you don’t have a Dollar Tree nearby, or they’re out of stock, check out these similar flag napkins.

Even though I wasn’t 100% sure how I was going to use them at the time, I bought 3 packs of 20 napkins each.

For this wreath, I used about 2 1/2 packs.

I also used my beloved Tacky Glue, my favorite glue gun, some leftover cardboard, and white ribbon.

Patriotic Paper Wreath ~ Grab some flag napkins to whip up this red, white and blue stunner that can dress up your front door all summer long! || www.thepaperycraftery.com

To make a super simple base for your door hanging, cut a square of cardboard, about 6 inches by 6 inches will do.

Since this is just a paper wreath, no heavy duty hanger is needed.

I cut a small slit in one corner of the cardboard, and threaded a 8″ length of white ribbon through.

A simple knot on the back will stop the ribbon from coming back through.

Patriotic Paper Wreath ~ Grab some flag napkins to whip up this red, white and blue stunner that can dress up your front door all summer long! || www.thepaperycraftery.com

Like I said earlier, I didn’t really have a plan when I started this door hanging.

So I played around a bit, and soon realized that I could simply roll the napkins.

They looked similar to the book pages used to make wreaths that are so popular on Pinterest right now.

And, I could roll them in a way to have the stars peek out from all the stripes.

It ended up being pretty simple!

First, place a napkin with the stars to the left, and the opening of the napkins facing the bottom.

Patriotic Paper Wreath ~ Grab some flag napkins to whip up this red, white and blue stunner that can dress up your front door all summer long! || www.thepaperycraftery.com

Next, fold the top down about 3/4 of the way to the bottom, but don’t crease.

(You’ll see more stars, but they’ll soon be covered, don’t worry about it!)

Holding the top in place, bring the bottom of the napkins up and over.

Keep rolling the end all the way around without pushing too hard. You don’t want to flatten the whole roll!

Patriotic Paper Wreath ~ Grab some flag napkins to whip up this red, white and blue stunner that can dress up your front door all summer long! || www.thepaperycraftery.com


Glue all the ends with a bit of Tacky Glue.

Hold for a few seconds until the napkin stays rolled.

Patriotic Paper Wreath ~ Grab some flag napkins to whip up this red, white and blue stunner that can dress up your front door all summer long! || www.thepaperycraftery.com

That’s it! Simple stars and stripes paper rolls!

Now, build your wreath.

Start by hot gluing four rolls facing the corners of your cardboard base.

Then, add a roll between each, so you have a total of 8.

I would recommend using a line of glue where ever the roll will meet the cardboard to make sure everything stays put.

Patriotic Paper Wreath ~ Grab some flag napkins to whip up this red, white and blue stunner that can dress up your front door all summer long! || www.thepaperycraftery.com

Fill in the spaces between the rolls from the last step.

Patriotic Paper Wreath ~ Grab some flag napkins to whip up this red, white and blue stunner that can dress up your front door all summer long! || www.thepaperycraftery.com

Take a break for cuteness!

My helper decided to make his face “like the Hulk’s”.  He’s just too adorable!

Patriotic Paper Wreath ~ Grab some flag napkins to whip up this red, white and blue stunner that can dress up your front door all summer long! || www.thepaperycraftery.com

Ok, back to crafting!

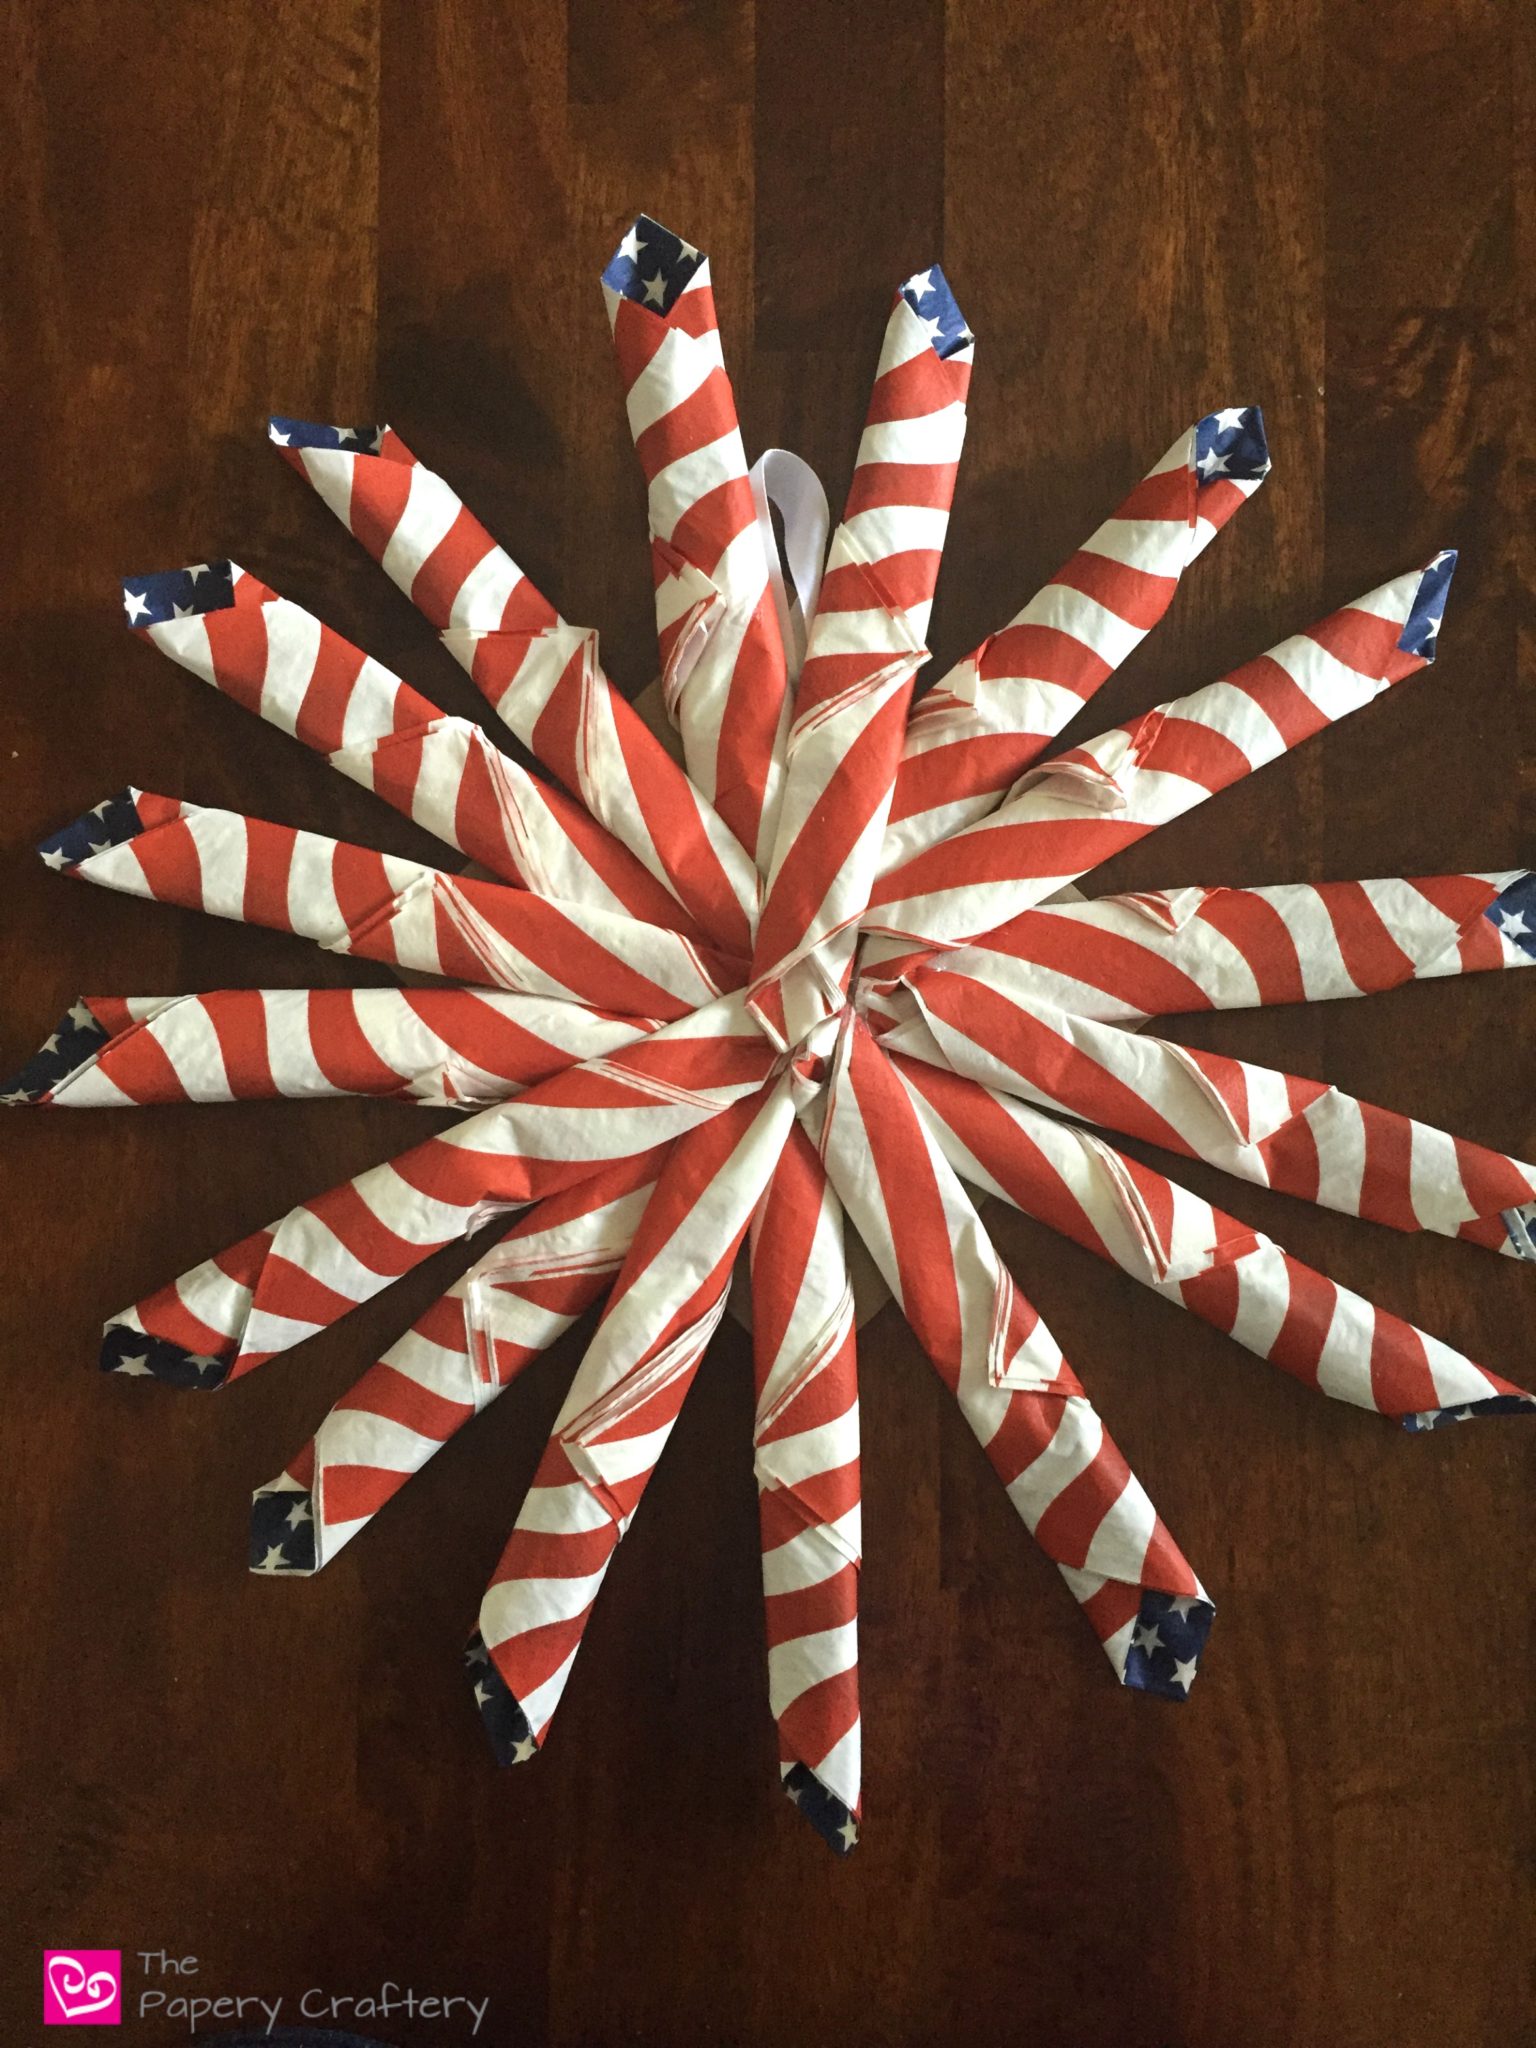
Start building your wreath to have more of a dome or “dahlia” shape.

To do that, make the rolls in the same way, but cut about 2 inches or so off the bottom.

Your rolls should stay together. But, add a touch of extra glue if need be!

Patriotic Paper Wreath ~ Grab some flag napkins to whip up this red, white and blue stunner that can dress up your front door all summer long! || www.thepaperycraftery.com

Keep building your wreath in a starburst pattern, trimming the ends a little more as you get to the center.

There’s no real science to this part. I just tried to keep all my rolls evenly spaced. I also made sure I was happy with the placement before I glued each level.

TIP: If your napkin rolls aren’t standing up in a way that you like when you get to the center, use extra hot glue behind and under them to give them a boost!

Patriotic Paper Wreath ~ Grab some flag napkins to whip up this red, white and blue stunner that can dress up your front door all summer long! || www.thepaperycraftery.com

Add a final roll right in the center to complete the pattern.

Patriotic Paper Wreath ~ Grab some flag napkins to whip up this red, white and blue stunner that can dress up your front door all summer long! || www.thepaperycraftery.com

And she’s ready to be hung!

Simple, but eye-catching, I think this patriotic paper wreath is the exact thing our new door needed!

Patriotic Paper Wreath ~ Grab some flag napkins to whip up this red, white and blue stunner that can dress up your front door all summer long! || www.thepaperycraftery.com

All in all, this project took about 40 minutes (including that break with the Hulk) and, since all I had to buy new was the napkins, it cost all of $3.

Patriotic Paper Wreath ~ Grab some flag napkins to whip up this red, white and blue stunner that can dress up your front door all summer long! || www.thepaperycraftery.com

This same technique would work with any pattern napkin or other type of paper for other seasons.

You could even add a lot more rolls to make the door hanging much more full.

Maybe use a few colors for more of a flower effect!

In the meantime, I hope you’ve been inspired to play with some paper napkins to make your own door hanging!


Print this post

Share this:

  • Click to share on Facebook (Opens in new window)
  • Click to share on Twitter (Opens in new window)
  • Click to share on Pinterest (Opens in new window)
  • Click to print (Opens in new window)

in Paper Crafting News # American Flag Wreath, July 4th Door Hanging, Paper Wreath, Red White Blue Wreath, Summer Wreath

Reader Interactions

you may also like
Quilling Art by Sena Runa
The Art of Quilling Paper Jewelry Book Review
Is Paper Quilling the Next Big Trend in Crafting?
How to Save Money on Craft Supplies

Comments

  1. Julie Hood says

    June 13, 2017 at 7:31 am

    I LOOOOVE doing crafts with what I’ve found at the dollar tree!! I swear they’re the best dollar store ever. It came out so cute!!

    Reply
    • Meredith says

      June 13, 2017 at 12:42 pm

      Thanks Julie! Check different Dollar Tree locations if you have a few nearby, like I do. I’ve found some have a lot more choices than others!

      Reply
  2. happymombrain says

    June 13, 2017 at 1:43 pm

    This is so cute!! I can’t wait to try it!

    Reply
    • Meredith says

      June 13, 2017 at 2:11 pm

      I hope you do! It really was quick and easy!

      Reply
  3. 21flavorsofsplendor says

    June 13, 2017 at 2:08 pm

    This is super cute!! I would have never thought to use napkins to make a wreath. This is a inexpensive and easy way to dress up your door for any holiday.

    Reply
    • Meredith says

      June 13, 2017 at 2:13 pm

      Thanks! I haven’t done it before either, but the napkins are holding up really well on my door so far!

      Reply
  4. Nostalgia Diaries says

    June 13, 2017 at 2:49 pm

    I never would have thought to do this. It’s so cute! You could do this with all sorts of seasonal napkins!

    Reply
    • Meredith says

      June 13, 2017 at 2:54 pm

      Thanks so much! It’s true; there are all kinds of pretty, decorative napkins out there!

      Reply
  5. onesharpmamablog says

    June 13, 2017 at 6:54 pm

    So pretty! I love that the supplies came from the dollar store! Love saving that $

    Reply
    • Meredith says

      June 13, 2017 at 9:14 pm

      Right?!? Finding a really inexpensive way do make something is one of my ultimate goals.

      Reply

Share your thoughts and leave a comment below! Cancel reply

Primary Sidebar

About Me

Hi there, Paper People! I'm so glad you've stumbled across my corner of the internet. I'll be sharing my favorite quilling tips and tutorials, plus some creative micro-biz pointers, and lots of paper crafting news! Thanks for stopping by!

Looking for a project, technique or tool? Search here!

There’s more on YouTube!

https://youtu.be/35_gat0Gp4w

Top Hits!

Thank you so much for stopping by my site. If you care to throw more support my way so I can continue to make new tutorials, you can do so by buying me a virtual cup of coffee!

Affiliate Policy

Some posts on this blog contain affiliate links.

If you click on the links and make a purchase, I would receive a small compensation to help me finance this site and keep coming up with awesome tutorials and tips! There’s no cost to you and I only ever include links to companies and products that I trust and work with on a regular basis.

All posts with affiliate links are clearly marked.

The Papery Craftery (ThePaperyCraftery.com) blog is a participant in the Amazon Services LLC Associates Program, an affiliate advertising program designed to provide a means for us to earn fees by linking to Amazon.com and affiliated sites.

Cookie Policy
Privacy Policy

I hope you’re inspired by my quilling!

Feel free to use my designs as gifts or for your own personal use. And I’d love any sharing of my photos and projects! All I ask is that all photos remain unaltered and link back to the original post, and please do not attempt to sell my any quilling created from my designs as your own work. Happy Crafting!

Latest on Instagram

thepaperycraftery

thepaperycraftery
It’s time for spring crafting! This week I’m It’s time for spring crafting!  This week I’m sharing 3 ways to make tiny quilling paper flower buds. Perfect to round out your next floral quilling project.  Full video is up now 👆
#quilling #paperflowers #papercrafts #flowers
Quilling paper shamrocks! One of my oldest and v Quilling paper shamrocks!  One of my oldest and very first designs 😍 full how-to’s are up now!  #quilling #papercrafts #paper #stpatricksday
Most of my FAQ’s are about making quilling paper Most of my FAQ’s are about making quilling paper letters - the first of 2 videos with all the tips is up now!  🎥 link in bio 
#quilling #quillingcrafts #paper #monograms #paperletters
Any day I get to pull out my favorite quilling com Any day I get to pull out my favorite quilling comb is a good day  Quilling a paper spider mums full video with all the steps is up on YouTube  🎥 link in bio 
#quilling #quillingcrafts #paper #papercrafts #paperflowers
I know 3D quilling isn’t everyone’s jam, but I I know 3D quilling isn’t everyone’s jam, but I love the magic in creating something realistic out of simple strips of paper 😍  Full video with all the steps is up on YouTube  🎥 link in bio 
#quilling #quillingcrafts #papercraft #blueberries #handmade
Rainy East Coast days call for teeny mushrooms F Rainy East Coast days call for teeny mushrooms  Full video with all the steps is up on YouTube  🎥 link in bio 
#quilling #quillingcrafts #papercrafts #paperart #autumnvibes #handmade
DIY sweet paper cherries 🍒 The full video wit DIY sweet paper cherries 🍒  The full video with all the steps is up on YouTube now  🎥 link in bio 
#quilling #quillingcrafts #papercraft #handmade
The how-to’s on these sweet cherries and blueber The how-to’s on these sweet cherries and blueberries won’t be up on YouTube until Sunday but they’re too cute not to share early 🤩  🎥 link in bio 
#quilling #quillingcrafts #papercrafts #handmade
4 fast fall flowers - use them all together or jus 4 fast fall flowers - use them all together or just choose your favorites 🤩  Full how-to video is up now on YouTube 🎥
#quilling #quillingcrafts #fallcrafts #paperflowers #autumnvibes #linkinbio
Stacks of paper swirls make colorful quilling pape Stacks of paper swirls make colorful quilling paper clouds ☁️ ☁️☁️  Full how-to video is up now on YouTube 🎥
#quilling #quillingcrafts
Wavy flower blossoms come together in minutes 🌸 Wavy flower blossoms come together in minutes 🌸🌸🌸 Couldn’t be easier!  Full how-to video is up now on YouTube 🎥
#quilling #quillingcrafts #paperflowers
Does anyone else have tons of coneflowers piping u Does anyone else have tons of coneflowers piping up in their neighborhood? The colors are 🤩🤩🤩  Full make your own quilling paper coneflower how-to video is up now on YouTube 🎥
#quilling #quillingcrafts
Tiny quilled ladybugs - 2 ways! Full video is up Tiny quilled ladybugs - 2 ways!  Full video is up now on YouTube 🎥
#quilling #quillingcrafts
Simple quilling paper flowers made on a husking bo Simple quilling paper flowers made on a husking board - comes together so quickly!  Full video is up now on YouTube 🎥
#quilling #quillingcrafts #paperflowers
Quilling paper 🤝 Valentine’s Day crafts Hear Quilling paper 🤝 Valentine’s Day crafts  Hearts are one of the simplest quilling shapes to create and I’m sharing 3 ways over on YouTube this week  #quilling #quillingcrafts #quillingforbeginners #papercrafts
There’s still a bit of time to sign up to join m There’s still a bit of time to sign up to join me at the @rebeccajpage Holiday Craft Summit on Monday!  You can learn how to make these mini wreaths and so much more!  See you there!  #quilling #christmascrafts #papercraft 
#holidayseason #holidaycraftsideas
Just over a week until the @rebeccajpage Holiday C Just over a week until the @rebeccajpage Holiday Craft Summit. I’ll be there sharing these mini quilling paper wreaths!  Join me by signing up with the link in my bio 🎄🎄🎄  #quilling #holidaycrafts #christmascrafts #craftersofinstagram #papercrafts
🔔 It’s almost time to ring in the holidays! 🔔 It’s almost time to ring in the holidays!  🔔 I have a playlist on my YouTube channel all about winter and Christmas quilling - featuring these bells, evergreen trees, ornaments, and more!  🔔 Look for the link in my bio  #quilling #papercraft
#christmascrafts #bells
Just making things out of paper over here #quillin Just making things out of paper over here #quilling #papercraft
🎄Big news! I’m so excited to announce that I’m going to be a part of the upcoming @rebeccajpage FREE Holiday Craft summit on November 29 - December 3.  🎄There will be more than 35 crafters sharing holiday gift and decor ideas - I’ll be sharing an exclusive quilling paper wreath project!  🎄Follow the link in my bio for all the details and to sign up 👆  I’ll see you there!  #quilling #papercrafts #christmascrafts
#holidaycrafts
Load More... Follow on Instagram
2021 © Meredith Amand Designs
made by soulmuse