• Skip to main content
  • Skip to primary sidebar

The Papery Craftery

Quilling and Other Fun Paper Things

  • Quilling Basics
  • Quilling
    • Tutorials
    • Free Quilling Templates
    • Quilling Tools and Supplies
    • Papercraft and Quilling Videos
  • The Crafty Life
    • Crafting Printables
    • Paper Crafting News
    • Other Fun Things
  • Shop My Favorite Supplies
  • About & Disclosures
    • Privacy Policy
    • Cookie Policy
  • Contact

How to Store Quilling Paper

February 20, 2016

A round-up of unique and resourceful ways to store your quilling paper, found across the web || www.thepaperycraftery.com


This post contains affiliate links. If you click on the links below and make a purchase, I may receive a small compensation to help me finance this site and keep coming up with awesome tutorials and tips! There’s no cost to you and I only ever include links to companies and products that I trust and work with on a regular basis. 

There are many awesome advantages to practicing the art of quilling paper.

One of the best parts of practicing quilling is how little space the actual paper takes. Even so, the question of how to store quilling paper may all be a question of personal choice.

A round-up of unique and resourceful ways to store your quilling paper, found across the web || www.thepaperycraftery.com

I know that I am guilty of the simplest and most straight-forward way of storing my paper and that is by keeping them in the packaging that they were shipped in.   Most of my packs of paper arrive in one of two different types of bags.

The longer sheets are packaged in resealable cellophane bags. These are the sheets I prefer. They feel slightly thinner, but they are much longer and, for my purposes, I get more bang for my buck with these.


The shorter quilling paper strips are also in a small cellophane bag, but this type doesn’t seal again. In fact, the recommendation on the enclosed instructions suggest keeping the paper inside the bag, but snipping off one end for easy access.  I’ve found that its also a good idea to write the name of the color on the bag for easy reference when reordering.

Keeping your quilling paper in the cellophane packages they were shipped in allows for easy storage and stacking. I keep all my strips in sturdy, pretty boxes that are available at all craft stores. I have great dreams of organizing my strips by color, but that probably will never happen.  Usually, the box on the top is filled with the colors that I use the most. (Ok, usually the colors that I use the most are left out on my work space, but when I straighten up, they get put back in the top box.)

Storing Quilling Paper in Pretty Boxes

The arguments against storing quilling paper that way is the paper is kept bent in their bags, and this could affect the quality of your quilling. But, the designs I quill are on a smaller scale, so these minor bends don’t seem to have much of an impact on the finished product.


On her site, Crafting Creatures, Cecelia Louie shows how she repurposed old camera negative sleeves in a binder to store her shorter, half-used quilling strips.  She also has a great idea to use a fishing tackle box to store tiny bits and coils, which is great if you’re continuously quilling the same designs or shapes. I’ve found that empty baby food containers do this job nicely, as well.

Quilling Paper Storage in a Binder
Binder Quilling Paper Storage by Crafting Creatures / Cecelia Louie

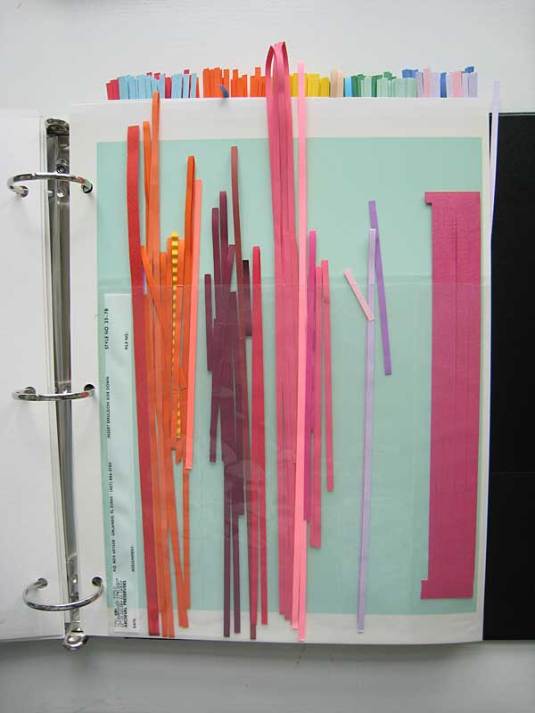
Jamie from Curly Quills uses a simliar type of binder storage, but she’s able to use whole sheets in hers!

Quilling paper storage in binders.
Binder Quilling Paper Storage by Jamie from Curly Quills

If you have a little more space in your crafting area, try using clips and a round dowel to keep your paper hanging straight, like Lady Rain Buzz.

How To Store Quilling Paper
Using Clips to Store Quilling Paper by Lady Rain Buzz

And the award for the most organized and awe-inspiring quilling paper storage solution was found on the Quilling Creations forum page with photos attributed to an unknown quiller.  Using metal washers and a spring-loaded curtain rod, the artist is able to see every color and strip while working on her latest project.

quilling paper storage:

There is probably as many ways to store quilling paper as there are quillers. Your method may depend on your space, how much time you can devote to quilling, or just your imagination.

I’d love to hear your technique for storing quilling paper strips. Leave a comment below and tell us all about it!


Print this post

Share this:

  • Click to share on Facebook (Opens in new window)
  • Click to share on Twitter (Opens in new window)
  • Click to share on Pinterest (Opens in new window)
  • Click to email a link to a friend (Opens in new window)
  • Click to print (Opens in new window)

in Quilling # Craft Room Organization, How to Store Quilling Paper, Quilling Paper Storage

Reader Interactions

you may also like
How to Make 3 Quilling Paper Flower Buds
4 Fast Fall Quilling Paper Flowers
Autumn Wreath with Quilling Paper Leaves
Quilling Paper Seahorse

Comments

  1. Ayse says

    March 15, 2016 at 3:36 pm

    Lovely ideas. I store my quilling papers in recycled paper towel tubes I assembled in a large box. Here’s a picture of how it looks, on my blog:
    http://kagitlik.blogspot.com.tr/2014/07/kutu-kutu-pense-elmam-yerse.html
    I was looking for ideas on how to store the longer ones, so this post is really helpful, thank you. 🙂

    Reply
    • Meredith says

      March 15, 2016 at 4:27 pm

      That’s a great idea! Pretty and functional, too. Thanks so much for sharing!

      Reply
  2. Paris says

    September 24, 2016 at 10:51 pm

    Presently, I keep my completed shapes & flowers in prescription pill bottles. The labels come off easily & they are simple to store & label with painters tape & a sharpie. I keep my strips of paper in ziplock baggies – by similar colors. If they get bent it doesn’t affect my final results!

    Reply
    • Meredith says

      September 25, 2016 at 7:23 am

      I love that you’re reusing bottles! Ive been known to keep some coils on stackable baby food jars. Thanks so much for visiting and sharing!

      Reply
  3. Michele says

    August 18, 2017 at 6:35 am

    I’ve been looking for a better way of storing my quilling papers. Currently I keep them in an accordian book I made. An attached

    ribbon wraps around the book to tie it closed. Each page is actually one piece of paper folded long ways in half and sewn up each side leaving the top open to create a pocket. The only downfalls are that it needs to be opened carefully as there are so many pages that one cover of the book tends to fall back\forward onto the ground spilling papers. Also my papers tend to leak into other pockets due to a wide stitch used in the sewing process. If I had the hinesite (probably a spelling error), to see these problems, they could have easily been solved many ways. Such as making an envelope book or creating several long pockets on each page with a shorter stitch.
    Thanks for your ideas, I like the one using a dowel and clips.

    Reply
    • Meredith says

      August 18, 2017 at 8:29 am

      I’m so impressed that you made your own book!

      Reply
  4. CINDY TROPEANO says

    December 14, 2017 at 6:59 am

    I have accumulated many strips and I keep mine all in the package they came in so I know what brand and color they are so I can replace them as needed. On Amazon I found stackable containers that are the perfect width for the packages of strips. 2 of them come clipped together but you can clip a whole stack together also! I organize them by width and color. It makes it so simple. On the outside of each box I write what width is in that box so I don’t have to open them all. If I knew how to post the link to them on Amazon I would but they are easy enough to find if you do a search for stackable containers. They are clear with blue clips.

    Reply
    • Meredith says

      December 14, 2017 at 7:21 am

      Thanks for sharing Cindy! That sounds like a great find!

      Reply
  5. Cmerkel says

    January 26, 2018 at 8:07 am

    We threaded picture hooks on picture hanging wire that is strung between two supports. Punched a hole in the top of the quilling paper storage bags and hung them on the hooks – three to a hook fit nicely. Easy on, easy off!

    Reply
    • Meredith says

      January 26, 2018 at 12:44 pm

      Great idea! And it sounds like you can see all your colors at once!

      Reply
  6. pilar sanchez says

    October 12, 2018 at 9:52 am

    I use 3 inch book rings and I hang them on the rod in the open closet of my craft room. Each ring holds a different color.

    Reply
    • Meredith says

      October 12, 2018 at 11:18 am

      That is very organized! I’m so impressed!!

      Reply
  7. Catherine Lamb says

    June 5, 2019 at 7:24 am

    I stuck drapery hooks into a corkboard. I then clip my leftover paper strips and hang them on a hook. The board hangs right beside where I quill so it is quite convenient.

    Reply
  8. BrendaLea says

    March 8, 2020 at 9:00 pm

    I took a ruler and glued mini clothes pins along it at 1 inch intravals and clip my strips in the mini clothes pins. Attached a cord to each end of ruler which then hangs from a nail. This works for me.

    Reply
    • Meredith says

      March 9, 2020 at 8:44 pm

      I love those mini clothes pins. They come in handy! Great idea to use them for strips.

      Reply
  9. Amanda says

    May 16, 2021 at 2:53 pm

    I store mine in their packaging if they’re unused, and in stackable plastic containers if they’re partially used. I also have a storage box with compartments that I store all my tools in, as well as my unfinished projects. This post was really helpful! Thanks for writing it.

    Reply

Share your thoughts and leave a comment below! Cancel reply

Primary Sidebar

About Me

Hi there, Paper People! I'm so glad you've stumbled across my corner of the internet. I'll be sharing my favorite quilling tips and tutorials, plus some creative micro-biz pointers, and lots of paper crafting news! Thanks for stopping by!

Looking for a project, technique or tool? Search here!

There’s more on YouTube!

https://youtu.be/Ii0AbxeeySs

Top Hits!

Thank you so much for stopping by my site. If you care to throw more support my way so I can continue to make new tutorials, you can do so by buying me a virtual cup of coffee!

Affiliate Policy

Some posts on this blog contain affiliate links.

If you click on the links and make a purchase, I would receive a small compensation to help me finance this site and keep coming up with awesome tutorials and tips! There’s no cost to you and I only ever include links to companies and products that I trust and work with on a regular basis.

All posts with affiliate links are clearly marked.

The Papery Craftery (ThePaperyCraftery.com) blog is a participant in the Amazon Services LLC Associates Program, an affiliate advertising program designed to provide a means for us to earn fees by linking to Amazon.com and affiliated sites.

Cookie Policy
Privacy Policy

I hope you’re inspired by my quilling!

Feel free to use my designs as gifts or for your own personal use. And I’d love any sharing of my photos and projects! All I ask is that all photos remain unaltered and link back to the original post, and please do not attempt to sell my any quilling created from my designs as your own work. Happy Crafting!

Latest on Instagram

thepaperycraftery

thepaperycraftery
So simple! Learn to make bunches of sweet quilling So simple! Learn to make bunches of sweet quilling paper lilac flowers and leaves ~ 
The full video is up now 👆  #quilling #paperflowers #papercrafts
Making quilling paper lily of the valley flowers a Making quilling paper lily of the valley flowers and leaves couldn’t be easier! 
Full video is up now 👆  #quilling #papercrafts #paperflowers #flowers
How to make big, bright, beautiful quilling paper How to make big, bright, beautiful quilling paper gerbera daisies! 
Full video is up now 👆  #quilling #papercrafts #paperflowers #crafts #craftideas
It’s time for spring crafting! This week I’m It’s time for spring crafting!  This week I’m sharing 3 ways to make tiny quilling paper flower buds. Perfect to round out your next floral quilling project.  Full video is up now 👆
#quilling #paperflowers #papercrafts #flowers
Quilling paper shamrocks! One of my oldest and v Quilling paper shamrocks!  One of my oldest and very first designs 😍 full how-to’s are up now!  #quilling #papercrafts #paper #stpatricksday
Most of my FAQ’s are about making quilling paper Most of my FAQ’s are about making quilling paper letters - the first of 2 videos with all the tips is up now!  🎥 link in bio 
#quilling #quillingcrafts #paper #monograms #paperletters
Any day I get to pull out my favorite quilling com Any day I get to pull out my favorite quilling comb is a good day  Quilling a paper spider mums full video with all the steps is up on YouTube  🎥 link in bio 
#quilling #quillingcrafts #paper #papercrafts #paperflowers
I know 3D quilling isn’t everyone’s jam, but I I know 3D quilling isn’t everyone’s jam, but I love the magic in creating something realistic out of simple strips of paper 😍  Full video with all the steps is up on YouTube  🎥 link in bio 
#quilling #quillingcrafts #papercraft #blueberries #handmade
Rainy East Coast days call for teeny mushrooms F Rainy East Coast days call for teeny mushrooms  Full video with all the steps is up on YouTube  🎥 link in bio 
#quilling #quillingcrafts #papercrafts #paperart #autumnvibes #handmade
DIY sweet paper cherries 🍒 The full video wit DIY sweet paper cherries 🍒  The full video with all the steps is up on YouTube now  🎥 link in bio 
#quilling #quillingcrafts #papercraft #handmade
The how-to’s on these sweet cherries and blueber The how-to’s on these sweet cherries and blueberries won’t be up on YouTube until Sunday but they’re too cute not to share early 🤩  🎥 link in bio 
#quilling #quillingcrafts #papercrafts #handmade
4 fast fall flowers - use them all together or jus 4 fast fall flowers - use them all together or just choose your favorites 🤩  Full how-to video is up now on YouTube 🎥
#quilling #quillingcrafts #fallcrafts #paperflowers #autumnvibes #linkinbio
Stacks of paper swirls make colorful quilling pape Stacks of paper swirls make colorful quilling paper clouds ☁️ ☁️☁️  Full how-to video is up now on YouTube 🎥
#quilling #quillingcrafts
Wavy flower blossoms come together in minutes 🌸 Wavy flower blossoms come together in minutes 🌸🌸🌸 Couldn’t be easier!  Full how-to video is up now on YouTube 🎥
#quilling #quillingcrafts #paperflowers
Does anyone else have tons of coneflowers piping u Does anyone else have tons of coneflowers piping up in their neighborhood? The colors are 🤩🤩🤩  Full make your own quilling paper coneflower how-to video is up now on YouTube 🎥
#quilling #quillingcrafts
Tiny quilled ladybugs - 2 ways! Full video is up Tiny quilled ladybugs - 2 ways!  Full video is up now on YouTube 🎥
#quilling #quillingcrafts
Simple quilling paper flowers made on a husking bo Simple quilling paper flowers made on a husking board - comes together so quickly!  Full video is up now on YouTube 🎥
#quilling #quillingcrafts #paperflowers
Quilling paper 🤝 Valentine’s Day crafts Hear Quilling paper 🤝 Valentine’s Day crafts  Hearts are one of the simplest quilling shapes to create and I’m sharing 3 ways over on YouTube this week  #quilling #quillingcrafts #quillingforbeginners #papercrafts
There’s still a bit of time to sign up to join m There’s still a bit of time to sign up to join me at the @rebeccajpage Holiday Craft Summit on Monday!  You can learn how to make these mini wreaths and so much more!  See you there!  #quilling #christmascrafts #papercraft 
#holidayseason #holidaycraftsideas
Just over a week until the @rebeccajpage Holiday C Just over a week until the @rebeccajpage Holiday Craft Summit. I’ll be there sharing these mini quilling paper wreaths!  Join me by signing up with the link in my bio 🎄🎄🎄  #quilling #holidaycrafts #christmascrafts #craftersofinstagram #papercrafts
Load More... Follow on Instagram
2021 © Meredith Amand Designs
made by soulmuse