• Skip to main content
  • Skip to primary sidebar

The Papery Craftery

Quilling and Other Fun Paper Things

  • Quilling Basics
  • Quilling
    • Tutorials
    • Free Quilling Templates
    • Quilling Tools and Supplies
    • Papercraft and Quilling Videos
  • Crafts
    • Quilling and Craft Printables
    • Paper Crafting News
    • Other Fun Things
  • Shop My Favorite Supplies
  • About and Disclosures
  • Contact

Red, White, and Blue Quilling Comb Star Wreath

June 20, 2018

Sometimes, my quilling tutorials come together in a few days.

Others can be a long time in the making.

This week’s project falls into the second category.

Today, I’m sharing a red, white, and blue quilling comb star wreath that has been on my radar for a few months.

This post contains affiliate links. If you click on the links below and make a purchase I may receive a small compensation to help me finance this site and keep coming up with awesome tutorials and tips! There’s no cost to you and I only ever include links to companies and products that I trust and work with on a regular basis. 


Red, White & Blue Quilling Comb Star Wreath ~ Patriotic stars and rope details makes the perfect simple summer wreath || www.ThePaperyCraftery.com

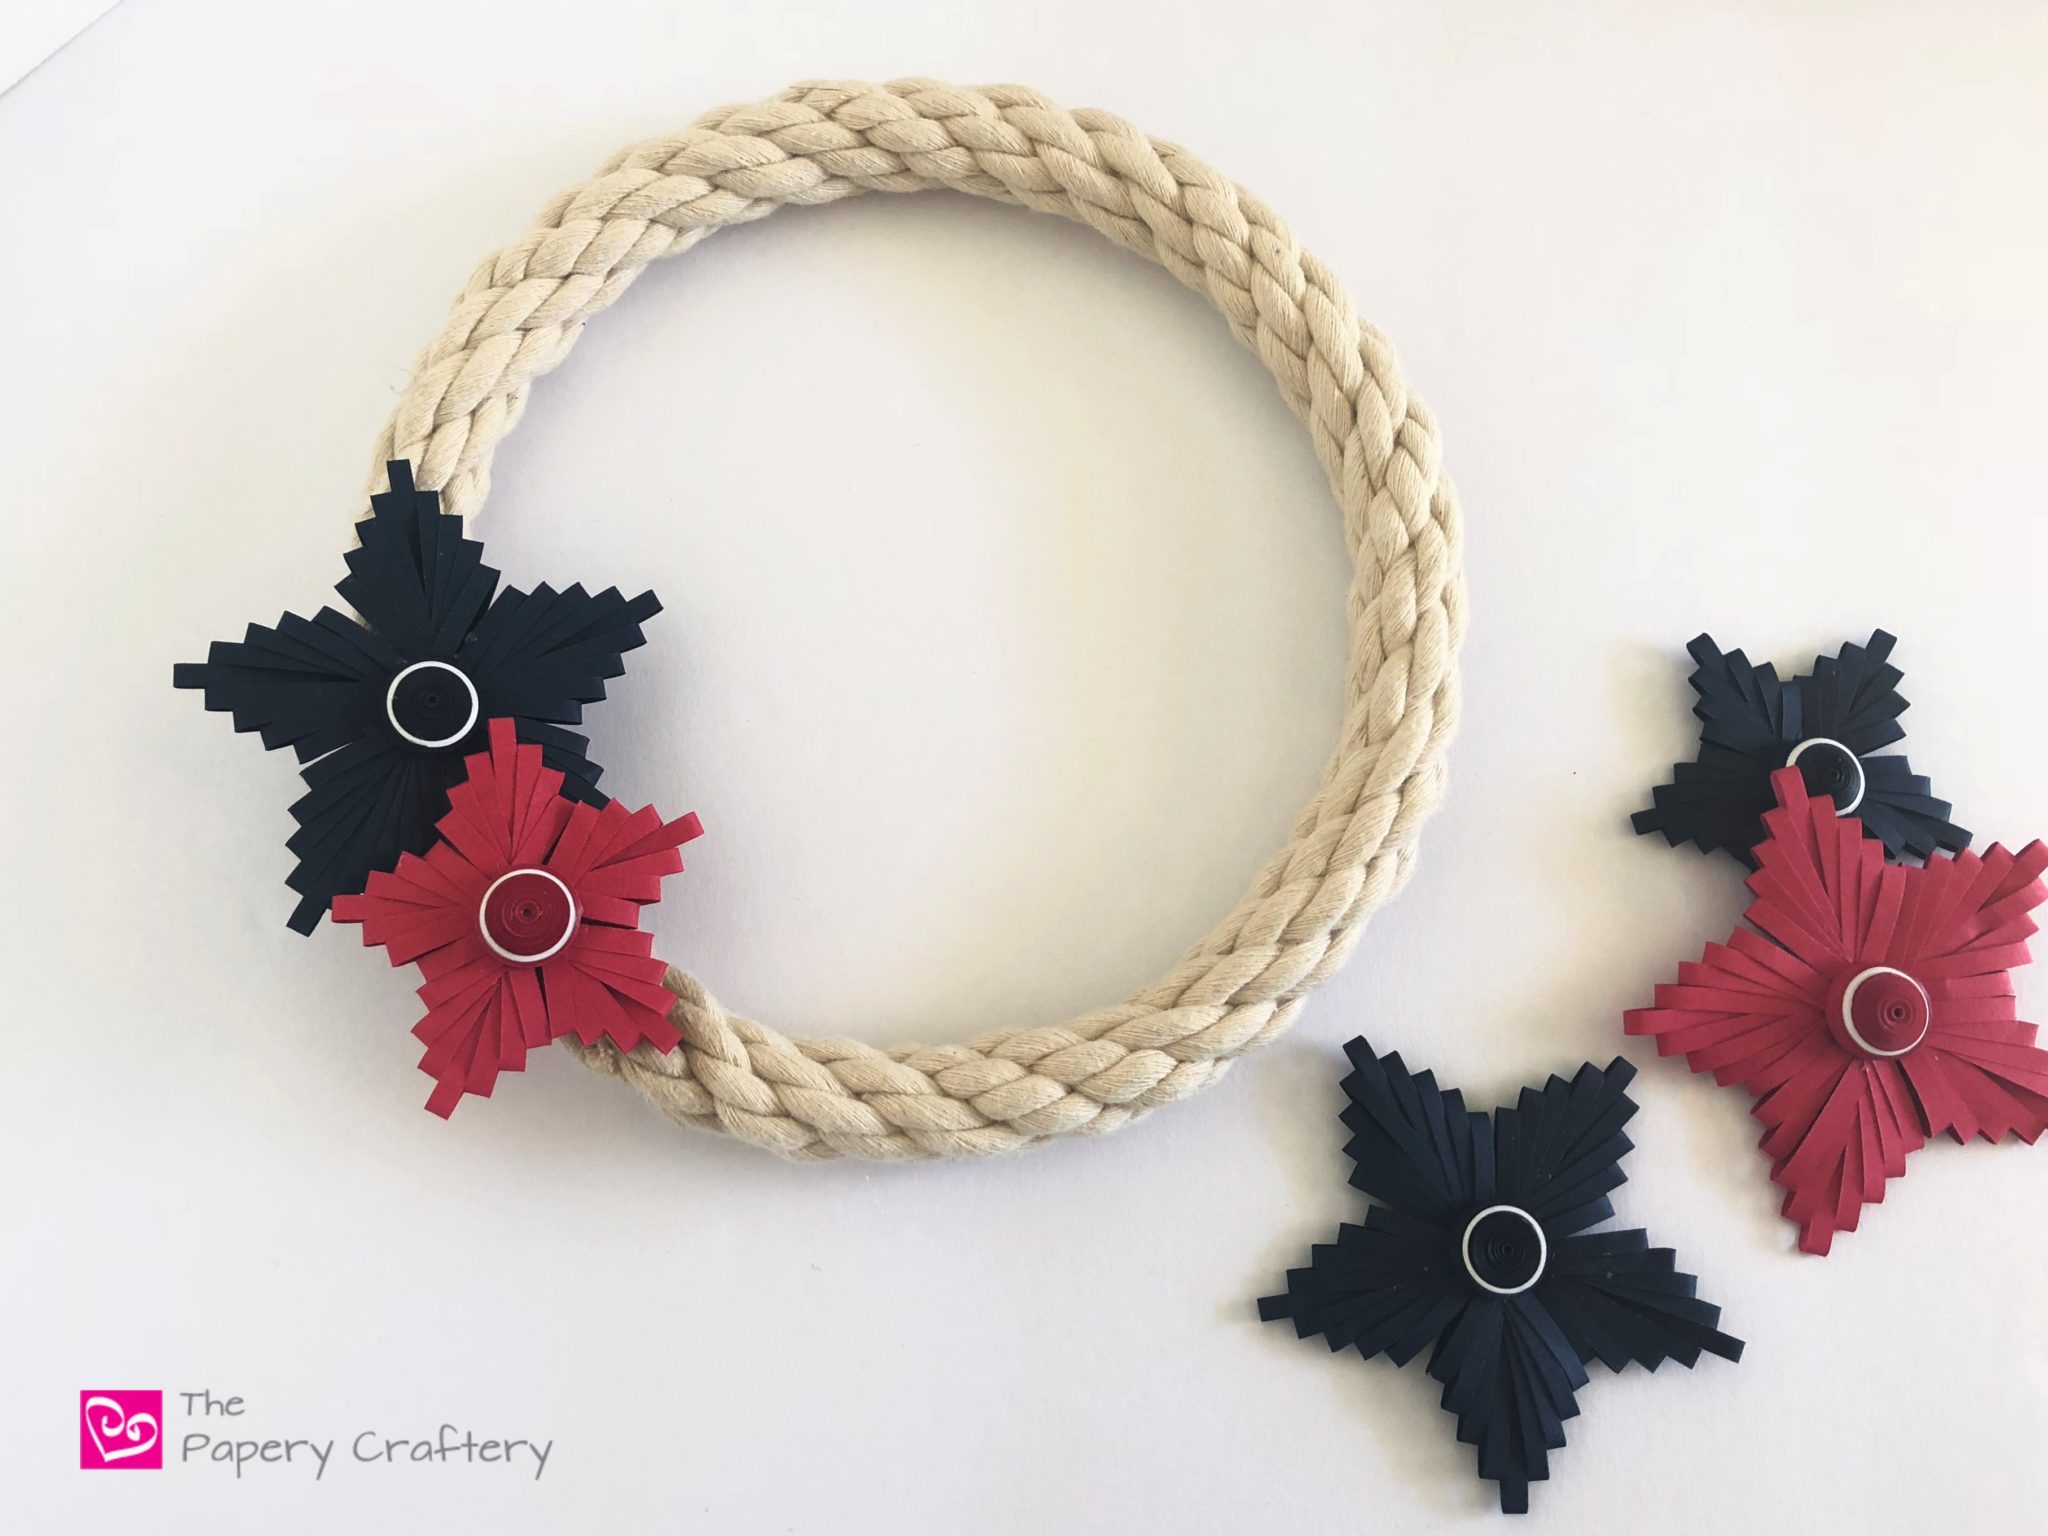
My wheels started turning last fall when I came across this awesome mini rope wreath in the clearance aisle at my local Joann’s.

It was less than a couple dollars, so I had to snap it up right away.

I figured I would come up with a use for it later.

I had trouble finding a similar wreath to suggest for this post, but you can always make your own.

Try wrapping white rope around an embroidery hoop or a wreath form yourself, or even picking up a white willow wreath form for a quicker solution.

Red, White & Blue Quilling Comb Star Wreath ~ Patriotic stars and rope details makes the perfect simple summer wreath || www.ThePaperyCraftery.com

The rope gave me a definite summer feeling.

I had thoughts to do a more nautical theme for this door hanging, but then I settled on making a patriotic wreath.

And I decided to take that idea as an opportunity to share another technique with a quilling comb to make woven stars.

To do this, gather a few basic supplies.

I chose crimson, navy, and white paper for the stars.

And some Tacky Glue, white glue, a needle tool, a workboard with waxed paper, and a quilling comb.

Red, White & Blue Quilling Comb Star Wreath ~ Patriotic stars and rope details makes the perfect simple summer wreath || www.ThePaperyCraftery.com

For the first step of making a woven star, pull a quilling paper strip through a tooth on your comb that is about 1 1/4″ from the bottom.

On my comb, this is the 8th tooth, but all combs vary in size.

Take care to hold the end of your strip in place so the end is facing straight down.

This will be the middle of your star segment.

You’ll want to do this in the center of your comb, as opposed to off to one side because you’ll need room to pull your strip to the left and right as your star grows.

Red, White & Blue Quilling Comb Star Wreath ~ Patriotic stars and rope details makes the perfect simple summer wreath || www.ThePaperyCraftery.com

Once you’ve established your center, pull the strip back to the front.

Overlap the center slightly and pull strip back through the comb to the right of the first step, but one tooth down.

Apply a small dot of glue at the bottom to keep these first few layers in place.

Pull the strip to the front again, but leaning to the left this time.

Loop it to the back but make sure you loop at the same level that you did on the right side.

The most important thing to pay attention to is that the loops are overlapping at more or less the same spot at the base everytime you pull your strip back to the front.


Red, White & Blue Quilling Comb Star Wreath ~ Patriotic stars and rope details makes the perfect simple summer wreath || www.ThePaperyCraftery.com

Continue in this way, looping front to back and right and left of the center until your segment is the size you need.

I found that 4 steps on both sides, plus the center line was the perfect size to allow the segments of my star to meet when it was time to put them together.

TIP: You shouldn’t need to add glue very often. I think I only added 2 the whole process. If you weave your star tightly enough, it should stay together pretty well.

Red, White & Blue Quilling Comb Star Wreath ~ Patriotic stars and rope details makes the perfect simple summer wreath || www.ThePaperyCraftery.com

When you’re happy with your star, tear off any excess paper at back and add a tiny dot of glue to secure.

Red, White & Blue Quilling Comb Star Wreath ~ Patriotic stars and rope details makes the perfect simple summer wreath || www.ThePaperyCraftery.com

Your segment should have a woven look!

You can pull it right off your comb and it should keep its shape.


Red, White & Blue Quilling Comb Star Wreath ~ Patriotic stars and rope details makes the perfect simple summer wreath || www.ThePaperyCraftery.com


Red, White & Blue Quilling Comb Star Wreath ~ Patriotic stars and rope details makes the perfect simple summer wreath || www.ThePaperyCraftery.com


To complete the star, make 4 more segments and apply a small amount of Tacky Glue at the base of each to keep them together.

Red, White & Blue Quilling Comb Star Wreath ~ Patriotic stars and rope details makes the perfect simple summer wreath || www.ThePaperyCraftery.com

I also made a tight coil to cover the middle of the stars.

To make this, start with rolling about 22″ of quilling paper that is the color of your star.

Then, wrap it with 8″ of white.

And another 7″ of the main color.

This will give a nice stripe of white that will tie the stars together with the rope color.

Red, White & Blue Quilling Comb Star Wreath ~ Patriotic stars and rope details makes the perfect simple summer wreath || www.ThePaperyCraftery.com


Red, White & Blue Quilling Comb Star Wreath ~ Patriotic stars and rope details makes the perfect simple summer wreath || www.ThePaperyCraftery.com

I made a few couple large navy stars and some smaller ones, too.

The smaller stars were woven in the same way, but the center loop started a little way down my quilling comb and only needed to have 3 loops on the sides instead of 4.

Again, it may all depend on the size of your comb.

Red, White & Blue Quilling Comb Star Wreath ~ Patriotic stars and rope details makes the perfect simple summer wreath || www.ThePaperyCraftery.com


Red, White & Blue Quilling Comb Star Wreath ~ Patriotic stars and rope details makes the perfect simple summer wreath || www.ThePaperyCraftery.com

I tried to plan out where I wanted to place my stars before I began to glue.


Red, White & Blue Quilling Comb Star Wreath ~ Patriotic stars and rope details makes the perfect simple summer wreath || www.ThePaperyCraftery.com

Once I was happy with the placement, I used some hot glue to keep everything together.

Tacky glue will work here, as well.

Red, White & Blue Quilling Comb Star Wreath ~ Patriotic stars and rope details makes the perfect simple summer wreath || www.ThePaperyCraftery.com

To complete the look, I added a simple loop of a red and white striped ribbon.

I couldn’t find the exact brand that I used to share in this post, but here is a similar striped ribbon.

Feel free to add more flair with a larger bow if you like!

Red, White & Blue Quilling Comb Star Wreath ~ Patriotic stars and rope details makes the perfect simple summer wreath || www.ThePaperyCraftery.com


Red, White & Blue Quilling Comb Star Wreath ~ Patriotic stars and rope details makes the perfect simple summer wreath || www.ThePaperyCraftery.com

This red, white, and blue quilling comb star wreath came into creation just in time.

The patriotic wreath I had made last summer didn’t survive the winter because we packed it up poorly and I really needed a new door hanger for the season.

Red, White & Blue Quilling Comb Star Wreath ~ Patriotic stars and rope details makes the perfect simple summer wreath || www.ThePaperyCraftery.com

I hope you’ll give this weaving technique a try even if you’re not making this entire wreath.

I’ve seen this same process used to make angel wings or fish.

Be creative and see what you can come up with, too!

And please let me know your thoughts in the comments below!


Print this post

Share this:

  • Click to share on Facebook (Opens in new window)
  • Click to share on Twitter (Opens in new window)
  • Click to share on Pinterest (Opens in new window)
  • Click to email a link to a friend (Opens in new window)
  • Click to print (Opens in new window)

in Quilling, Tutorials # patriotic quilling, quilling paper star, quilling paper wreath

Reader Interactions

you may also like
How to Make Quilling Paper Bluebells
How to Make 3 Quilling Paper Flower Buds
4 Fast Fall Quilling Paper Flowers
Autumn Wreath with Quilling Paper Leaves

Comments

  1. Deb Booth says

    June 20, 2018 at 11:18 am

    So cute, Meredith! What a great idea. I’ve played with this technique making angels, but the star idea would make great Christmas ornaments too! Thanks for sharing your talents, kind soul 🙂

    Reply
    • Meredith says

      June 20, 2018 at 1:15 pm

      Thank you, Deb. I bet they would look really pretty with metallic paper or even using more than one color to add stripes to the sections as you weave.

      Reply

Trackbacks

  1. Make Quilling Comb Star Ornaments - imitation paper news says:
    March 21, 2022 at 3:31 am

    […] wheel by including written directions to this put up as a result of she has already achieved that on her weblog. And right here is her […]

    Reply

Share your thoughts and leave a comment below!Cancel reply

Primary Sidebar

About Me

Hi there, Paper People! I'm so glad you've stumbled across my corner of the internet. I'll be sharing my favorite quilling tips and tutorials, plus some creative micro-biz pointers, and lots of paper crafting news! Thanks for stopping by!

Looking for a project, technique or tool? Search here!

There’s more on YouTube!

https://youtu.be/kndglSrYWKg

Top Posts & Pages

  • Quilling Paper Sunflowers
    Quilling Paper Sunflowers
  • How to Store Quilling Paper
    How to Store Quilling Paper
  • The 4 Types of Glue Every Quilling Artist Needs
    The 4 Types of Glue Every Quilling Artist Needs
  • Quilling Paper Rainbow Umbrella
    Quilling Paper Rainbow Umbrella
  • How to Make Quilling Paper Swirls
    How to Make Quilling Paper Swirls
  • How To Make Simple Quilling Paper Flowers: Lily of the Valley
    How To Make Simple Quilling Paper Flowers: Lily of the Valley

Thank you so much for stopping by my site. If you care to throw more support my way so I can continue to make new tutorials, you can do so by buying me a virtual cup of coffee!

Affiliate Policy

Some posts on this blog contain affiliate links.

If you click on the links and make a purchase, I would receive a small compensation to help me finance this site and keep coming up with awesome tutorials and tips! There’s no cost to you and I only ever include links to companies and products that I trust and work with on a regular basis.

All posts with affiliate links are clearly marked.

The Papery Craftery (ThePaperyCraftery.com) blog is a participant in the Amazon Services LLC Associates Program, an affiliate advertising program designed to provide a means for us to earn fees by linking to Amazon.com and affiliated sites.

Manage Cookie Preferences

Cookie Settings
Privacy Policy

I hope you’re inspired by my quilling!

Feel free to use my designs as gifts or for your own personal use. And I’d love any sharing of my photos and projects! All I ask is that all photos remain unaltered and link back to the original post, and please do not attempt to sell any quilling created from my designs as your own work. Happy Crafting!

thepaperycraftery

Quilling paper aster flowers The full video with Quilling paper aster flowers  The full video with all the steps is up on my YouTube now 👆follow the link above ⭐️
A quick before and after of the flower project I s A quick before and after of the flower project I shared this week - simple flowers with black stripes!  The full video with all the steps is up on my YouTube now 👆follow the link above 🩷
Queen Anne’s lace flowers with quilling paper | Queen Anne’s lace flowers with quilling paper | Full video is up now with all the details so you can make your own
So tiny and spiky. So tiny and spiky.
Super simple quilling paper seashells | Full video Super simple quilling paper seashells | Full video with all the steps is up now!
Throwback to a project from a couple years back - Throwback to a project from a couple years back - quilling paper dandelions! 
Watch the full video on YT to learn how to make your own 👆  #quilling #paperflowers #crafts
Teeny paper starfish are a great way to practice m Teeny paper starfish are a great way to practice making quilling triangles - 
Watch the full video on YT to learn how to make your own 👆  #quilling #papercrafts #ocean #crafts
Playing with wider paper strips this week to make Playing with wider paper strips this week to make quilled chamomile flowers 
Watch the full video on YT to learn how to make your own 👆  #quilling #paperflowers
This week we’re practicing making cones for thes This week we’re practicing making cones for these sweet little bluebells! 
Watch the full video on YT to learn how to make your own 👆  #quilling #paperflowers #crafts
Mix it up with a little mixed-media quilling! W Mix it up with a little mixed-media quilling! 
Watch the full video to learn all the steps to make your own folk art flowers👆  #quilling #paperflowers
Gift tag idea 💡 make your own quilling paper Ch Gift tag idea 💡 make your own quilling paper Christmas lights! 
Watch the full video to learn all the steps to make your own! 👆  #quilling #papercraft #christmascrafts #cardmaking
This week I’m sharing snow topped evergreen tree This week I’m sharing snow topped evergreen trees made from quilling paper 🎄 
Watch the full video to learn how to make your own with just a few steps! 👆  #quilling #papercrafts #christmascrafts
Mini quilling paper ornaments are up on the YT cha Mini quilling paper ornaments are up on the YT channel now! 
See the full video for all the steps and how-to’s 👆  #quilling #papercrafts #christmascrafts
Tiny quilling snowmen ready to hand over the perfe Tiny quilling snowmen ready to hand over the perfect gift! 
See the full video for all the info and how-to’s 👆  #quilling #papercrafts #christmascrafts
Simple quilling paper pansy flowers! See the fu Simple quilling paper pansy flowers! 
See the full video for all the steps and details on the supplies! Click the link in my bio👆  #quilling #paperflowers #crafting
Have you ever added paint to your quilling? It can Have you ever added paint to your quilling? It can add a bit of depth and detail to your paper flowers! 
See the full video for all the info and how-to’s 👆  #quilling #papercrafts #paperflowers #watercolor
Super quick quilling paper Black Eyed Susans- a co Super quick quilling paper Black Eyed Susans- a couple simple shapes and they come together in no time! 
The full video is up now 👆  #quilling #papercrafts #paperflowers
Big, bright tropical flowers made with a paper cri Big, bright tropical flowers made with a paper crimper and a quilling comb 
The full video is up now 👆  #quilling #papercrafts #paperflowers
How to make quilling paper ice cream cones 🍦 How to make quilling paper ice cream cones 🍦 
The full video is up now 👆  #quilling #papercrafts #crafting
So simple! Learn to make bunches of sweet quilling So simple! Learn to make bunches of sweet quilling paper lilac flowers and leaves ~ 
The full video is up now 👆  #quilling #paperflowers #papercrafts
Load More Follow on Instagram
2021 © Meredith Amand Designs
made by soulmuse