• Skip to main content
  • Skip to primary sidebar

The Papery Craftery

Quilling and Other Fun Paper Things

  • Quilling Basics
  • Quilling
    • Tutorials
    • Free Quilling Templates
    • Quilling Tools and Supplies
    • Papercraft and Quilling Videos
  • The Crafty Life
    • Crafting Printables
    • Paper Crafting News
    • Other Fun Things
  • Shop My Favorite Supplies
  • About and Disclosures
  • Contact

Mini Quilling Paper Evergreen Trees

November 28, 2018

A few weeks ago, I wrote a tutorial for quilling paper pine needles.

I had been curious about how to make them for a while and I was pretty pleased with the outcome!

And guessing by how many crafters have visited that post since, it seems that many others have been wondering too.

This week, I’m sharing another easy way to make fir trees, but on a much smaller scale.

I present to you mini quilling paper evergreen trees!

This post contains affiliate links. If you click on the links below and make a purchase I may receive a small compensation to help me finance this site and keep coming up with awesome tutorials and tips! There’s no cost to you and I only ever include links to companies and products that I trust and work with on a regular basis. 


Mini Quilling Paper Evergreen Trees - The perfect addition to any quilled Christmas crafts! || www.ThePaperyCraftery.com

Mini Quilling Paper Evergreen Trees - The perfect addition to any quilled Christmas crafts! || www.ThePaperyCraftery.com

You won’t need much for these trees.

Just some green paper for your needles, brown for the branches and some white glue.

A wax paper covered work board would be helpful later on, too.

Start by making some branches.

Layer two strips of brown together with glue and press the entire length together firmly so there are no air bubbles between them.

The size of your strips doesn’t matter much at this point because you’ll be tearing them into bits later on.

I chose Quilled Creations’ Light Brown because it contrasted nicely with my needles.

As your branches dry, layer green strips (I’m using my favorite green – Lake City Crafts’ Leaf Green) in the same way and dry.

Keep in mind the reason for all this layering is so your trees are nice and strong.

If you’re using very thick paper or cardstock, you might not need to make stronger strips by layering.

Mini Quilling Paper Evergreen Trees - The perfect addition to any quilled Christmas crafts! || www.ThePaperyCraftery.com

Once your paper is dry, you’re ready to start molding your evergreen needles!

You could use all the pins just like the larger needles, but when working in this size, the needles just get in the way.

Now we’re just using our fingers!

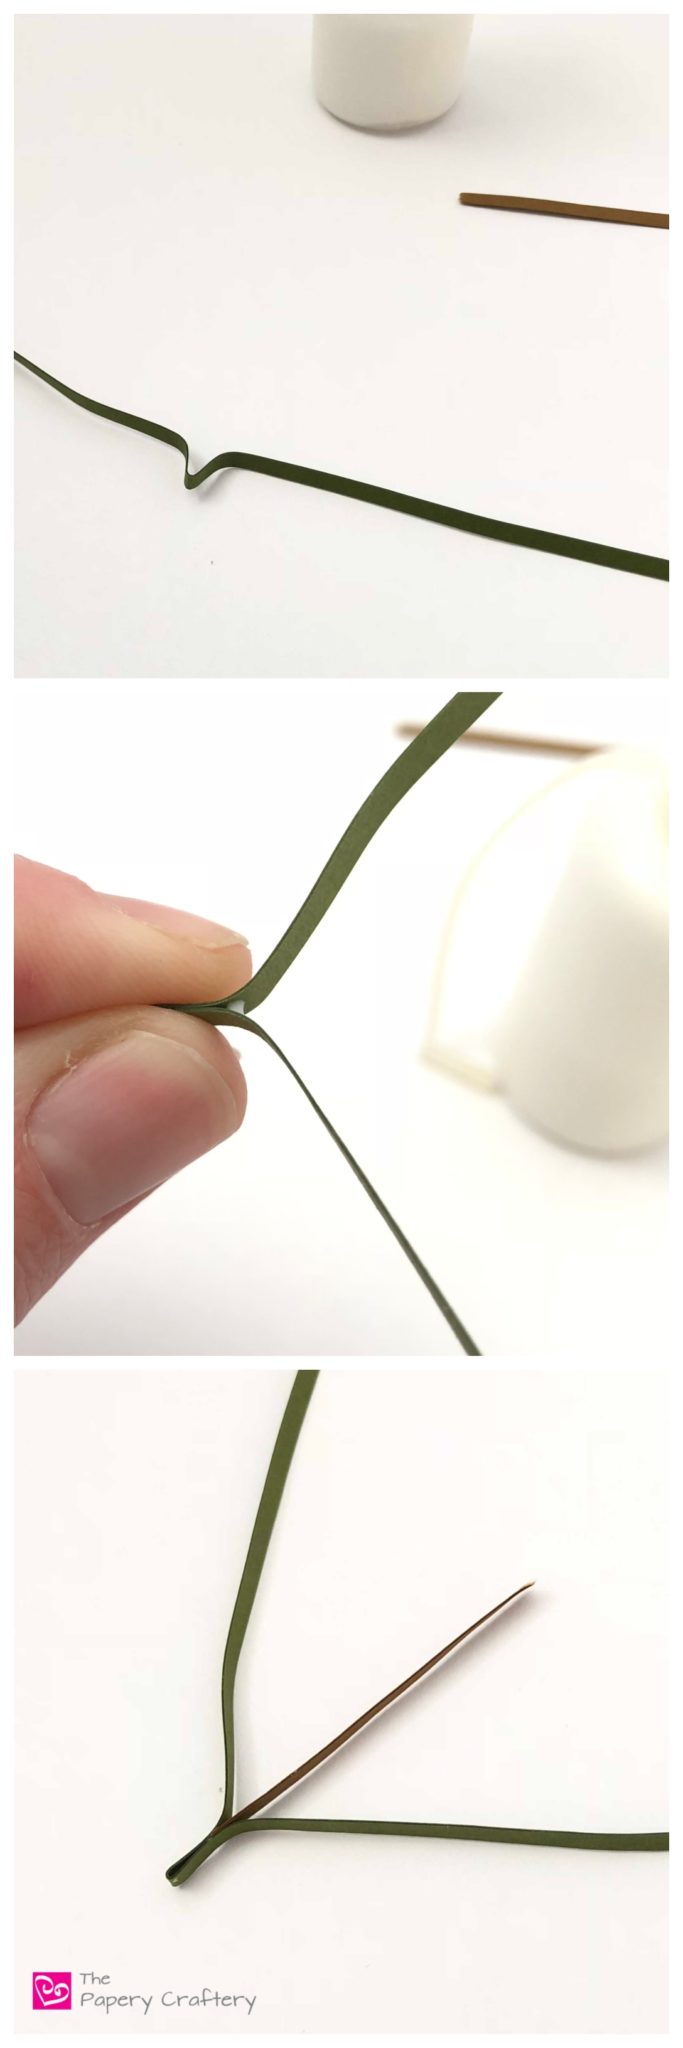
First, grab one of your green strips and bend in half without creasing to create a small loop.

Mini Quilling Paper Evergreen Trees - The perfect addition to any quilled Christmas crafts! || www.ThePaperyCraftery.com

This bend is going to be the first needle on your branch.

It’s also where you’re going to attach a stem.

Apply a dot of glue to the bottom of the loop. I found it helpful to bend the rest of the paper strip out a bit first.

Add a small piece of the brown quilling strip to the glue and let dry. 
Mini Quilling Paper Evergreen Trees - The perfect addition to any quilled Christmas crafts! || www.ThePaperyCraftery.com

Once the glue has set, it’s time to start making the rest of the needles.

Like I mentioned earlier in the post, we’re just using fingers for this, and we’re just making loops.

First, make a loop up…

Mini Quilling Paper Evergreen Trees - The perfect addition to any quilled Christmas crafts! || www.ThePaperyCraftery.com

… then holding that curve with one hand, let the strip loop again at the base near the stem.

Keep making loops until you run out of paper.

Because you’re using a thicker strip, it won’t crease or fold too much.

Mini Quilling Paper Evergreen Trees - The perfect addition to any quilled Christmas crafts! || www.ThePaperyCraftery.com

When you’re done, the needles will look a bit like a piece of ribbon candy.

Mini Quilling Paper Evergreen Trees - The perfect addition to any quilled Christmas crafts! || www.ThePaperyCraftery.com

Release your needles and add some glue wherever the green paper meets the stem.

Mini Quilling Paper Evergreen Trees - The perfect addition to any quilled Christmas crafts! || www.ThePaperyCraftery.com

Reshape along the stem and let the glue dry.

Mini Quilling Paper Evergreen Trees - The perfect addition to any quilled Christmas crafts! || www.ThePaperyCraftery.com

It might not look like much now, but just wait!

Mini Quilling Paper Evergreen Trees - The perfect addition to any quilled Christmas crafts! || www.ThePaperyCraftery.com

Flip your branch over and loop the evergreen needles on the other side in the same way.

Mini Quilling Paper Evergreen Trees - The perfect addition to any quilled Christmas crafts! || www.ThePaperyCraftery.com

It’s really starting to look like a branch!

Mini Quilling Paper Evergreen Trees - The perfect addition to any quilled Christmas crafts! || www.ThePaperyCraftery.com

To finish, give your branch a good squeeze to flatten out the needles and give them a little point.

Mini Quilling Paper Evergreen Trees - The perfect addition to any quilled Christmas crafts! || www.ThePaperyCraftery.com Mini Quilling Paper Evergreen Trees - The perfect addition to any quilled Christmas crafts! || www.ThePaperyCraftery.com

You may want some of your branches to have a slight bend too. Mini Quilling Paper Evergreen Trees - The perfect addition to any quilled Christmas crafts! || www.ThePaperyCraftery.com


These mini evergreen branches would be perfect tucked into a winter flower scene.

But if you’re looking to make an entire tree, I would make a quick triangle sketch about the size that you’d like your finished project to be.

Slip this under a piece of wax paper on your work board to use as a guide.

Lay out your completed branches filling in your triangle and using a dot of glue wherever your branches meet.

Keep in mind, you will be building up your tree in layers, so you don’t have to completely fill every open space right away.

Mini Quilling Paper Evergreen Trees - The perfect addition to any quilled Christmas crafts! || www.ThePaperyCraftery.com

Keep layering your evergreen branches to fill in your tree.

Note: after I took the photos above I realized that I would be able to see the brown of the stems in the branches on the outside of my tree. To fix this, I added another green paper strip to make more needles on those stems.

Mini Quilling Paper Evergreen Trees - The perfect addition to any quilled Christmas crafts! || www.ThePaperyCraftery.com Mini Quilling Paper Evergreen Trees - The perfect addition to any quilled Christmas crafts! || www.ThePaperyCraftery.com

Three layers seem to be just right.

You can see from this angle how I staggered the heights of the layers away from the top.

This will aid in the 3D effect and leave space at the top for your tree topper.

Mini Quilling Paper Evergreen Trees - The perfect addition to any quilled Christmas crafts! || www.ThePaperyCraftery.com

It’s time to start trimming your mini quilling paper evergreen tree!

Try adding some tiny white sparkles.

Mini Quilling Paper Evergreen Trees - The perfect addition to any quilled Christmas crafts! || www.ThePaperyCraftery.com

Or use thin 1/16″ width paper for a bow topper and some garland made with a paper crimper.

Mini Quilling Paper Evergreen Trees - The perfect addition to any quilled Christmas crafts! || www.ThePaperyCraftery.com

I also went a little more traditional with a classic quilled angel and some golden ball ornaments!

Mini Quilling Paper Evergreen Trees - The perfect addition to any quilled Christmas crafts! || www.ThePaperyCraftery.com Mini Quilling Paper Evergreen Trees - The perfect addition to any quilled Christmas crafts! || www.ThePaperyCraftery.com

It may seem like a lot of effort, but once your fingers figure out the steps these mini quilling paper evergreen trees will come together quickly.

It will take a minute or two to create each branch.

And I used less than 15 for each tree.

You’ll be decorating your tiny trees in no time!

I think it would sweet to recreate your family tree as a gift!

How would you decorate your quilled tree?

Leave a comment below!


Print this post

Share this:

  • Click to share on Facebook (Opens in new window)
  • Click to share on Twitter (Opens in new window)
  • Click to share on Pinterest (Opens in new window)
  • Click to email a link to a friend (Opens in new window)
  • Click to print (Opens in new window)

in Quilling, Tutorials # paper evergreen trees, quilling ornaments, Quilling paper christmas crafts, quilling paper christmas trees

Reader Interactions

you may also like
How to Make 3 Quilling Paper Flower Buds
4 Fast Fall Quilling Paper Flowers
Autumn Wreath with Quilling Paper Leaves
Quilling Paper Seahorse

Comments

  1. Barbara says

    November 28, 2018 at 12:44 pm

    Really cute trees. Loved the angel. I would use rhinestones, all one color, so the stones do not overtake the cute tree.

    Reply
    • Meredith says

      November 28, 2018 at 3:36 pm

      Great idea! I love a little sparkle!

      Reply
  2. rubyjune27 says

    November 28, 2018 at 5:11 pm

    Love these. As always, thank you very much for sharing. (Have just finished making poinsettias following previous post of yours). My decorations will probably be OTT, like my real tree will be😊

    Reply
    • Meredith says

      November 28, 2018 at 9:05 pm

      I love it, Rudy June! I’m so glad you’re finding my posts useful.

      Reply
  3. Holly says

    November 29, 2018 at 12:50 am

    Love these. You are sooo talented. I am going to give these a try. Thanks for your tutorial.

    Reply
    • Meredith says

      November 29, 2018 at 1:35 pm

      Thanks so much! Let me know how they turn out!

      Reply
  4. Anarieta says

    December 7, 2018 at 3:41 am

    Thanks for sharing gift,WOW! I like it,beautiful.

    Reply
    • Meredith says

      December 7, 2018 at 3:12 pm

      Thank you, Anarieta!

      Reply
  5. Janet says

    December 15, 2018 at 9:08 am

    I’m trying this project today. Great tree ornament to top packages.

    Reply
    • Meredith says

      December 15, 2018 at 4:51 pm

      They sure would be! Enjoy and let me know how they turned out!

      Reply
  6. Pat says

    December 17, 2018 at 4:05 pm

    Thank you so much. I’ve been looking everywhere for a tutorial and this is perfect! Thank you again.

    Reply
    • Meredith says

      December 17, 2018 at 6:04 pm

      You’re so welcome, Pat! Enjoy!

      Reply

Share your thoughts and leave a comment below!Cancel reply

Primary Sidebar

About Me

Hi there, Paper People! I'm so glad you've stumbled across my corner of the internet. I'll be sharing my favorite quilling tips and tutorials, plus some creative micro-biz pointers, and lots of paper crafting news! Thanks for stopping by!

Looking for a project, technique or tool? Search here!

There’s more on YouTube!

https://youtu.be/kndglSrYWKg

Top Posts & Pages

  • How to Make Quilling Paper Snowflakes
    How to Make Quilling Paper Snowflakes
  • Eleven Ways to Decorate With Paper Snowflakes All Winter Long
    Eleven Ways to Decorate With Paper Snowflakes All Winter Long
  • The 4 Types of Glue Every Quilling Artist Needs
    The 4 Types of Glue Every Quilling Artist Needs
  • How to Turn Your Quilling Crafts into Ornaments
    How to Turn Your Quilling Crafts into Ornaments
  • How to Use a Curling Coach for Quilling
    How to Use a Curling Coach for Quilling
  • How to Store Quilling Paper
    How to Store Quilling Paper

Thank you so much for stopping by my site. If you care to throw more support my way so I can continue to make new tutorials, you can do so by buying me a virtual cup of coffee!

Affiliate Policy

Some posts on this blog contain affiliate links.

If you click on the links and make a purchase, I would receive a small compensation to help me finance this site and keep coming up with awesome tutorials and tips! There’s no cost to you and I only ever include links to companies and products that I trust and work with on a regular basis.

All posts with affiliate links are clearly marked.

The Papery Craftery (ThePaperyCraftery.com) blog is a participant in the Amazon Services LLC Associates Program, an affiliate advertising program designed to provide a means for us to earn fees by linking to Amazon.com and affiliated sites.

Cookie Policy
Privacy Policy

I hope you’re inspired by my quilling!

Feel free to use my designs as gifts or for your own personal use. And I’d love any sharing of my photos and projects! All I ask is that all photos remain unaltered and link back to the original post, and please do not attempt to sell my any quilling created from my designs as your own work. Happy Crafting!

thepaperycraftery

Gift tag idea 💡 make your own quilling paper Ch Gift tag idea 💡 make your own quilling paper Christmas lights! 
Watch the full video to learn all the steps to make your own! 👆  #quilling #papercraft #christmascrafts #cardmaking
This week I’m sharing snow topped evergreen tree This week I’m sharing snow topped evergreen trees made from quilling paper 🎄 
Watch the full video to learn how to make your own with just a few steps! 👆  #quilling #papercrafts #christmascrafts
Mini quilling paper ornaments are up on the YT cha Mini quilling paper ornaments are up on the YT channel now! 
See the full video for all the steps and how-to’s 👆  #quilling #papercrafts #christmascrafts
Tiny quilling snowmen ready to hand over the perfe Tiny quilling snowmen ready to hand over the perfect gift! 
See the full video for all the info and how-to’s 👆  #quilling #papercrafts #christmascrafts
Simple quilling paper pansy flowers! See the fu Simple quilling paper pansy flowers! 
See the full video for all the steps and details on the supplies! Click the link in my bio👆  #quilling #paperflowers #crafting
Have you ever added paint to your quilling? It can Have you ever added paint to your quilling? It can add a bit of depth and detail to your paper flowers! 
See the full video for all the info and how-to’s 👆  #quilling #papercrafts #paperflowers #watercolor
Super quick quilling paper Black Eyed Susans- a co Super quick quilling paper Black Eyed Susans- a couple simple shapes and they come together in no time! 
The full video is up now 👆  #quilling #papercrafts #paperflowers
Big, bright tropical flowers made with a paper cri Big, bright tropical flowers made with a paper crimper and a quilling comb 
The full video is up now 👆  #quilling #papercrafts #paperflowers
How to make quilling paper ice cream cones 🍦 How to make quilling paper ice cream cones 🍦 
The full video is up now 👆  #quilling #papercrafts #crafting
So simple! Learn to make bunches of sweet quilling So simple! Learn to make bunches of sweet quilling paper lilac flowers and leaves ~ 
The full video is up now 👆  #quilling #paperflowers #papercrafts
Making quilling paper lily of the valley flowers a Making quilling paper lily of the valley flowers and leaves couldn’t be easier! 
Full video is up now 👆  #quilling #papercrafts #paperflowers #flowers
How to make big, bright, beautiful quilling paper How to make big, bright, beautiful quilling paper gerbera daisies! 
Full video is up now 👆  #quilling #papercrafts #paperflowers #crafts #craftideas
It’s time for spring crafting! This week I’m It’s time for spring crafting!  This week I’m sharing 3 ways to make tiny quilling paper flower buds. Perfect to round out your next floral quilling project.  Full video is up now 👆
#quilling #paperflowers #papercrafts #flowers
Quilling paper shamrocks! One of my oldest and v Quilling paper shamrocks!  One of my oldest and very first designs 😍 full how-to’s are up now!  #quilling #papercrafts #paper #stpatricksday
Most of my FAQ’s are about making quilling paper Most of my FAQ’s are about making quilling paper letters - the first of 2 videos with all the tips is up now!  🎥 link in bio 
#quilling #quillingcrafts #paper #monograms #paperletters
Any day I get to pull out my favorite quilling com Any day I get to pull out my favorite quilling comb is a good day  Quilling a paper spider mums full video with all the steps is up on YouTube  🎥 link in bio 
#quilling #quillingcrafts #paper #papercrafts #paperflowers
I know 3D quilling isn’t everyone’s jam, but I I know 3D quilling isn’t everyone’s jam, but I love the magic in creating something realistic out of simple strips of paper 😍  Full video with all the steps is up on YouTube  🎥 link in bio 
#quilling #quillingcrafts #papercraft #blueberries #handmade
Rainy East Coast days call for teeny mushrooms F Rainy East Coast days call for teeny mushrooms  Full video with all the steps is up on YouTube  🎥 link in bio 
#quilling #quillingcrafts #papercrafts #paperart #autumnvibes #handmade
DIY sweet paper cherries 🍒 The full video wit DIY sweet paper cherries 🍒  The full video with all the steps is up on YouTube now  🎥 link in bio 
#quilling #quillingcrafts #papercraft #handmade
The how-to’s on these sweet cherries and blueber The how-to’s on these sweet cherries and blueberries won’t be up on YouTube until Sunday but they’re too cute not to share early 🤩  🎥 link in bio 
#quilling #quillingcrafts #papercrafts #handmade
Load More Follow on Instagram
2021 © Meredith Amand Designs
made by soulmuse