• Skip to main content
  • Skip to primary sidebar

The Papery Craftery

Quilling and Other Fun Paper Things

  • Quilling Basics
  • Quilling
    • Tutorials
    • Free Quilling Templates
    • Quilling Tools and Supplies
    • Papercraft and Quilling Videos
  • Crafts
    • Quilling and Craft Printables
    • Paper Crafting News
    • Other Fun Things
  • Shop My Favorite Supplies
  • About and Disclosures
  • Contact

Quilling Paper Cherries

June 6, 2017

Quilling Paper Cherries ~ Simple but realistic summer quilling craft. Make one or a bunch! || www.thepaperycraftery.com

It should be no surprise to those who’ve followed my quilling tutorials for a while that I love figuring how to make realistic quilled paper fruit and veggies.

In a recent post, I even suggested using produce as inspiration when you’re feeling creatively stuck, because this is a trick I use all the time.

So I couldn’t resist making a tutorial for one of my family’s favorite fruit.

Get ready for some simple quilling paper cherries!

This post contains affiliate links. If you click on the links below and make a purchase, I may receive a small compensation to help me finance this site and keep coming up with awesome tutorials and tips! There’s no cost to you and I only ever include links to companies and products that I trust and work with on a regular basis. 


Quilling Paper Cherries ~ Simple but realistic summer quilling craft. Make one or a bunch! || www.thepaperycraftery.com

Quilling Paper Cherries ~ Simple but realistic summer quilling craft. Make one or a bunch! || www.thepaperycraftery.com

Quilling paper cherries are an ideal beginner craft for new quillers, especially those who are looking to try out some easy 3D quilling.

Just a few supplies needed:

I choose to use a dark crimson paper for my cherries, and my favorite leaf green for the stems.

Plus, some glue and a needle or slotted tool.

A quilling mold is helpful, but not necessary ~ you can always use your fingers or other rounded object to shape your cherries.

But, I find using a mold makes everything a lot more even, and, I think, it’s actually faster.

Quilling Paper Cherries ~ Simple but realistic summer quilling craft. Make one or a bunch! || www.thepaperycraftery.com

To start, make a tight coil from approximately 48 inches of red quilling paper.

If you need to, glue a few strips together so it’s long enough.

Roll another coil in the same way. Each cherry will use 2.

Quilling Paper Cherries ~ Simple but realistic summer quilling craft. Make one or a bunch! || www.thepaperycraftery.com

Next, mold each coil so it makes a dome shape.

If you’re thinking of getting a quilling mold, this is where it would come in handy.

Quilling Paper Cherries ~ Simple but realistic summer quilling craft. Make one or a bunch! || www.thepaperycraftery.com

Simply place the coil on top of the rounded mold that corresponds to the size of your quilling paper coil.

Gently spread your thumb and finger out from the center until the paper is pushed all around the dome of the mold.

Again, you can use your finger or another rounded object to make your quilling more 3D, but for a few dollars, I think a mold is a great investment.

Mold the second coil in the same way and try to make them as even as possible.

Quilling Paper Cherries ~ Simple but realistic summer quilling craft. Make one or a bunch! || www.thepaperycraftery.com

Add some glue to the inside of your rounded coils so you don’t lose their shape.

I like to do this with a needle-nosed bottle and a small brush.

Quilling Paper Cherries ~ Simple but realistic summer quilling craft. Make one or a bunch! || www.thepaperycraftery.com

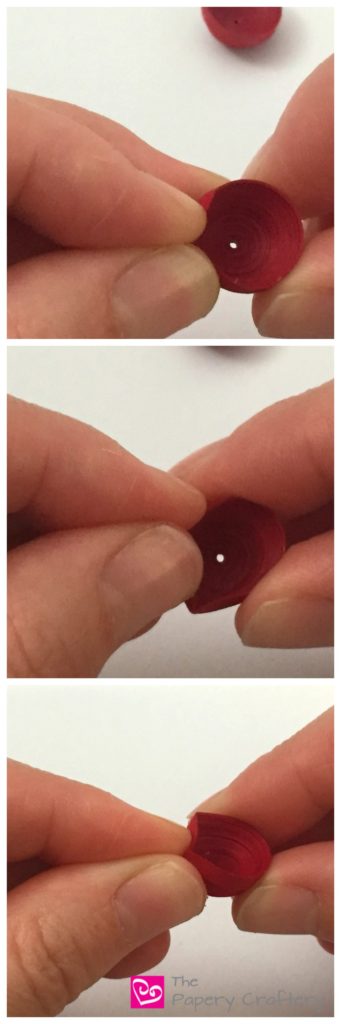
Cherries naturally have a little indent on the top where the stem is connected.

So, of course, our quilling paper cherries will too!

To do this, gently pinch the edge of each dome in two places, about a fingertip apart.

After some trial and error, I found it was easiest to do this before the glue had dried completely.

The end result will be two peaks with a dip in the middle. I kind of think it looks like a cat’s head!

Quilling Paper Cherries ~ Simple but realistic summer quilling craft. Make one or a bunch! || www.thepaperycraftery.com

Paper Crafts Supplies

Run a small line of glue around the edge of one of your pinched domes and place the two halves together.

Make sure the indented parts are lined up together.

If you need to, clean up any extra glue with a small paintbrush.

I also used a small strip of quilling paper to cover up the seam in the center of my cherries, but that’s totally optional.

Quilling Paper Cherries ~ Simple but realistic summer quilling craft. Make one or a bunch! || www.thepaperycraftery.com

Next, the stem!

I wanted my stems to be really sturdy, so I folded an 8 inch strip of leaf green quilling paper in half and glued it together.

Once dry, I folded that in half again and glued it together, leaving a tiny bit at the end unglued.

The result is a 2 inch strip that has a very small bit open at the end. It’s almost like a very long letter “y”.

Quilling Paper Cherries ~ Simple but realistic summer quilling craft. Make one or a bunch! || www.thepaperycraftery.com

Apply a very small amount of glue to the opening of the stem and place it on the dip in the top of the cherry.

I like Tacky Glue for this. It’s a thick glue that helps bits stick right away, And it’s perfect when you’re impatiently holding a stem onto a cherry.

Quilling Paper Cherries ~ Simple but realistic summer quilling craft. Make one or a bunch! || www.thepaperycraftery.com

Wrap a 2 inch strip of the same leaf green paper around the end of the stem to mimic the bump where the stem would meet a branch.

Since cherries can come in a few different shades, I also quilled up some in a true red, and also a deep rose color.

Try wrapping a couple cherries stems together, too!

Quilling Paper Cherries ~ Simple but realistic summer quilling craft. Make one or a bunch! || www.thepaperycraftery.com

I have some big plans for these little guys!

When I have a few more, I’m thinking of making a wreath from my quilling paper cherries.

I’m also loving the idea of a bowl full of cherries on my dining room table for the summer!

I hope you’re inspired to quill a few cherries this summer.

As always, leave me a comment below and tell me what you think of these lovelies!


Print this post

Share this:

  • Click to share on Facebook (Opens in new window)
  • Click to share on Twitter (Opens in new window)
  • Click to share on Pinterest (Opens in new window)
  • Click to email a link to a friend (Opens in new window)
  • Click to print (Opens in new window)

in Quilling, Tutorials # 3D Quilling, Quilling Paper Cherries, quilling paper fruit, Summer Quilling Crafts

Reader Interactions

you may also like
How to Make Quilling Paper Bluebells
How to Make 3 Quilling Paper Flower Buds
4 Fast Fall Quilling Paper Flowers
Autumn Wreath with Quilling Paper Leaves

Comments

  1. Katie says

    June 8, 2017 at 10:18 am

    These look so pretty! What a lovely idea 🙂

    Reply
    • Meredith says

      June 8, 2017 at 3:27 pm

      Thanks so much, Katie!

      Reply
  2. Andrea says

    June 8, 2017 at 9:50 pm

    I love quilling but I still haven’t had the courage to try it on my own. I admire your quilling skills big time!!! This is a great idea and it looks doable for a total quilling dummy like myself! I hope I can find the guts to give it a try, lol!

    Reply
    • Meredith says

      June 9, 2017 at 7:58 am

      Yay, Andrea! I’m glad you enjoyed the cherries! Go ahead and give them a try ~ quilling supplies are super inexpensive so you don’t have much to lose. I know you can make these!

      Reply
  3. Heather says

    June 9, 2017 at 9:24 am

    They are so dainty and pretty!

    Reply
    • Meredith says

      June 9, 2017 at 1:48 pm

      Thanks, Heather! I think so too 😉

      Reply
  4. Emily says

    July 9, 2017 at 11:38 pm

    Hi Meredith. What a fabulous tutorial 🙂 Our readers will love this! Have included it in our Crafty Like Granny weekly Craft roundup. https://craftylikegranny.com/crafting-happiness/ Cheers Emily

    Reply
    • Meredith says

      July 10, 2017 at 7:36 am

      I hope they do, Emily! Thanks so much!

      Reply
  5. Vicki says

    August 25, 2017 at 6:16 am

    I learn something new about quilling all of the time. It’s very relaxing and therapeutic. Then you get to see something pretty that you yourself created. Thank you for sharing your knowledge.

    Reply
    • Meredith says

      August 25, 2017 at 1:04 pm

      Thanks so much for stopping by, Vicki!

      Reply

Trackbacks

  1. Happiness Is A Way of Travel Not A Destination | Crafting Pursuits says:
    July 9, 2017 at 11:29 pm

    […] The Paper Craftery Quilling Paper Cherries […]

    Reply

Share your thoughts and leave a comment below!Cancel reply

Primary Sidebar

About Me

Hi there, Paper People! I'm so glad you've stumbled across my corner of the internet. I'll be sharing my favorite quilling tips and tutorials, plus some creative micro-biz pointers, and lots of paper crafting news! Thanks for stopping by!

Looking for a project, technique or tool? Search here!

There’s more on YouTube!

https://youtu.be/kndglSrYWKg

Top Posts & Pages

  • Quilling Paper Sunflowers
    Quilling Paper Sunflowers
  • How to Store Quilling Paper
    How to Store Quilling Paper
  • The 4 Types of Glue Every Quilling Artist Needs
    The 4 Types of Glue Every Quilling Artist Needs
  • Quilling Paper Rainbow Umbrella
    Quilling Paper Rainbow Umbrella
  • How to Make Quilling Paper Swirls
    How to Make Quilling Paper Swirls
  • How To Make Simple Quilling Paper Flowers: Lily of the Valley
    How To Make Simple Quilling Paper Flowers: Lily of the Valley

Thank you so much for stopping by my site. If you care to throw more support my way so I can continue to make new tutorials, you can do so by buying me a virtual cup of coffee!

Affiliate Policy

Some posts on this blog contain affiliate links.

If you click on the links and make a purchase, I would receive a small compensation to help me finance this site and keep coming up with awesome tutorials and tips! There’s no cost to you and I only ever include links to companies and products that I trust and work with on a regular basis.

All posts with affiliate links are clearly marked.

The Papery Craftery (ThePaperyCraftery.com) blog is a participant in the Amazon Services LLC Associates Program, an affiliate advertising program designed to provide a means for us to earn fees by linking to Amazon.com and affiliated sites.

Manage Cookie Preferences

Cookie Settings
Privacy Policy

I hope you’re inspired by my quilling!

Feel free to use my designs as gifts or for your own personal use. And I’d love any sharing of my photos and projects! All I ask is that all photos remain unaltered and link back to the original post, and please do not attempt to sell any quilling created from my designs as your own work. Happy Crafting!

thepaperycraftery

Quilling paper aster flowers The full video with Quilling paper aster flowers  The full video with all the steps is up on my YouTube now 👆follow the link above ⭐️
A quick before and after of the flower project I s A quick before and after of the flower project I shared this week - simple flowers with black stripes!  The full video with all the steps is up on my YouTube now 👆follow the link above 🩷
Queen Anne’s lace flowers with quilling paper | Queen Anne’s lace flowers with quilling paper | Full video is up now with all the details so you can make your own
So tiny and spiky. So tiny and spiky.
Super simple quilling paper seashells | Full video Super simple quilling paper seashells | Full video with all the steps is up now!
Throwback to a project from a couple years back - Throwback to a project from a couple years back - quilling paper dandelions! 
Watch the full video on YT to learn how to make your own 👆  #quilling #paperflowers #crafts
Teeny paper starfish are a great way to practice m Teeny paper starfish are a great way to practice making quilling triangles - 
Watch the full video on YT to learn how to make your own 👆  #quilling #papercrafts #ocean #crafts
Playing with wider paper strips this week to make Playing with wider paper strips this week to make quilled chamomile flowers 
Watch the full video on YT to learn how to make your own 👆  #quilling #paperflowers
This week we’re practicing making cones for thes This week we’re practicing making cones for these sweet little bluebells! 
Watch the full video on YT to learn how to make your own 👆  #quilling #paperflowers #crafts
Mix it up with a little mixed-media quilling! W Mix it up with a little mixed-media quilling! 
Watch the full video to learn all the steps to make your own folk art flowers👆  #quilling #paperflowers
Gift tag idea 💡 make your own quilling paper Ch Gift tag idea 💡 make your own quilling paper Christmas lights! 
Watch the full video to learn all the steps to make your own! 👆  #quilling #papercraft #christmascrafts #cardmaking
This week I’m sharing snow topped evergreen tree This week I’m sharing snow topped evergreen trees made from quilling paper 🎄 
Watch the full video to learn how to make your own with just a few steps! 👆  #quilling #papercrafts #christmascrafts
Mini quilling paper ornaments are up on the YT cha Mini quilling paper ornaments are up on the YT channel now! 
See the full video for all the steps and how-to’s 👆  #quilling #papercrafts #christmascrafts
Tiny quilling snowmen ready to hand over the perfe Tiny quilling snowmen ready to hand over the perfect gift! 
See the full video for all the info and how-to’s 👆  #quilling #papercrafts #christmascrafts
Simple quilling paper pansy flowers! See the fu Simple quilling paper pansy flowers! 
See the full video for all the steps and details on the supplies! Click the link in my bio👆  #quilling #paperflowers #crafting
Have you ever added paint to your quilling? It can Have you ever added paint to your quilling? It can add a bit of depth and detail to your paper flowers! 
See the full video for all the info and how-to’s 👆  #quilling #papercrafts #paperflowers #watercolor
Super quick quilling paper Black Eyed Susans- a co Super quick quilling paper Black Eyed Susans- a couple simple shapes and they come together in no time! 
The full video is up now 👆  #quilling #papercrafts #paperflowers
Big, bright tropical flowers made with a paper cri Big, bright tropical flowers made with a paper crimper and a quilling comb 
The full video is up now 👆  #quilling #papercrafts #paperflowers
How to make quilling paper ice cream cones 🍦 How to make quilling paper ice cream cones 🍦 
The full video is up now 👆  #quilling #papercrafts #crafting
So simple! Learn to make bunches of sweet quilling So simple! Learn to make bunches of sweet quilling paper lilac flowers and leaves ~ 
The full video is up now 👆  #quilling #paperflowers #papercrafts
Load More Follow on Instagram
2021 © Meredith Amand Designs
made by soulmuse