• Skip to main content
  • Skip to primary sidebar

The Papery Craftery

Quilling and Other Fun Paper Things

  • Quilling Basics
  • Quilling
    • Tutorials
    • Free Quilling Templates
    • Quilling Tools and Supplies
    • Papercraft and Quilling Videos
  • The Crafty Life
    • Crafting Printables
    • Paper Crafting News
    • Other Fun Things
  • Shop My Favorite Supplies
  • About & Disclosures
    • Privacy Policy
    • Cookie Policy
  • Contact

Quilling Paper Coneflowers

October 11, 2018

You never know where you’re going to find inspiration for your quilling.

The idea for this post came from a recent issue of Better Homes & Gardens magazine.

As soon as I saw the bright, open blooms on the cover, I knew I had to figure how to quill them.

So I set to work, and after some time experimenting, I can share them with you today.

This week, I’m making quilling paper coneflowers.

This post contains affiliate links. If you click on the links below and make a purchase I may receive a small compensation to help me finance this site and keep coming up with awesome tutorials and tips! There’s no cost to you and I only ever include links to companies and products that I trust and work with on a regular basis.


Quilling Paper Coneflowers ~ Say goodbye to summer with new quilling techniques for these colorful coneflowers || www.ThePaperyCraftery.com

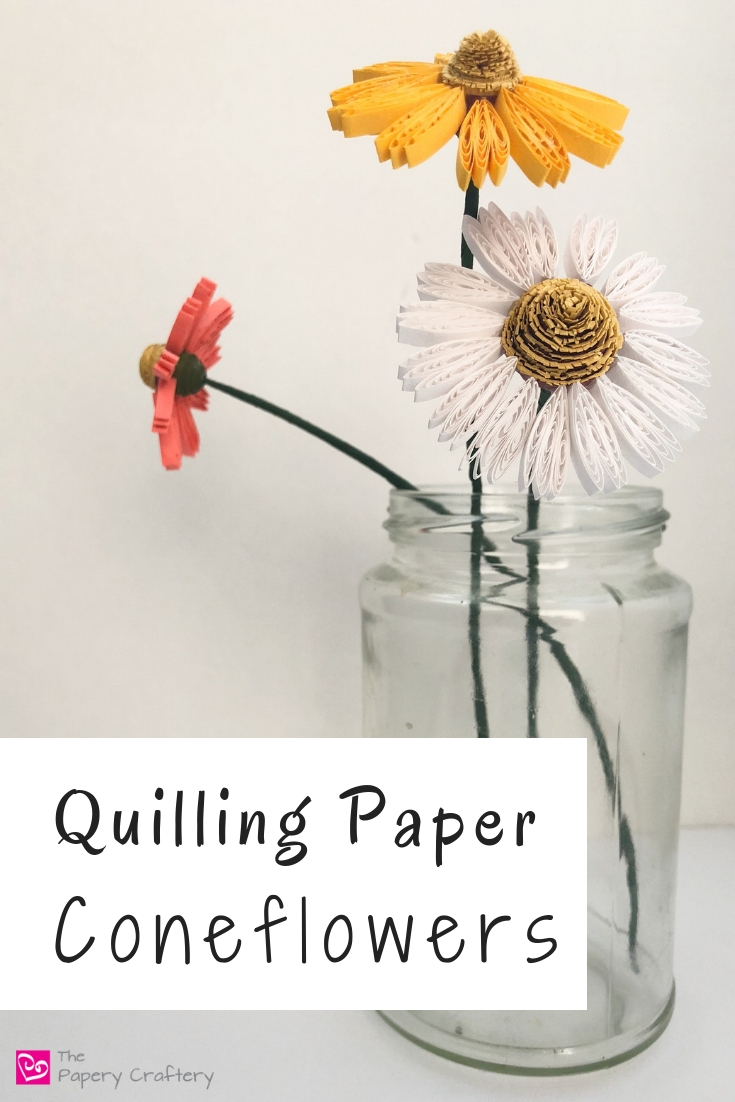
For those of you unfamiliar with coneflowers (as I was before some research), they grow in the eastern and central regions of the U.S. and they’re related to daisies.

They are also known as echinacea, which can have some health benefits.

The name echinacea come from the Greek word for “hedgehog” because of their spiky centers.

And, that’s where we’re going to start with our flowers!

To make the centers, sandwich about 8″ of golden quilling paper between two strips of dark red. But, instead of evenly layering the strips, glue them so there is just a hint of the gold peeking out from the end.

Quilling Paper Coneflowers ~ Say goodbye to summer with new quilling techniques for these colorful coneflowers || www.ThePaperyCraftery.com

Next, use small scissors to snip the gold paper into a fringe.

It’s ok if you cut the red paper a bit, but I would try to avoid that as you can.

Quilling Paper Coneflowers ~ Say goodbye to summer with new quilling techniques for these colorful coneflowers || www.ThePaperyCraftery.com

Using a slotted tool, roll into a tight coil.

Glue the end, and push the middle up into a dome.

Remember to glue the underside of the dome to keep the shape!

Quilling Paper Coneflowers ~ Say goodbye to summer with new quilling techniques for these colorful coneflowers || www.ThePaperyCraftery.com

To get the spiked look, gently separate the golden fringe.

I used my needle tool to pull the fringe away from the dome.

Because the gold strip was layered between 2 strips of the deep red, the spikes will stick out in neat rows, instead of a lumpy mess.

Quilling Paper Coneflowers ~ Say goodbye to summer with new quilling techniques for these colorful coneflowers || www.ThePaperyCraftery.com

Now onto the quilling paper coneflower petals.

First, choose your colors.

Coneflowers can grow in all sorts of bold shades.

When I was making mine, I worked with white, yellow, and a beautiful shade of orangey-pink called Blush from Quilled Creations.

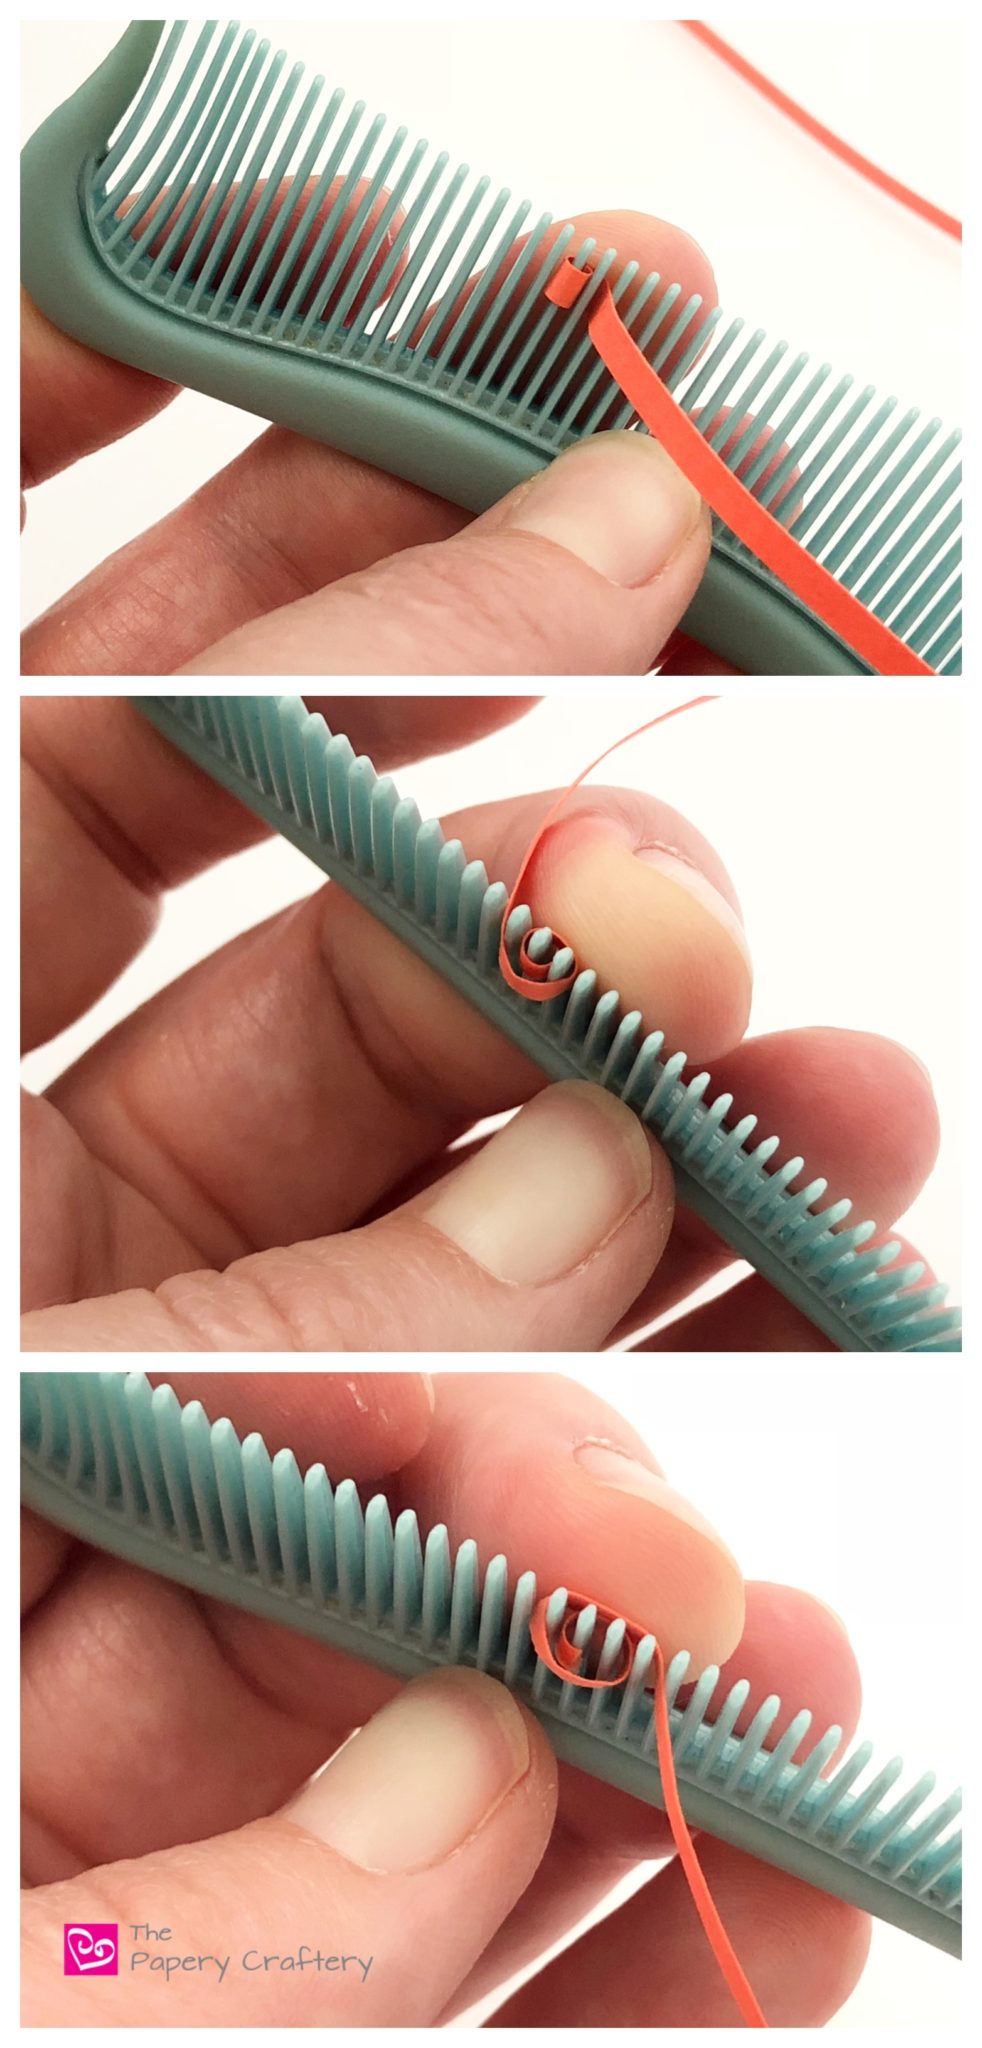
You’ll also need a quilling comb with very small, tight teeth.

I’m using a small hair comb that I’ve had for years.

First, roll the end of your strip slightly on a needle tool, and place that roll over a tooth on the comb.

Quilling Paper Coneflowers ~ Say goodbye to summer with new quilling techniques for these colorful coneflowers || www.ThePaperyCraftery.com

Next, wrap the rest of your strip around your comb, going from the back to the front, adding another tooth on each side as you go.

Quilling Paper Coneflowers ~ Say goodbye to summer with new quilling techniques for these colorful coneflowers || www.ThePaperyCraftery.com

I found that 4 prongs on each side of the center was the perfect size for my petals on this comb.

Everyone’s tools will be a little different, so there may be some trial and error here.

Notice that I lost the center roll at some point.

That’s not really a problem for this project, because the petals will be pinched later on. So, no worries if this happens to you!

Quilling Paper Coneflowers ~ Say goodbye to summer with new quilling techniques for these colorful coneflowers || www.ThePaperyCraftery.com

Once you’ve got the size you need, tear off the extra paper.

Glue the end and carefully remove from the tool.

Quilling Paper Coneflowers ~ Say goodbye to summer with new quilling techniques for these colorful coneflowers || www.ThePaperyCraftery.com


Repeat the same exact steps twice more.

You’ll need 3 for each petal.

Pinch one end of each, then line a little glue down one side, being careful not to apply any glue to the pointed end.

Glue the 3 petal pieces together.

Quilling Paper Coneflowers ~ Say goodbye to summer with new quilling techniques for these colorful coneflowers || www.ThePaperyCraftery.com

Firmly pinch to the end that is glued together.

The result will have one side that comes to a point, but the other end will still be separated.

Each flower will need between 10-12 petals, depending on the size of your spiky center.

Quilling Paper Coneflowers ~ Say goodbye to summer with new quilling techniques for these colorful coneflowers || www.ThePaperyCraftery.com

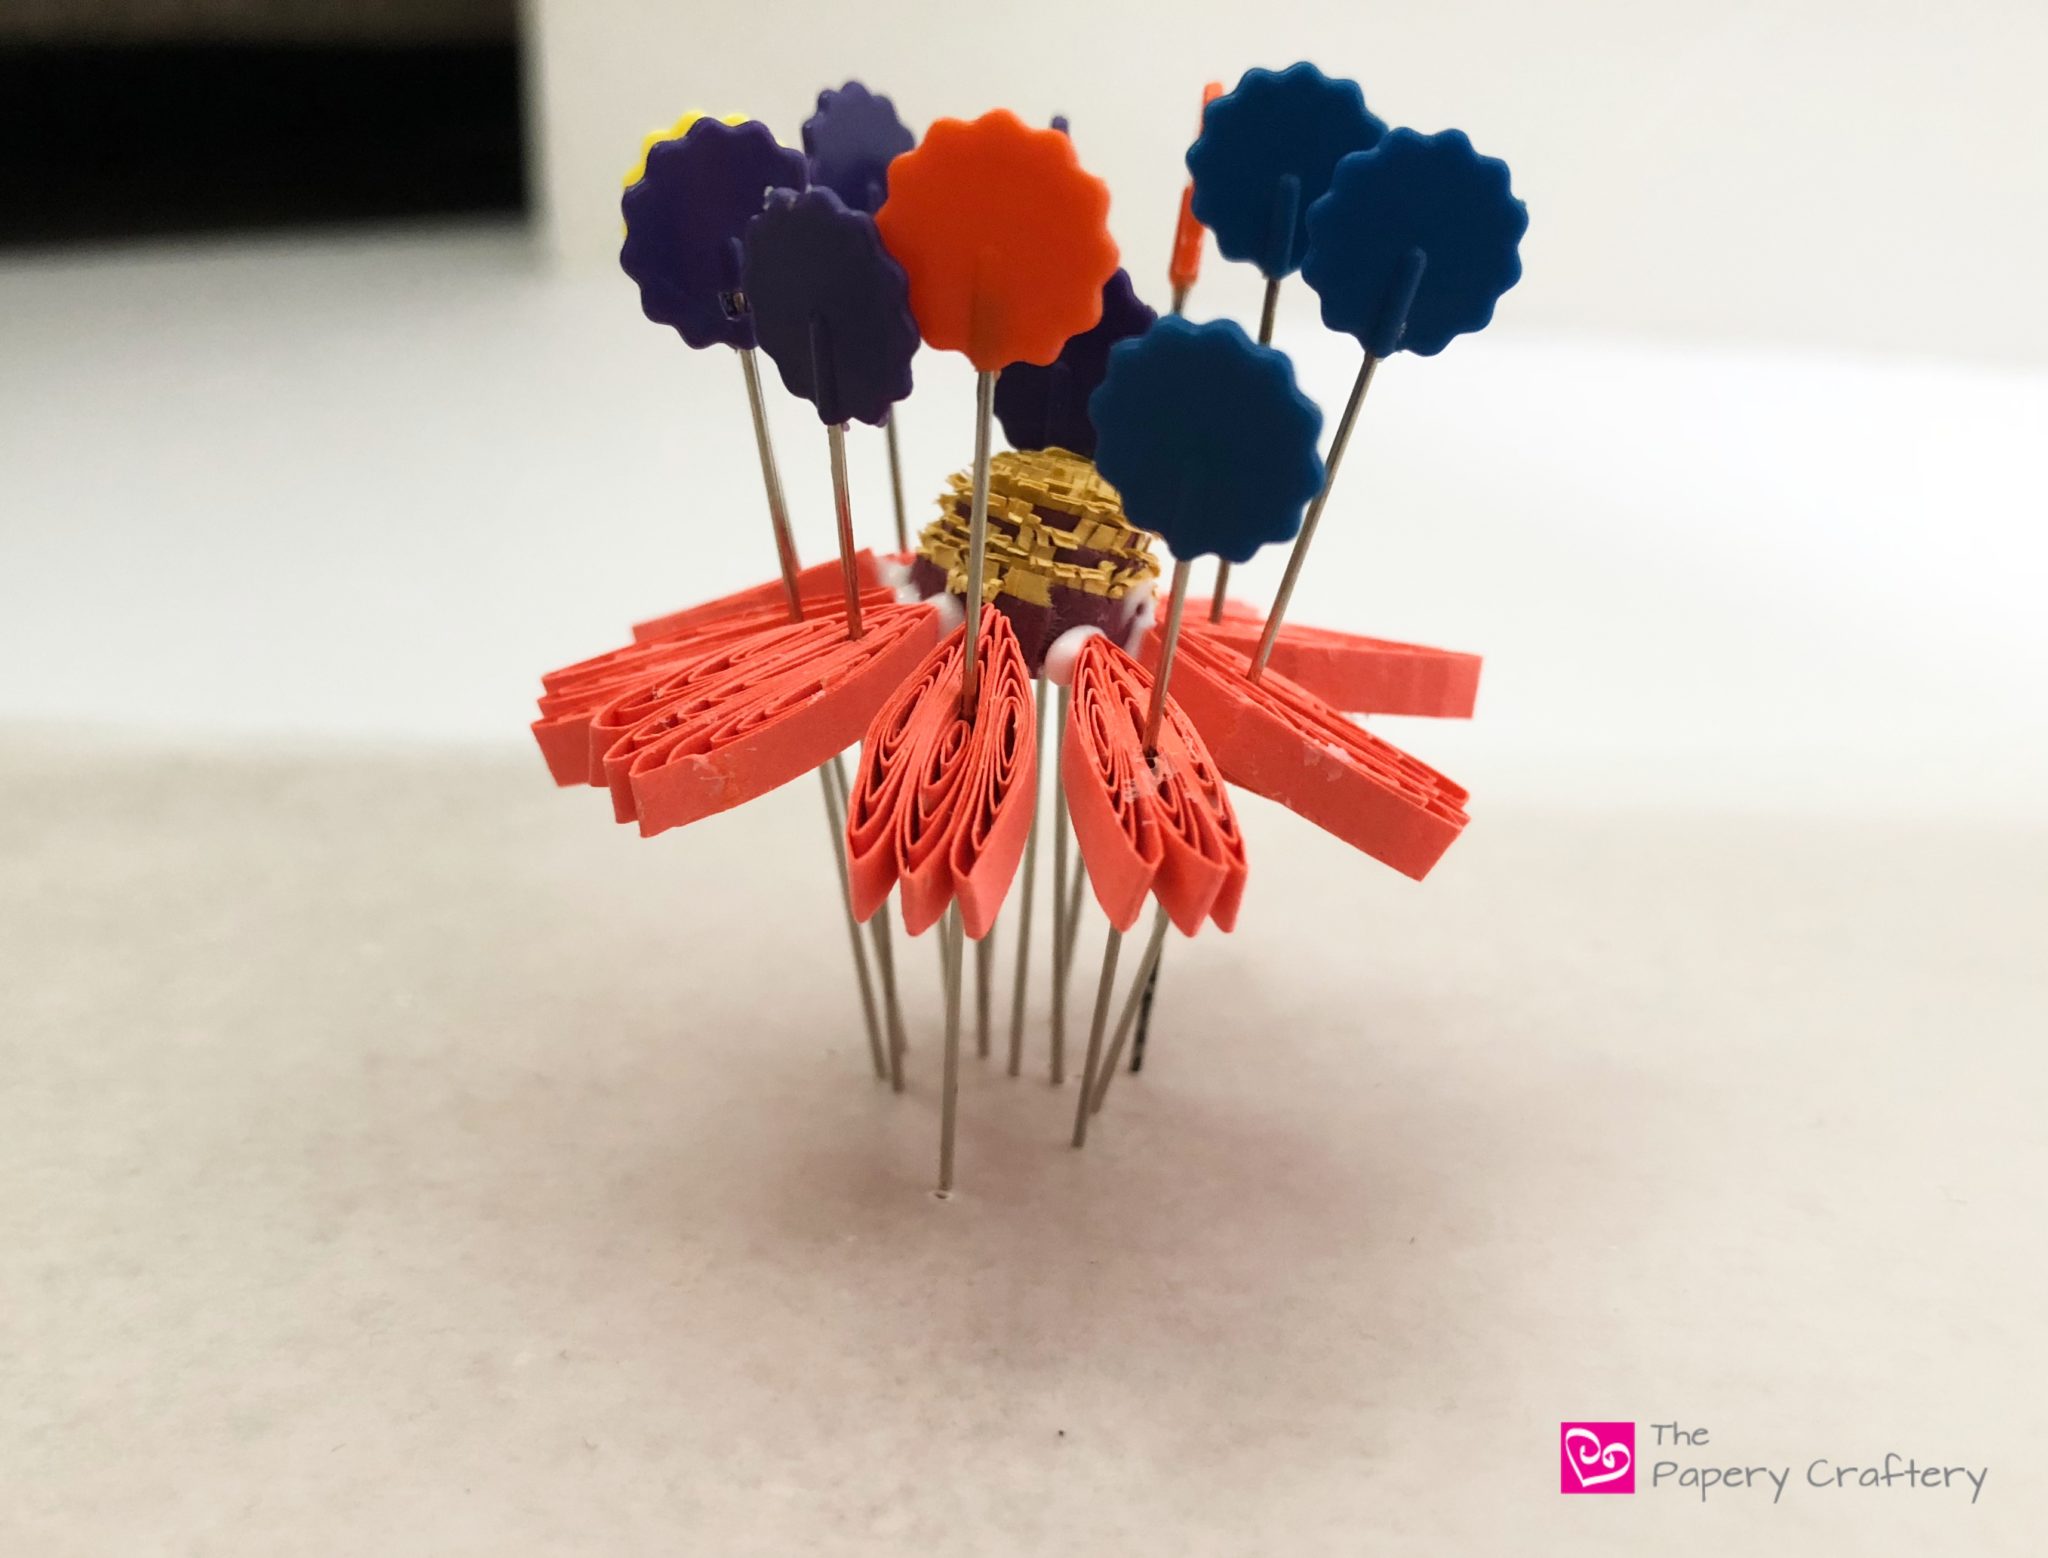
Now, the tricky part is getting the petals to dry on the center while keeping the cone shape of the flowers.

I made a system using 2 pins from the underneath and 1 through the center to keep it elevated.

Quilling Paper Coneflowers ~ Say goodbye to summer with new quilling techniques for these colorful coneflowers || www.ThePaperyCraftery.com

Quilling Paper Coneflowers ~ Say goodbye to summer with new quilling techniques for these colorful coneflowers || www.ThePaperyCraftery.com

Start your FREE Bluprint trial.

Then, use more pins keep the petals at an angle as they dry.

Tacky glue is your friend here! It will help the petals stick a little faster.

Quilling Paper Coneflowers ~ Say goodbye to summer with new quilling techniques for these colorful coneflowers || www.ThePaperyCraftery.com

Keep adding your pins and petals all the way around your center.

I wasn’t really concerned with the excess glue that is between the petals and the center but feel free to try to gently wipe it away with a small brush.

Quilling Paper Coneflowers ~ Say goodbye to summer with new quilling techniques for these colorful coneflowers || www.ThePaperyCraftery.com

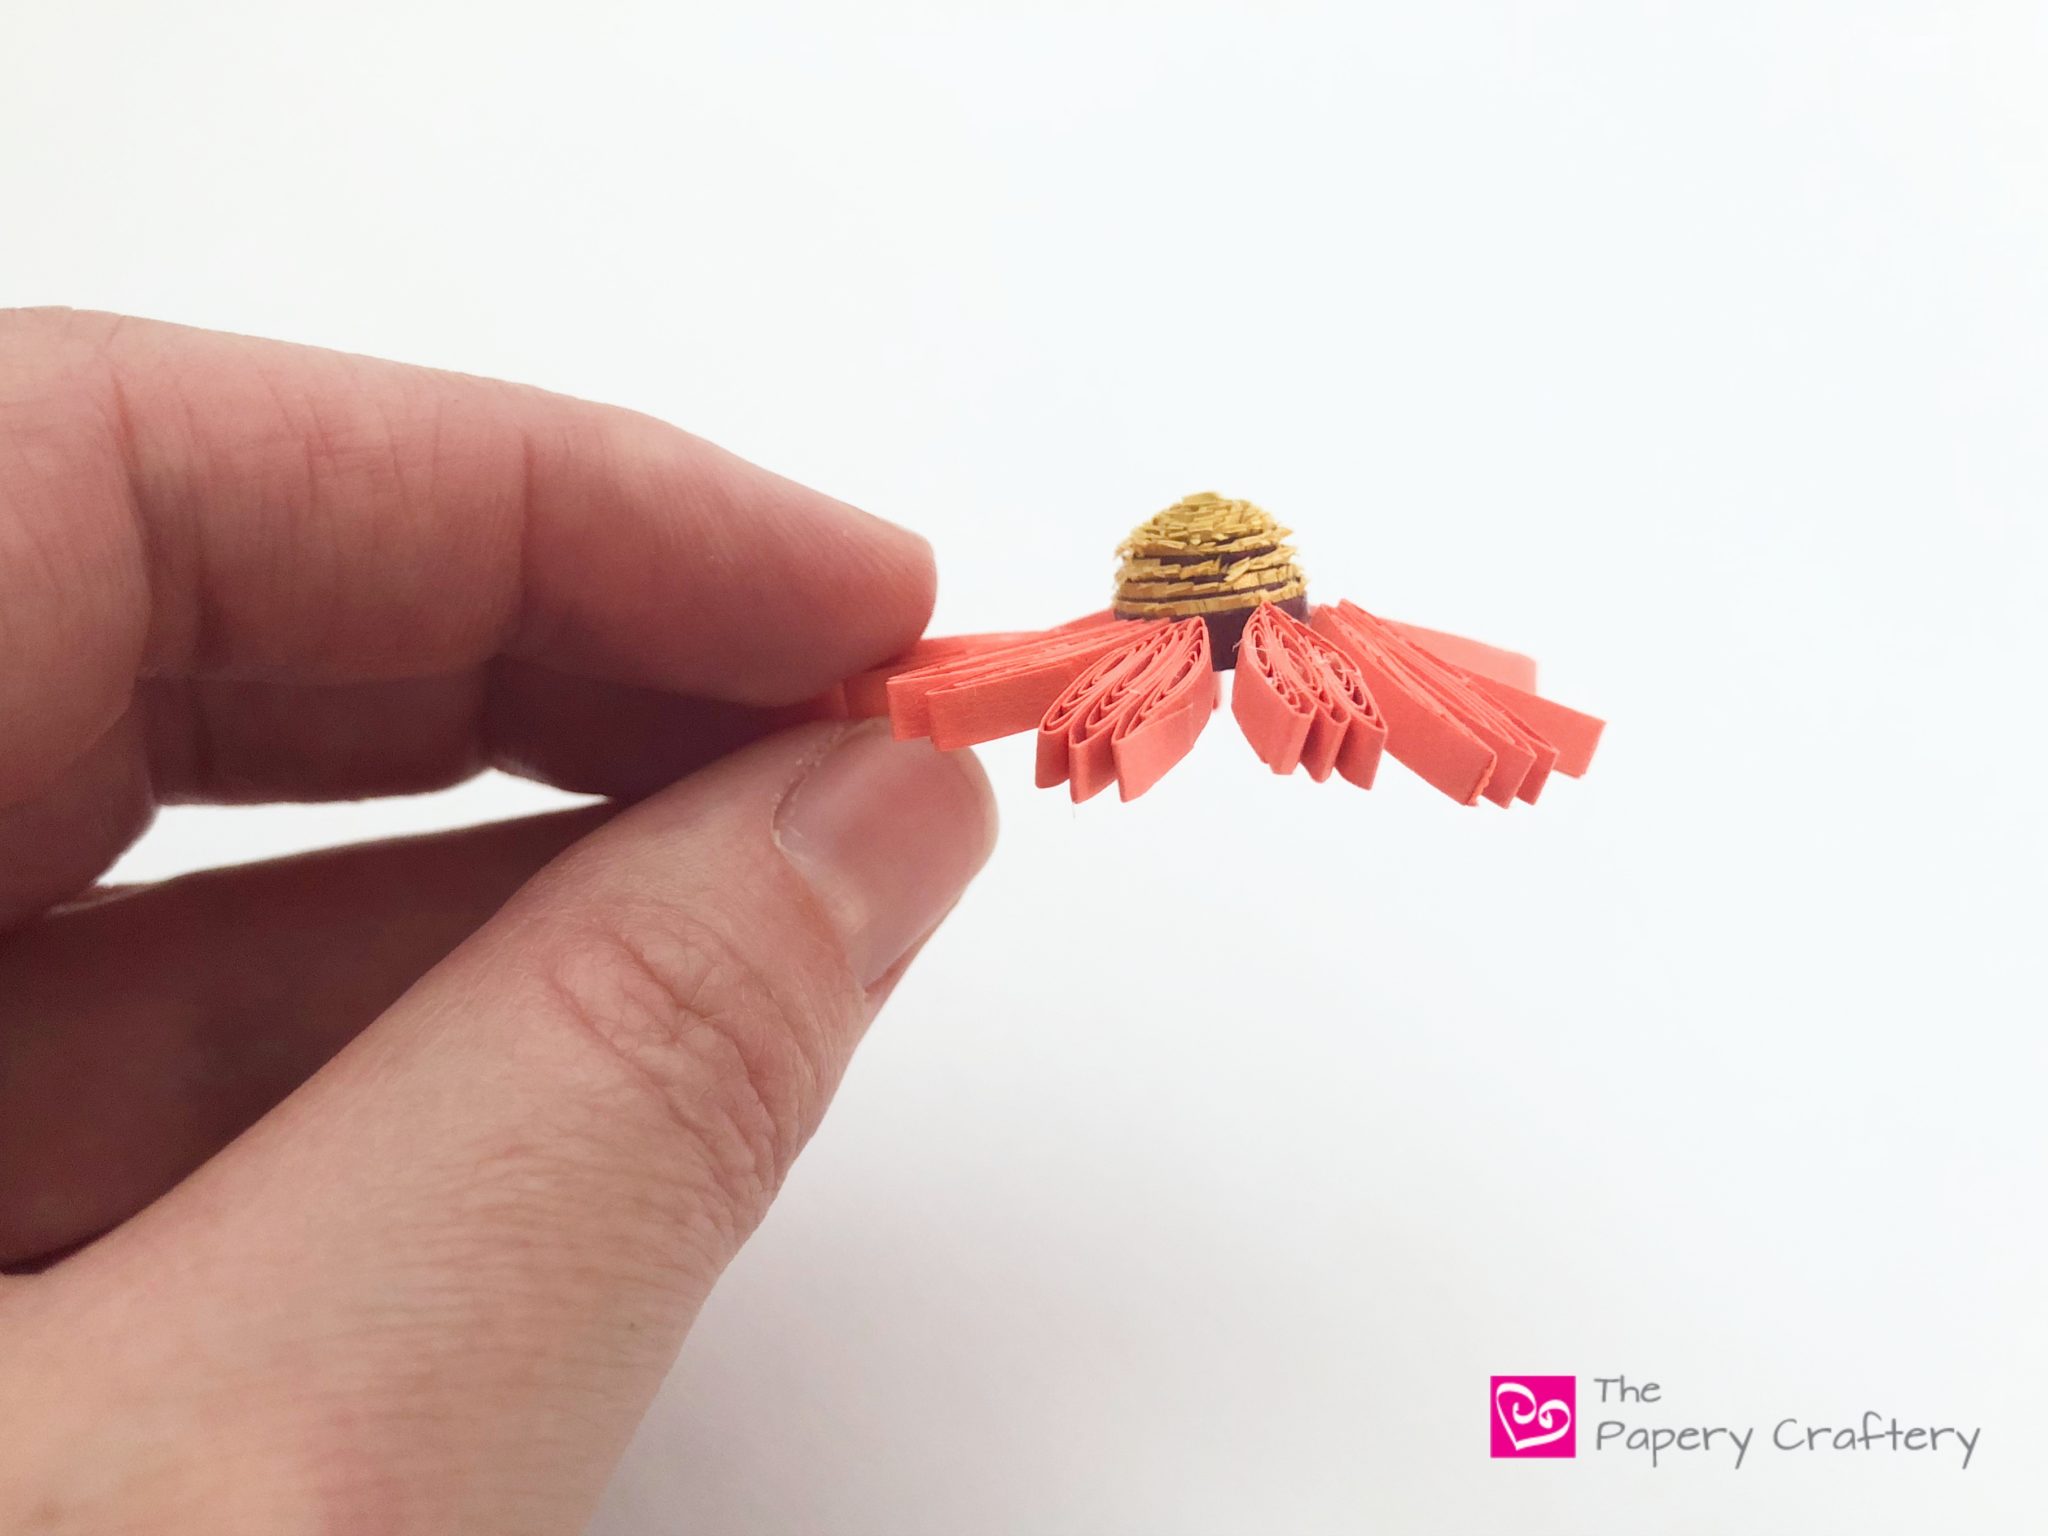
After the glue dries, you can remove all the pins.

You’ll see that the petals stay at an angle!

Quilling Paper Coneflowers ~ Say goodbye to summer with new quilling techniques for these colorful coneflowers || www.ThePaperyCraftery.com

If you’re looking for flowers on stems, try using floral tape wrapped wire.

Leave a small amount of the tip unwrapped.

Quilling Paper Coneflowers ~ Say goodbye to summer with new quilling techniques for these colorful coneflowers || www.ThePaperyCraftery.com

Roll a base from a leaf green and form into a dome.

The strip that you use should be about as long as strip you used for the original spiky dome.

Slide the center of the dome over the bare wire.

Quilling Paper Coneflowers ~ Say goodbye to summer with new quilling techniques for these colorful coneflowers || www.ThePaperyCraftery.com

Add some glue and place into the underside of your quilled coneflower.


Quilling Paper Coneflowers ~ Say goodbye to summer with new quilling techniques for these colorful coneflowers || www.ThePaperyCraftery.com


Quilling Paper Coneflowers ~ Say goodbye to summer with new quilling techniques for these colorful coneflowers || www.ThePaperyCraftery.com


Quilling Paper Coneflowers ~ Say goodbye to summer with new quilling techniques for these colorful coneflowers || www.ThePaperyCraftery.com

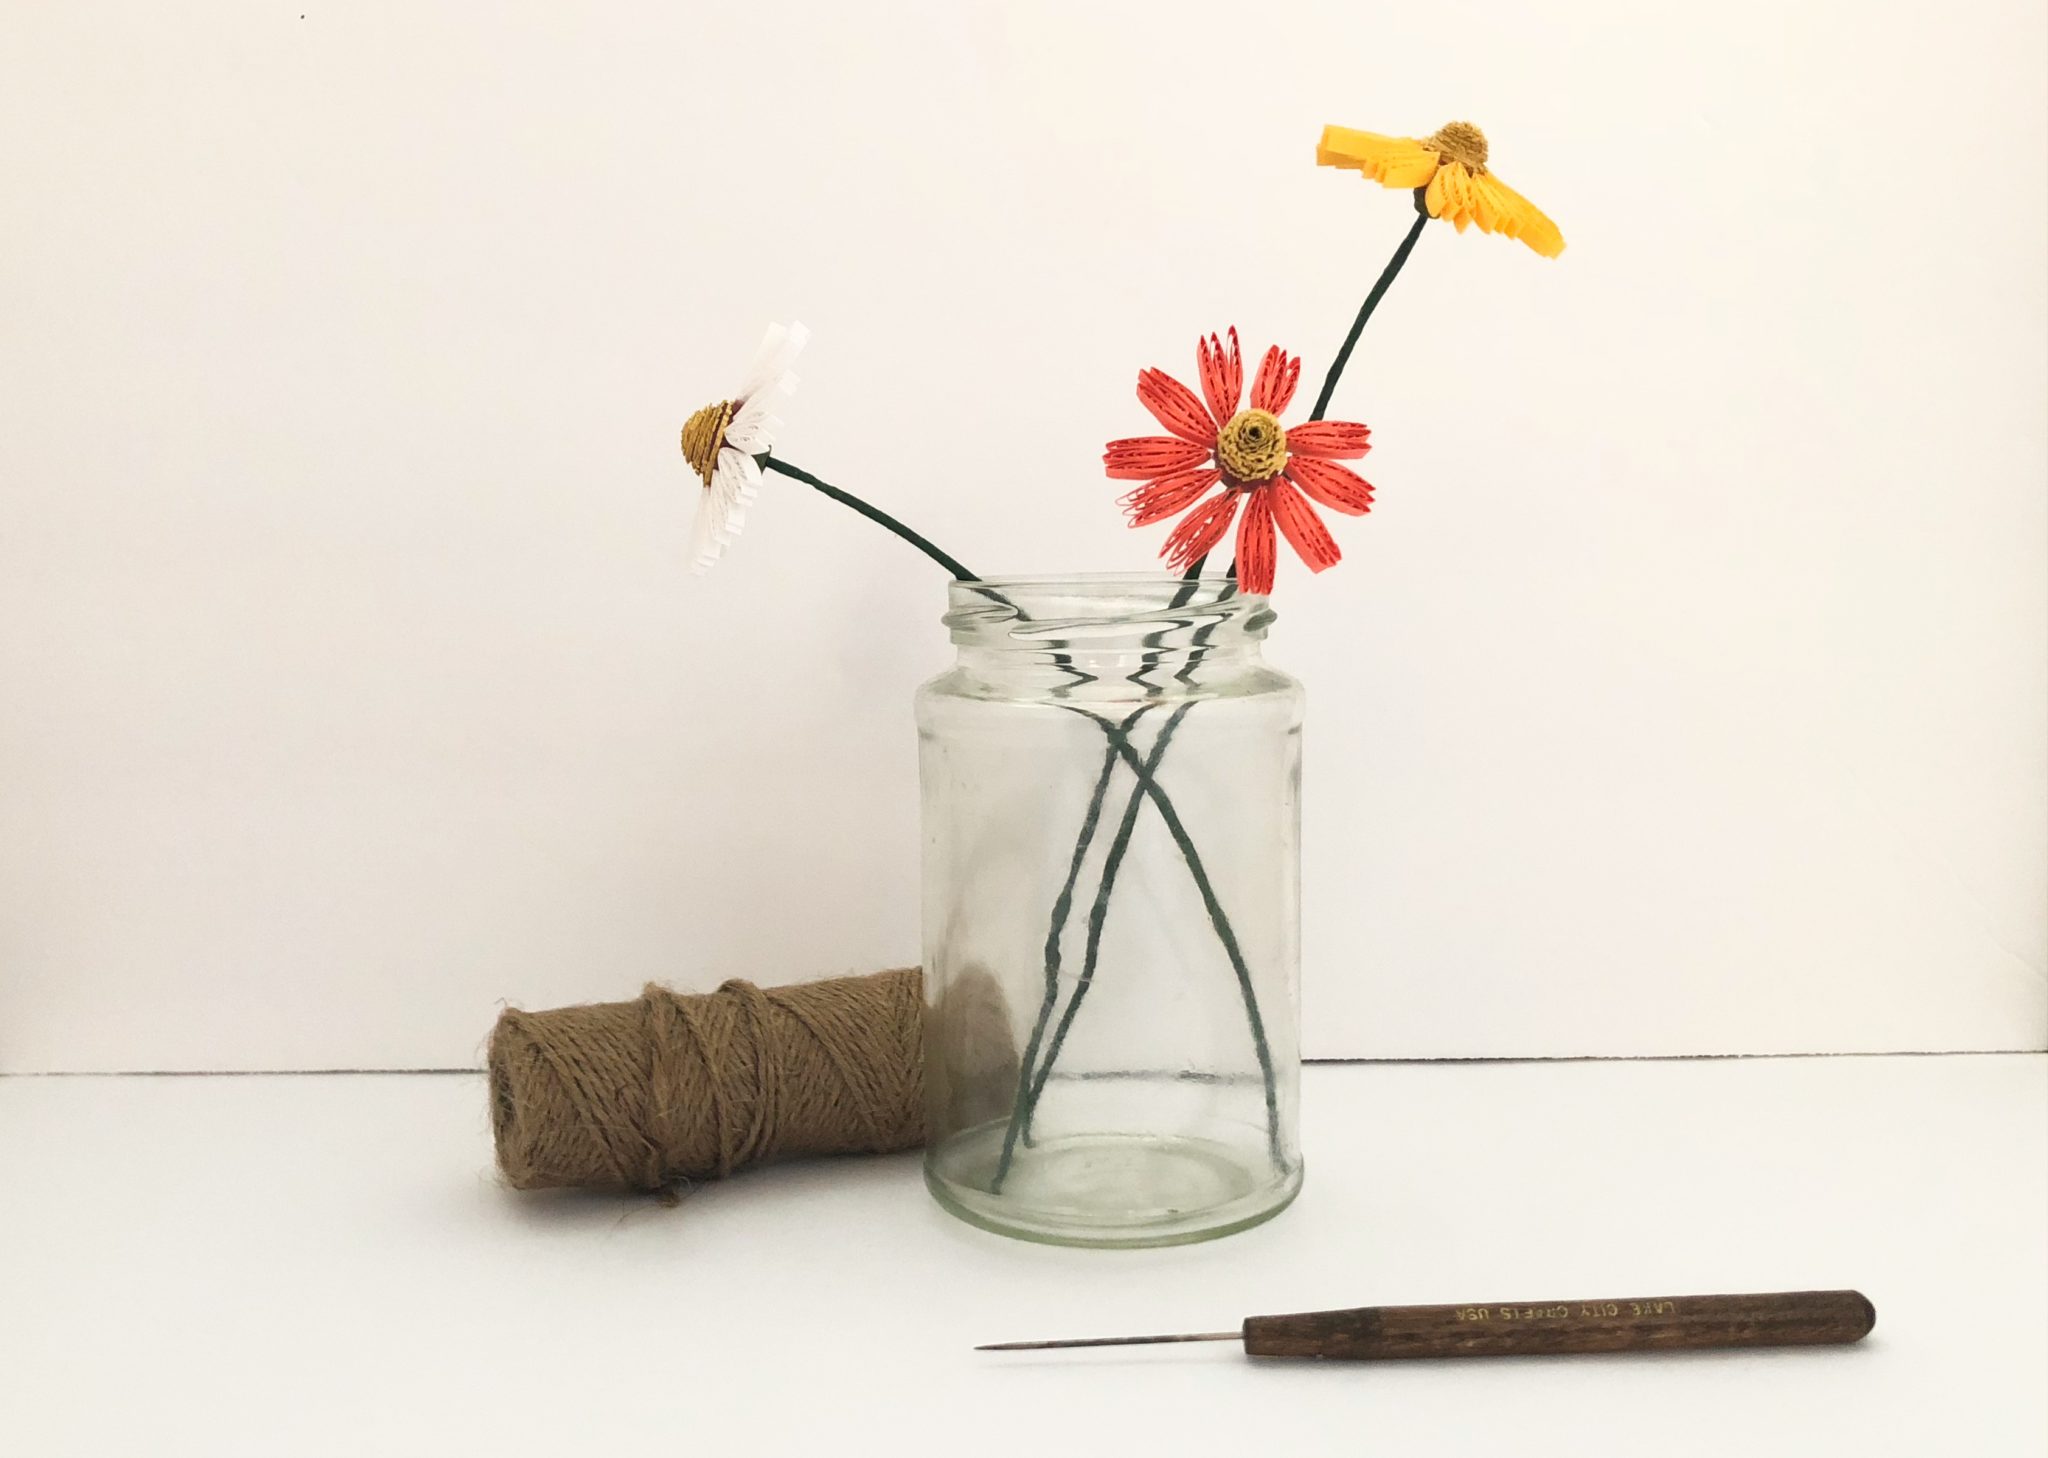
I love the simplicity of these quilling paper coneflowers!

I can just imagine picking them from a field on a warm day.

I know this seems like a longer challenge, but the petals do go quickly when you get the hang of them.

Give this one a try and tell me how it goes!


Print this post

Share this:

  • Click to share on Facebook (Opens in new window)
  • Click to share on Twitter (Opens in new window)
  • Click to share on Pinterest (Opens in new window)
  • Click to print (Opens in new window)

in Quilling, Tutorials # paper coneflowers, Quilling Paper Flowers, summer autumn quilling

Reader Interactions

you may also like
How to Make 3 Quilling Paper Flower Buds
4 Fast Fall Quilling Paper Flowers
Autumn Wreath with Quilling Paper Leaves
Quilling Paper Seahorse

Comments

  1. Barbara Wallace says

    October 11, 2018 at 11:14 am

    Very cute results. Thank you for this tutorial.

    Reply
    • Meredith says

      October 11, 2018 at 7:37 pm

      Thanks Barbara! I’m glad you like them.

      Reply
  2. POSADAS MARIE-HELENE says

    October 11, 2018 at 11:28 am

    magnifique ! and it’s seeme not too difficult .I like what you do. Thank you

    Reply
    • Meredith says

      October 11, 2018 at 7:37 pm

      Thanks! They really are pretty simple once you get the steps down.

      Reply
  3. Yuen Mi says

    November 28, 2018 at 8:17 am

    These looks so cute and easy, am considering making it this month. It’ll definitely take my gift wrapping skills to the next level with these on top of them.

    Reply
    • Meredith says

      November 28, 2018 at 3:35 pm

      That would look amazing, I’m sure!

      Reply

Share your thoughts and leave a comment below! Cancel reply

Primary Sidebar

About Me

Hi there, Paper People! I'm so glad you've stumbled across my corner of the internet. I'll be sharing my favorite quilling tips and tutorials, plus some creative micro-biz pointers, and lots of paper crafting news! Thanks for stopping by!

Looking for a project, technique or tool? Search here!

There’s more on YouTube!

https://youtu.be/35_gat0Gp4w

Top Hits!

Thank you so much for stopping by my site. If you care to throw more support my way so I can continue to make new tutorials, you can do so by buying me a virtual cup of coffee!

Affiliate Policy

Some posts on this blog contain affiliate links.

If you click on the links and make a purchase, I would receive a small compensation to help me finance this site and keep coming up with awesome tutorials and tips! There’s no cost to you and I only ever include links to companies and products that I trust and work with on a regular basis.

All posts with affiliate links are clearly marked.

The Papery Craftery (ThePaperyCraftery.com) blog is a participant in the Amazon Services LLC Associates Program, an affiliate advertising program designed to provide a means for us to earn fees by linking to Amazon.com and affiliated sites.

Cookie Policy
Privacy Policy

I hope you’re inspired by my quilling!

Feel free to use my designs as gifts or for your own personal use. And I’d love any sharing of my photos and projects! All I ask is that all photos remain unaltered and link back to the original post, and please do not attempt to sell my any quilling created from my designs as your own work. Happy Crafting!

Latest on Instagram

thepaperycraftery

thepaperycraftery
It’s time for spring crafting! This week I’m It’s time for spring crafting!  This week I’m sharing 3 ways to make tiny quilling paper flower buds. Perfect to round out your next floral quilling project.  Full video is up now 👆
#quilling #paperflowers #papercrafts #flowers
Quilling paper shamrocks! One of my oldest and v Quilling paper shamrocks!  One of my oldest and very first designs 😍 full how-to’s are up now!  #quilling #papercrafts #paper #stpatricksday
Most of my FAQ’s are about making quilling paper Most of my FAQ’s are about making quilling paper letters - the first of 2 videos with all the tips is up now!  🎥 link in bio 
#quilling #quillingcrafts #paper #monograms #paperletters
Any day I get to pull out my favorite quilling com Any day I get to pull out my favorite quilling comb is a good day  Quilling a paper spider mums full video with all the steps is up on YouTube  🎥 link in bio 
#quilling #quillingcrafts #paper #papercrafts #paperflowers
I know 3D quilling isn’t everyone’s jam, but I I know 3D quilling isn’t everyone’s jam, but I love the magic in creating something realistic out of simple strips of paper 😍  Full video with all the steps is up on YouTube  🎥 link in bio 
#quilling #quillingcrafts #papercraft #blueberries #handmade
Rainy East Coast days call for teeny mushrooms F Rainy East Coast days call for teeny mushrooms  Full video with all the steps is up on YouTube  🎥 link in bio 
#quilling #quillingcrafts #papercrafts #paperart #autumnvibes #handmade
DIY sweet paper cherries 🍒 The full video wit DIY sweet paper cherries 🍒  The full video with all the steps is up on YouTube now  🎥 link in bio 
#quilling #quillingcrafts #papercraft #handmade
The how-to’s on these sweet cherries and blueber The how-to’s on these sweet cherries and blueberries won’t be up on YouTube until Sunday but they’re too cute not to share early 🤩  🎥 link in bio 
#quilling #quillingcrafts #papercrafts #handmade
4 fast fall flowers - use them all together or jus 4 fast fall flowers - use them all together or just choose your favorites 🤩  Full how-to video is up now on YouTube 🎥
#quilling #quillingcrafts #fallcrafts #paperflowers #autumnvibes #linkinbio
Stacks of paper swirls make colorful quilling pape Stacks of paper swirls make colorful quilling paper clouds ☁️ ☁️☁️  Full how-to video is up now on YouTube 🎥
#quilling #quillingcrafts
Wavy flower blossoms come together in minutes 🌸 Wavy flower blossoms come together in minutes 🌸🌸🌸 Couldn’t be easier!  Full how-to video is up now on YouTube 🎥
#quilling #quillingcrafts #paperflowers
Does anyone else have tons of coneflowers piping u Does anyone else have tons of coneflowers piping up in their neighborhood? The colors are 🤩🤩🤩  Full make your own quilling paper coneflower how-to video is up now on YouTube 🎥
#quilling #quillingcrafts
Tiny quilled ladybugs - 2 ways! Full video is up Tiny quilled ladybugs - 2 ways!  Full video is up now on YouTube 🎥
#quilling #quillingcrafts
Simple quilling paper flowers made on a husking bo Simple quilling paper flowers made on a husking board - comes together so quickly!  Full video is up now on YouTube 🎥
#quilling #quillingcrafts #paperflowers
Quilling paper 🤝 Valentine’s Day crafts Hear Quilling paper 🤝 Valentine’s Day crafts  Hearts are one of the simplest quilling shapes to create and I’m sharing 3 ways over on YouTube this week  #quilling #quillingcrafts #quillingforbeginners #papercrafts
There’s still a bit of time to sign up to join m There’s still a bit of time to sign up to join me at the @rebeccajpage Holiday Craft Summit on Monday!  You can learn how to make these mini wreaths and so much more!  See you there!  #quilling #christmascrafts #papercraft 
#holidayseason #holidaycraftsideas
Just over a week until the @rebeccajpage Holiday C Just over a week until the @rebeccajpage Holiday Craft Summit. I’ll be there sharing these mini quilling paper wreaths!  Join me by signing up with the link in my bio 🎄🎄🎄  #quilling #holidaycrafts #christmascrafts #craftersofinstagram #papercrafts
🔔 It’s almost time to ring in the holidays! 🔔 It’s almost time to ring in the holidays!  🔔 I have a playlist on my YouTube channel all about winter and Christmas quilling - featuring these bells, evergreen trees, ornaments, and more!  🔔 Look for the link in my bio  #quilling #papercraft
#christmascrafts #bells
Just making things out of paper over here #quillin Just making things out of paper over here #quilling #papercraft
🎄Big news! I’m so excited to announce that I’m going to be a part of the upcoming @rebeccajpage FREE Holiday Craft summit on November 29 - December 3.  🎄There will be more than 35 crafters sharing holiday gift and decor ideas - I’ll be sharing an exclusive quilling paper wreath project!  🎄Follow the link in my bio for all the details and to sign up 👆  I’ll see you there!  #quilling #papercrafts #christmascrafts
#holidaycrafts
Load More... Follow on Instagram
2021 © Meredith Amand Designs
made by soulmuse