• Skip to main content
  • Skip to primary sidebar

The Papery Craftery

Quilling and Other Fun Paper Things

  • Quilling Basics
  • Quilling
    • Tutorials
    • Free Quilling Templates
    • Quilling Tools and Supplies
    • Papercraft and Quilling Videos
  • The Crafty Life
    • Crafting Printables
    • Paper Crafting News
    • Other Fun Things
  • Shop My Favorite Supplies
  • About & Disclosures
    • Privacy Policy
    • Cookie Policy
  • Contact

Quilling Paper Eucalyptus and Lavender

September 28, 2017

Life is a little crazy around the Craftery house this week because my Moose is turning 6.

6 years old, you guys!!!

6 is no longer a tiny kid, but an over 4 foot tall, school-aged, smarty-pants ball of awesome!

Anyway, even though I’m in the midst of getting his birthday party together, I didn’t want to wait to share this last quilling paper greenery post.

This time, I’m going for more of a rustic, farmhouse vibe and sharing an easy tutorial on making quilling paper eucalyptus and lavender.

This post contains affiliate links. If you click on the links below and make a purchase, I may receive a small compensation to help me finance this site and keep coming up with awesome tutorials and tips! There’s no cost to you and I only ever include links to companies and products that I trust and work with on a regular basis. 


Quilling Paper Eucalyptus and Lavender - Add some rustic, farmhouse quilling to your designs -- www.thepaperycraftery.com

Just like the paper orchids in my last post, both of these plants feature stems made from floral tape wrapped wire

I didn’t go into any detail on how to do this last time, but the process is very simple.

Cut the wire to the length needed for the individual stems and wrap the tape around the wire, overlapping it slightly as you go.

The tape doesn’t feel sticky but it will stick to itself as it goes around the wire. Easy peasy.

Quilling Paper Eucalyptus and Lavender - Add some rustic, farmhouse quilling to your designs -- www.thepaperycraftery.com

Now, let’s tackle the eucalyptus first.

Like some plants, eucalyptus can have a few different shapes, but I chose to make the most recognizable type, the true blue.

The true blue eucalyptus features pairs of flat leaves growing side by side up a single stem.

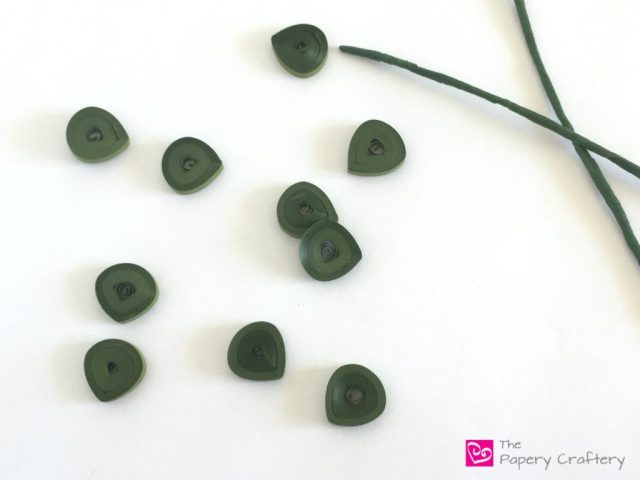
I made the leaves by rolling extra long strips of deep leaf green quilling paper into a tight coil.

To make yours the same size, try gluing 2 22″ strips together, or 2 1/2 17″ strips.

Quilling Paper Eucalyptus and Lavender - Add some rustic, farmhouse quilling to your designs -- www.thepaperycraftery.com

Once each coil is rolled, remove them from your quilling tool and let it unravel very, very slightly, while still holding it between your fingers.

This will allow the center to open up just a tiny bit.

Glue the end to keep the coil in shape.

To make the eucalyptus leaf, pinch one end of the coil into a teardrop.

Then pinch the other end gently between both hands, being careful not to squeeze too hard.

You’re not looking to making two more points, but more of a flattened heart shape.

Letting the coil unravel a tiny bit allows it to be shaped a little easier.
Quilling Paper Eucalyptus and Lavender - Add some rustic, farmhouse quilling to your designs -- www.thepaperycraftery.com


Each eucalyptus stem will need quite a few of these leaves.

The smallest stem I made used 10 leaves.

This might be one of those situations where you decide to pick up a battery operated quilling tool. It really will come in handy here.

Quilling Paper Eucalyptus and Lavender - Add some rustic, farmhouse quilling to your designs -- www.thepaperycraftery.com

After all the leaves are made, they can be added to the stems.

TIP: Think about using hot glue, so you don’t have to hold each leaf as it dries!

Quilling Paper Eucalyptus and Lavender - Add some rustic, farmhouse quilling to your designs -- www.thepaperycraftery.comEach pair of leaves can be glued about a half an inch apart on the stem.

To keep a natural look, have all the leaves facing the same way, but allow them to twist on the stem a little bit.

Quilling Paper Eucalyptus and Lavender - Add some rustic, farmhouse quilling to your designs -- www.thepaperycraftery.com

Quilling Paper Eucalyptus and Lavender - Add some rustic, farmhouse quilling to your designs -- www.thepaperycraftery.com

A lavender plant can be easily spotted by its many, many small buds sprouting from a long stem.

Quilled lavender buds can be made by simply rolling 1-inch strips of light purple quilling paper into tight coils, or pegs.

Quilling Paper Eucalyptus and Lavender - Add some rustic, farmhouse quilling to your designs -- www.thepaperycraftery.com

The lavender buds can be glued directly onto the wire stems.

I started with one at the very top.

Then, I continued, making rows of 4 buds in a circle around the stem.

Quilling Paper Eucalyptus and Lavender - Add some rustic, farmhouse quilling to your designs -- www.thepaperycraftery.comI’ll be totally honest and let you know that I made a pretty nice mess trying to use hot glue to stick lavender buds to a stem.

It got really gloppy and was just not working.

I ended up dipping the edge of each bud in some Tacky Glue, then holding them against the stem for a few seconds until they stayed in place.

I did blow on each one in the hopes of having the Tacky Glue dry even faster. But who knows if that really helped 🙂

Try to have your buds angled away from the stem to aid in the look that they’re sprouting out.

Quilling Paper Eucalyptus and Lavender - Add some rustic, farmhouse quilling to your designs -- www.thepaperycraftery.com

Each lavender stem that I made has 8 or 9 rows of buds.

Quilling Paper Eucalyptus and Lavender - Add some rustic, farmhouse quilling to your designs -- www.thepaperycraftery.com

I love the mix of sturdy eucalyptus leaves mixed with delicate lavender flowers!

Quilling Paper Eucalyptus and Lavender - Add some rustic, farmhouse quilling to your designs -- www.thepaperycraftery.com

Try wrapping a few of each stem with some lacy ribbon!

I think I might try adding a drop or two of eucalyptus and lavender essential oil so they can smell as real as they look!

Quilling Paper Eucalyptus and Lavender - Add some rustic, farmhouse quilling to your designs -- www.thepaperycraftery.com

I have some plans for these quilling paper eucalyptus and lavender stems.

I’ll share that post in a couple weeks!

In the meantime, I hope you’ll give this tutorial a try.

Let me know how it goes in the comments below!


Print this post

Share this:

  • Click to share on Facebook (Opens in new window)
  • Click to share on Twitter (Opens in new window)
  • Click to share on Pinterest (Opens in new window)
  • Click to print (Opens in new window)

in Quilling, Tutorials # farmhouse quilling, quilling paper eucalyptus, quilling paper lavender, rustic paper craft

Reader Interactions

you may also like
Autumn Wreath with Quilling Paper Leaves
Quilling Paper Seahorse
Quilling Paper Rainbow Umbrella
Autumn Quilling Paper Acorn

Comments

  1. Gerri DiSalvio Ruppert says

    September 28, 2017 at 10:27 am

    Gives me a great idea! I’ve kinda been on a rock-painting “binge” but I have a nice large flat rock that I may try to incorporate the eucalyptus and lavender with tacky glue. of course it will have to be an indoor decoration (most of my painted rocks end up in the garden) I just got a coupon from JoAnn so it was an omen! hahahaha Have a great day, and HAPPY 6th BIRTHDAY, MOOSE!

    Reply
    • Meredith says

      September 28, 2017 at 6:56 pm

      So glad to inspire some new quilling/ painted rock mash-up for you, Gerri! And I’ll pass along the kind wishes to my guy!

      Reply
  2. Lois Mikeal says

    September 28, 2017 at 5:30 pm

    I am enjoying your posts so very much ! You give clear instructions ! I have been a quiller for over 40 years !
    Thank you for sharing ! Sincerely , Lois Mikeal ( I’m a 78 year old retired Early Childhood teacher. )

    Reply
    • Meredith says

      September 28, 2017 at 6:55 pm

      That’s so wonderful to hear, Lois! I really appreciate it. I’m sure with your experience you can teach me a thing or two about quilling. And with 2 little ones running around here, I have nothing but absolute respect for all teachers! So nice to meet you!

      Reply
  3. patmitchell2 says

    October 6, 2017 at 8:27 pm

    Is there some way to print the instructions besides using ctrl P? If I do that it’s 8 pages. I would appreciate a print key like pinterest and facebook that would condense the instructions. Love you tutorials!!! Thanks for helping us along on the journey of quilling.

    Reply
    • Meredith says

      October 6, 2017 at 9:08 pm

      That’s a great question! Honestly, I’m not sure why there’s not an easier way. Have you thought of only copying and pasting the parts you really need to a blank document and printing that? I’m sure there’s quite a bit that could be skipped. Thanks so much for your feedback! I’m glad you’re finding my tutorials helpful 😊

      Reply

Share your thoughts and leave a comment below! Cancel reply

Primary Sidebar

About Me

Hi there, Paper People! I'm so glad you've stumbled across my corner of the internet. I'll be sharing my favorite quilling tips and tutorials, plus some creative micro-biz pointers, and lots of paper crafting news! Thanks for stopping by!

Looking for a project, technique or tool? Search here!

There’s more on YouTube!

https://youtu.be/eOyugg54Amc

Top Hits!

Thank you so much for stopping by my site. If you care to throw more support my way so I can continue to make new tutorials, you can do so by buying me a virtual cup of coffee!

Affiliate Policy

Some posts on this blog contain affiliate links.

If you click on the links and make a purchase, I would receive a small compensation to help me finance this site and keep coming up with awesome tutorials and tips! There’s no cost to you and I only ever include links to companies and products that I trust and work with on a regular basis.

All posts with affiliate links are clearly marked.

The Papery Craftery (ThePaperyCraftery.com) blog is a participant in the Amazon Services LLC Associates Program, an affiliate advertising program designed to provide a means for us to earn fees by linking to Amazon.com and affiliated sites.

Cookie Policy
Privacy Policy

I hope you’re inspired by my quilling!

Feel free to use my designs as gifts or for your own personal use. And I’d love any sharing of my photos and projects! All I ask is that all photos remain unaltered and link back to the original post, and please do not attempt to sell my any quilling created from my designs as your own work. Happy Crafting!

Latest on Instagram

Quilling paper 🤝 Valentine’s Day crafts Hear Quilling paper 🤝 Valentine’s Day crafts  Hearts are one of the simplest quilling shapes to create and I’m sharing 3 ways over on YouTube this week  #quilling #quillingcrafts #quillingforbeginners #papercrafts
There’s still a bit of time to sign up to join m There’s still a bit of time to sign up to join me at the @rebeccajpage Holiday Craft Summit on Monday!  You can learn how to make these mini wreaths and so much more!  See you there!  #quilling #christmascrafts #papercraft 
#holidayseason #holidaycraftsideas
🔔 It’s almost time to ring in the holidays! 🔔 It’s almost time to ring in the holidays!  🔔 I have a playlist on my YouTube channel all about winter and Christmas quilling - featuring these bells, evergreen trees, ornaments, and more!  🔔 Look for the link in my bio  #quilling #papercraft
#christmascrafts #bells
🎄Big news! I’m so excited to announce that I’m going to be a part of the upcoming @rebeccajpage FREE Holiday Craft summit on November 29 - December 3.  🎄There will be more than 35 crafters sharing holiday gift and decor ideas - I’ll be sharing an exclusive quilling paper wreath project!  🎄Follow the link in my bio for all the details and to sign up 👆  I’ll see you there!  #quilling #papercrafts #christmascrafts
#holidaycrafts
Today’s the day! The 2021 Paper Craft Summit s Today’s the day!  The 2021 Paper Craft Summit sponsored by @rebeccajpage is live 🤩 You can follow along now with my video as I create these mini autumn flower buds…  Or you can have a year to watch all the 40+ videos with the VIP access - all the info can be found in the link tree in my bio 👆  You don’t want to miss put on this! See you there 😁  #quilling #papercrafts #papercrafting #paperflowers #rebeccapage
I’ve had some big news to share and it’s final I’ve had some big news to share and it’s finally here! I’m so excited to be part of the @rebeccajpage #papercraftssummit August 16th – 20th! This FREE Virtual summit includes over 40+ paper craft classes – including an exclusive, never-before-seen class taught by me! Learn the basics of paper crafting including card making, paper quilting, origami and more. 
Sign up today by clicking through the link tree my bio!  #rebeccapage #rplearn #rplearnpapercrafting #papercrafting #crafts #quilling #quillingart
2021 © Meredith Amand Designs
made by soulmuse