• Skip to main content
  • Skip to primary sidebar

The Papery Craftery

Quilling and Other Fun Paper Things

  • Quilling Basics
  • Quilling
    • Tutorials
    • Free Quilling Templates
    • Quilling Tools and Supplies
    • Papercraft and Quilling Videos
  • The Crafty Life
    • Crafting Printables
    • Paper Crafting News
    • Other Fun Things
  • Shop My Favorite Supplies
  • About & Disclosures
    • Privacy Policy
    • Cookie Policy
  • Contact

Quilling Paper Gerbera Daisies

June 5, 2019

Roll a few big, bold, beautiful blooms! These quilling paper gerbera daisies are made with super-skinny quilling paper for a real “wow”!

This post contains affiliate links. If you click on the links below and make a purchase I may receive a small compensation to help me finance this site and keep coming up with awesome tutorials and tips! There’s no cost to you and I only ever include links to companies and products that I trust and work with on a regular basis. 

Quilling Paper Gerbera Daisies - Big, bright, beautiful blooms made from thin quilling paper | ThePaperyCraftery.com

The process for making this tutorial has been a long one.

It began with a bunch of 1/16″ quilling paper packages that I have been holding onto since Christmas time.

I had grand plans of trying to create a quilled ranunculus flower, but the number of petals on each blossom completely overwhelmed me.

So, I was on the lookout to use these strips on another flower, then it hit me. Quilled gerbera daisies!

They still have a bunch of petals, but nowhere near as many as the ranunculus. And, the thin strips of paper would allow me to layer the petals, just like on the actual daisies.

Perfect!

All of my 1/16″ quilling sheets have come from Custom Quilling by Denise.

She offers a fairly large selection with quite a few colors, many of them perfect for quilling paper gerbera daisies!

To access her shop, look for her square logo on the side of this page. It will take you right to the site!

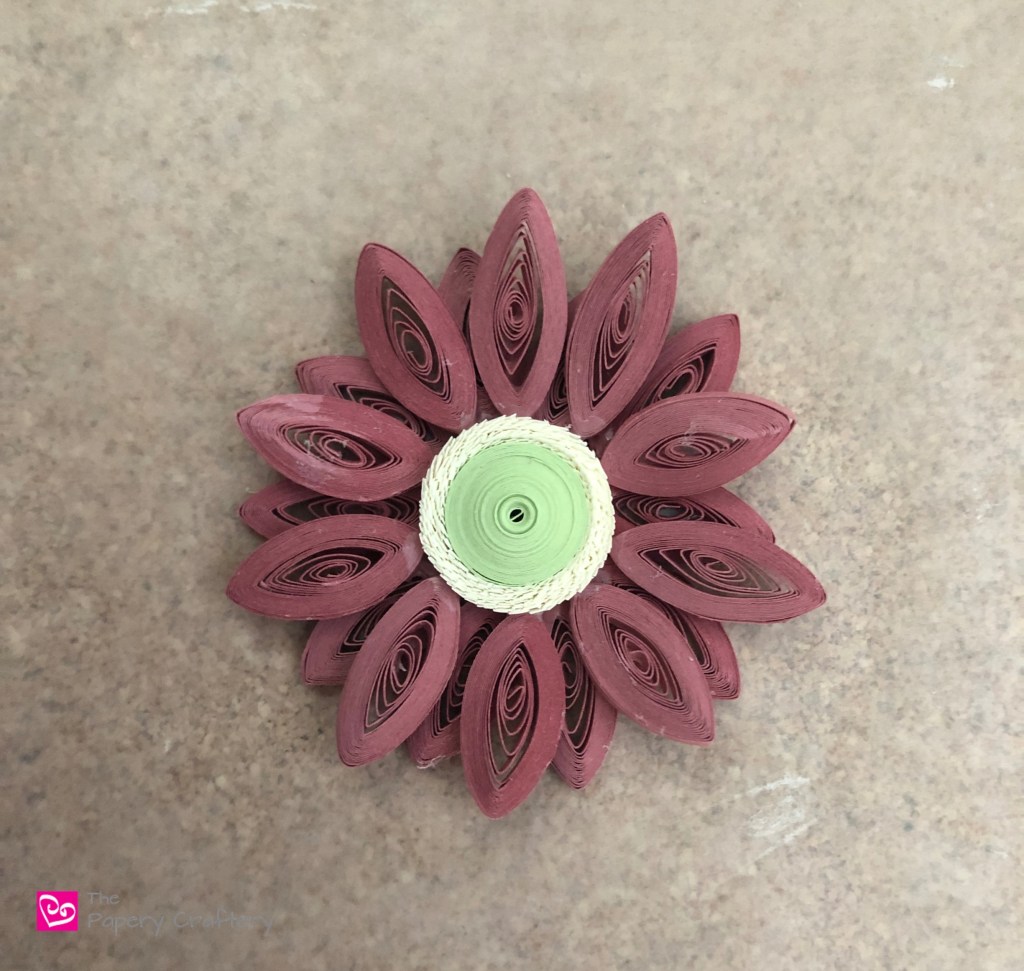
For this demo, I’m using Mauve, a dusty pink by Paplin.

First, roll each paper strip into a coil.

Once again, I’m used my savvy slotted tool. It’s a habit now and my go-to tool!

Carefully, remove the coil from the quilling tool, and let it unravel just a bit in your hands.

Try to only let the inside of the coil open up, like in the photo below.

This might take a few practice rolls, but once you get the hang of it, it goes quickly.

You’ll need to make 20 of these coils for each gerbera daisy.

Pinch each side of the coil to make a marquise shape.

Pinching gerbera daisy petals into shape ThePaperyCraftery.com

Paint some all-purpose glue on the underside of each petal to keep the shape.

While your gerbera daisy petals are drying, you can make the centers.

Roll about 30 inches of 1/8″ quilling paper into a tight coil and glue the end to secure.

Push the center out to make a small dome and brush some glue to the underside.

Fringe another strip of 1/8″ paper with small scissors or a commercial fringer.

Glue one end to the dome and wrap the rest around.

Don’t forget to secure the end so the fringed strip doesn’t unravel.

Christmas in July

It’s time to put all your work together!

To build your quilling paper gerbera daisies, place a small dot of glue on the end of 2 of your petals.

Place them opposite each other on your workspace covered in wax paper, and add your center on top.

I like Tacky Glue for this because of it’s speedy drying time.

Next, add 8 more petals by sliding each under the flower center after applying a tiny bit of glue to each.

If this is giving you trouble, you can always arrange 10 petals in a circle with a space in the middle (think like a doughnut shape), then place the center right on top.

It may be easier to fit all your petals in that way.

Now, add the other 10 petals on top as a second layer.

Try to keep the new petals alternating between the ones underneath for a natural look.

It might look a little messy now, but the glue will dry!

After the glue dries, remove you gerbera daisy from your wax paper and use as you like!

Go wild with the colors!

One of the most well-known attributes of a gerbera daisy is their amazing and bright shades.

If you can’t find the 1/16″ paper in the colors you like, you can always cut your 1/8″ in half.

It takes a while, but it’s possible.

I had to do that for the red and the purple daisy, and you can’t really see the difference!

Quilling Paper Gerbera Daisies - Big, bright, beautiful blooms made from thin quilling paper | ThePaperyCraftery.com

These quilling paper gerbera daisies just scream SUMMER to me.

They’ll be perfect for a bold addition to your seasonal crafts.

Let me know how they turn out in the comments below!

Print this post

Share this:

  • Click to share on Facebook (Opens in new window)
  • Click to share on Twitter (Opens in new window)
  • Click to share on Pinterest (Opens in new window)
  • Click to print (Opens in new window)

in Quilling, Tutorials # colorful quilling flowers, paper gerber daisy

Reader Interactions

you may also like
Autumn Wreath with Quilling Paper Leaves
Quilling Paper Seahorse
Quilling Paper Rainbow Umbrella
Autumn Quilling Paper Acorn

Comments

  1. Patricia Wilson says

    June 5, 2019 at 12:58 pm

    I like your Gerbera Daisies. Pretty neat. Thanks for sharing the technique with us.

    Reply
    • Meredith says

      June 5, 2019 at 1:12 pm

      Thanks Patricia!

      Reply
  2. Barbara says

    June 5, 2019 at 10:58 pm

    Thank you Meredith. These flowers are lovely.

    Reply
  3. Barb scheper says

    July 13, 2019 at 5:19 pm

    Thank you so much for sharing your techniques, I am new to quilling and am in love with everything you can do. So glad I found your site. Barb

    Reply
    • Meredith says

      July 14, 2019 at 12:40 pm

      I’m glad you’ve found my site too, Barb! Let me know if you have any questions!

      Reply

Share your thoughts and leave a comment below! Cancel reply

Primary Sidebar

About Me

Hi there, Paper People! I'm so glad you've stumbled across my corner of the internet. I'll be sharing my favorite quilling tips and tutorials, plus some creative micro-biz pointers, and lots of paper crafting news! Thanks for stopping by!

Looking for a project, technique or tool? Search here!

There’s more on YouTube!

https://youtu.be/eOyugg54Amc

Top Hits!

Thank you so much for stopping by my site. If you care to throw more support my way so I can continue to make new tutorials, you can do so by buying me a virtual cup of coffee!

Affiliate Policy

Some posts on this blog contain affiliate links.

If you click on the links and make a purchase, I would receive a small compensation to help me finance this site and keep coming up with awesome tutorials and tips! There’s no cost to you and I only ever include links to companies and products that I trust and work with on a regular basis.

All posts with affiliate links are clearly marked.

The Papery Craftery (ThePaperyCraftery.com) blog is a participant in the Amazon Services LLC Associates Program, an affiliate advertising program designed to provide a means for us to earn fees by linking to Amazon.com and affiliated sites.

Cookie Policy
Privacy Policy

I hope you’re inspired by my quilling!

Feel free to use my designs as gifts or for your own personal use. And I’d love any sharing of my photos and projects! All I ask is that all photos remain unaltered and link back to the original post, and please do not attempt to sell my any quilling created from my designs as your own work. Happy Crafting!

Latest on Instagram

Quilling paper 🤝 Valentine’s Day crafts Hear Quilling paper 🤝 Valentine’s Day crafts  Hearts are one of the simplest quilling shapes to create and I’m sharing 3 ways over on YouTube this week  #quilling #quillingcrafts #quillingforbeginners #papercrafts
There’s still a bit of time to sign up to join m There’s still a bit of time to sign up to join me at the @rebeccajpage Holiday Craft Summit on Monday!  You can learn how to make these mini wreaths and so much more!  See you there!  #quilling #christmascrafts #papercraft 
#holidayseason #holidaycraftsideas
🔔 It’s almost time to ring in the holidays! 🔔 It’s almost time to ring in the holidays!  🔔 I have a playlist on my YouTube channel all about winter and Christmas quilling - featuring these bells, evergreen trees, ornaments, and more!  🔔 Look for the link in my bio  #quilling #papercraft
#christmascrafts #bells
🎄Big news! I’m so excited to announce that I’m going to be a part of the upcoming @rebeccajpage FREE Holiday Craft summit on November 29 - December 3.  🎄There will be more than 35 crafters sharing holiday gift and decor ideas - I’ll be sharing an exclusive quilling paper wreath project!  🎄Follow the link in my bio for all the details and to sign up 👆  I’ll see you there!  #quilling #papercrafts #christmascrafts
#holidaycrafts
Today’s the day! The 2021 Paper Craft Summit s Today’s the day!  The 2021 Paper Craft Summit sponsored by @rebeccajpage is live 🤩 You can follow along now with my video as I create these mini autumn flower buds…  Or you can have a year to watch all the 40+ videos with the VIP access - all the info can be found in the link tree in my bio 👆  You don’t want to miss put on this! See you there 😁  #quilling #papercrafts #papercrafting #paperflowers #rebeccapage
I’ve had some big news to share and it’s final I’ve had some big news to share and it’s finally here! I’m so excited to be part of the @rebeccajpage #papercraftssummit August 16th – 20th! This FREE Virtual summit includes over 40+ paper craft classes – including an exclusive, never-before-seen class taught by me! Learn the basics of paper crafting including card making, paper quilting, origami and more. 
Sign up today by clicking through the link tree my bio!  #rebeccapage #rplearn #rplearnpapercrafting #papercrafting #crafts #quilling #quillingart
2021 © Meredith Amand Designs
made by soulmuse