• Skip to main content
  • Skip to primary sidebar

The Papery Craftery

Quilling and Other Fun Paper Things

  • Quilling Basics
  • Quilling
    • Tutorials
    • Free Quilling Templates
    • Quilling Tools and Supplies
    • Papercraft and Quilling Videos
  • The Crafty Life
    • Crafting Printables
    • Paper Crafting News
    • Other Fun Things
  • Shop My Favorite Supplies
  • About & Disclosures
    • Privacy Policy
    • Cookie Policy
  • Contact

Quilling Paper Water Lilies

April 11, 2018

It has been one very wet spring so far, here in Delaware.

Our backyard is so soggy, it reminds me of a swamp.

And swamps remind me of frogs.

And frogs remind me of the lily pad and water lily post I’ve been wanting to work on.

So, while I was waiting for our backyard to dry out, I got busy rolling paper.

And now I’m sharing a tutorial all about quilling paper water lilies!

This post contains affiliate links. If you click on the links below and make a purchase, I may receive a small compensation to help me finance this site and keep coming up with awesome tutorials and tips! There’s no cost to you and I only ever include links to companies and products that I trust and work with on a regular basis. 


Quilling Paper Water Lilies ~ Brush up on your 3D quilling and quilling comb techniques with my latest tutorial || www.ThePaperyCraftery.com

Now, hold on to your hats, folks, because this is a heck of a post.

There are actually two separate projects here: the lily and the lily pad.

Quilling Paper Water Lilies ~ Brush up on your 3D quilling and quilling comb techniques with my latest tutorial || www.ThePaperyCraftery.com

First, let’s tackle the flower.

The lily is comprised of 3-D pale pink petals surrounding a yellow center that is slightly fringed.

Start with the center.

It is going to made in two steps.

First, roll a tight coil from about 25″ of yellow quilling paper.

Quilling Paper Water Lilies ~ Brush up on your 3D quilling and quilling comb techniques with my latest tutorial || www.ThePaperyCraftery.com

As that dries, make a quick fringed strip using a paper fringer or by using the clip technique.

This just means using a binder clip to hold one edge of a strip of quilling paper, and making small snips along the exposed edge.

The clip will stop your scissors from cutting all the way through the strip.

Quilling Paper Water Lilies ~ Brush up on your 3D quilling and quilling comb techniques with my latest tutorial || www.ThePaperyCraftery.com

Gently glue one end of the fringed strip to the yellow coil and wrap, gluing in spots as you go.

Set the completed center aside.

Quilling Paper Water Lilies ~ Brush up on your 3D quilling and quilling comb techniques with my latest tutorial || www.ThePaperyCraftery.com

The rest of the lily flower is made of rows of tight coils that are pinched into teardrops.

For those who have followed me for a while, this might remind you of my paper succulent tutorial from last year.

The first row will be the smallest in size.

I played around with making this layer tow-toned by first rolling 6″ of white into a tight coil, then adding 12″ of pale pink and continuing to roll.

Quilling Paper Water Lilies ~ Brush up on your 3D quilling and quilling comb techniques with my latest tutorial || www.ThePaperyCraftery.com

Take the coil off your tool, and make into a very slight dome.

Pinch into a teardrop, and repeat to make 6 petals.

Quilling Paper Water Lilies ~ Brush up on your 3D quilling and quilling comb techniques with my latest tutorial || www.ThePaperyCraftery.com

The next two rows are made in the same way, except I only used one color.

To make these, glue 2 17″ strips of pale pink together.

Roll, dome and pinch just like the petals in the first row.

You will need 12 total petals of this size for each lily.

Quilling Paper Water Lilies ~ Brush up on your 3D quilling and quilling comb techniques with my latest tutorial || www.ThePaperyCraftery.com

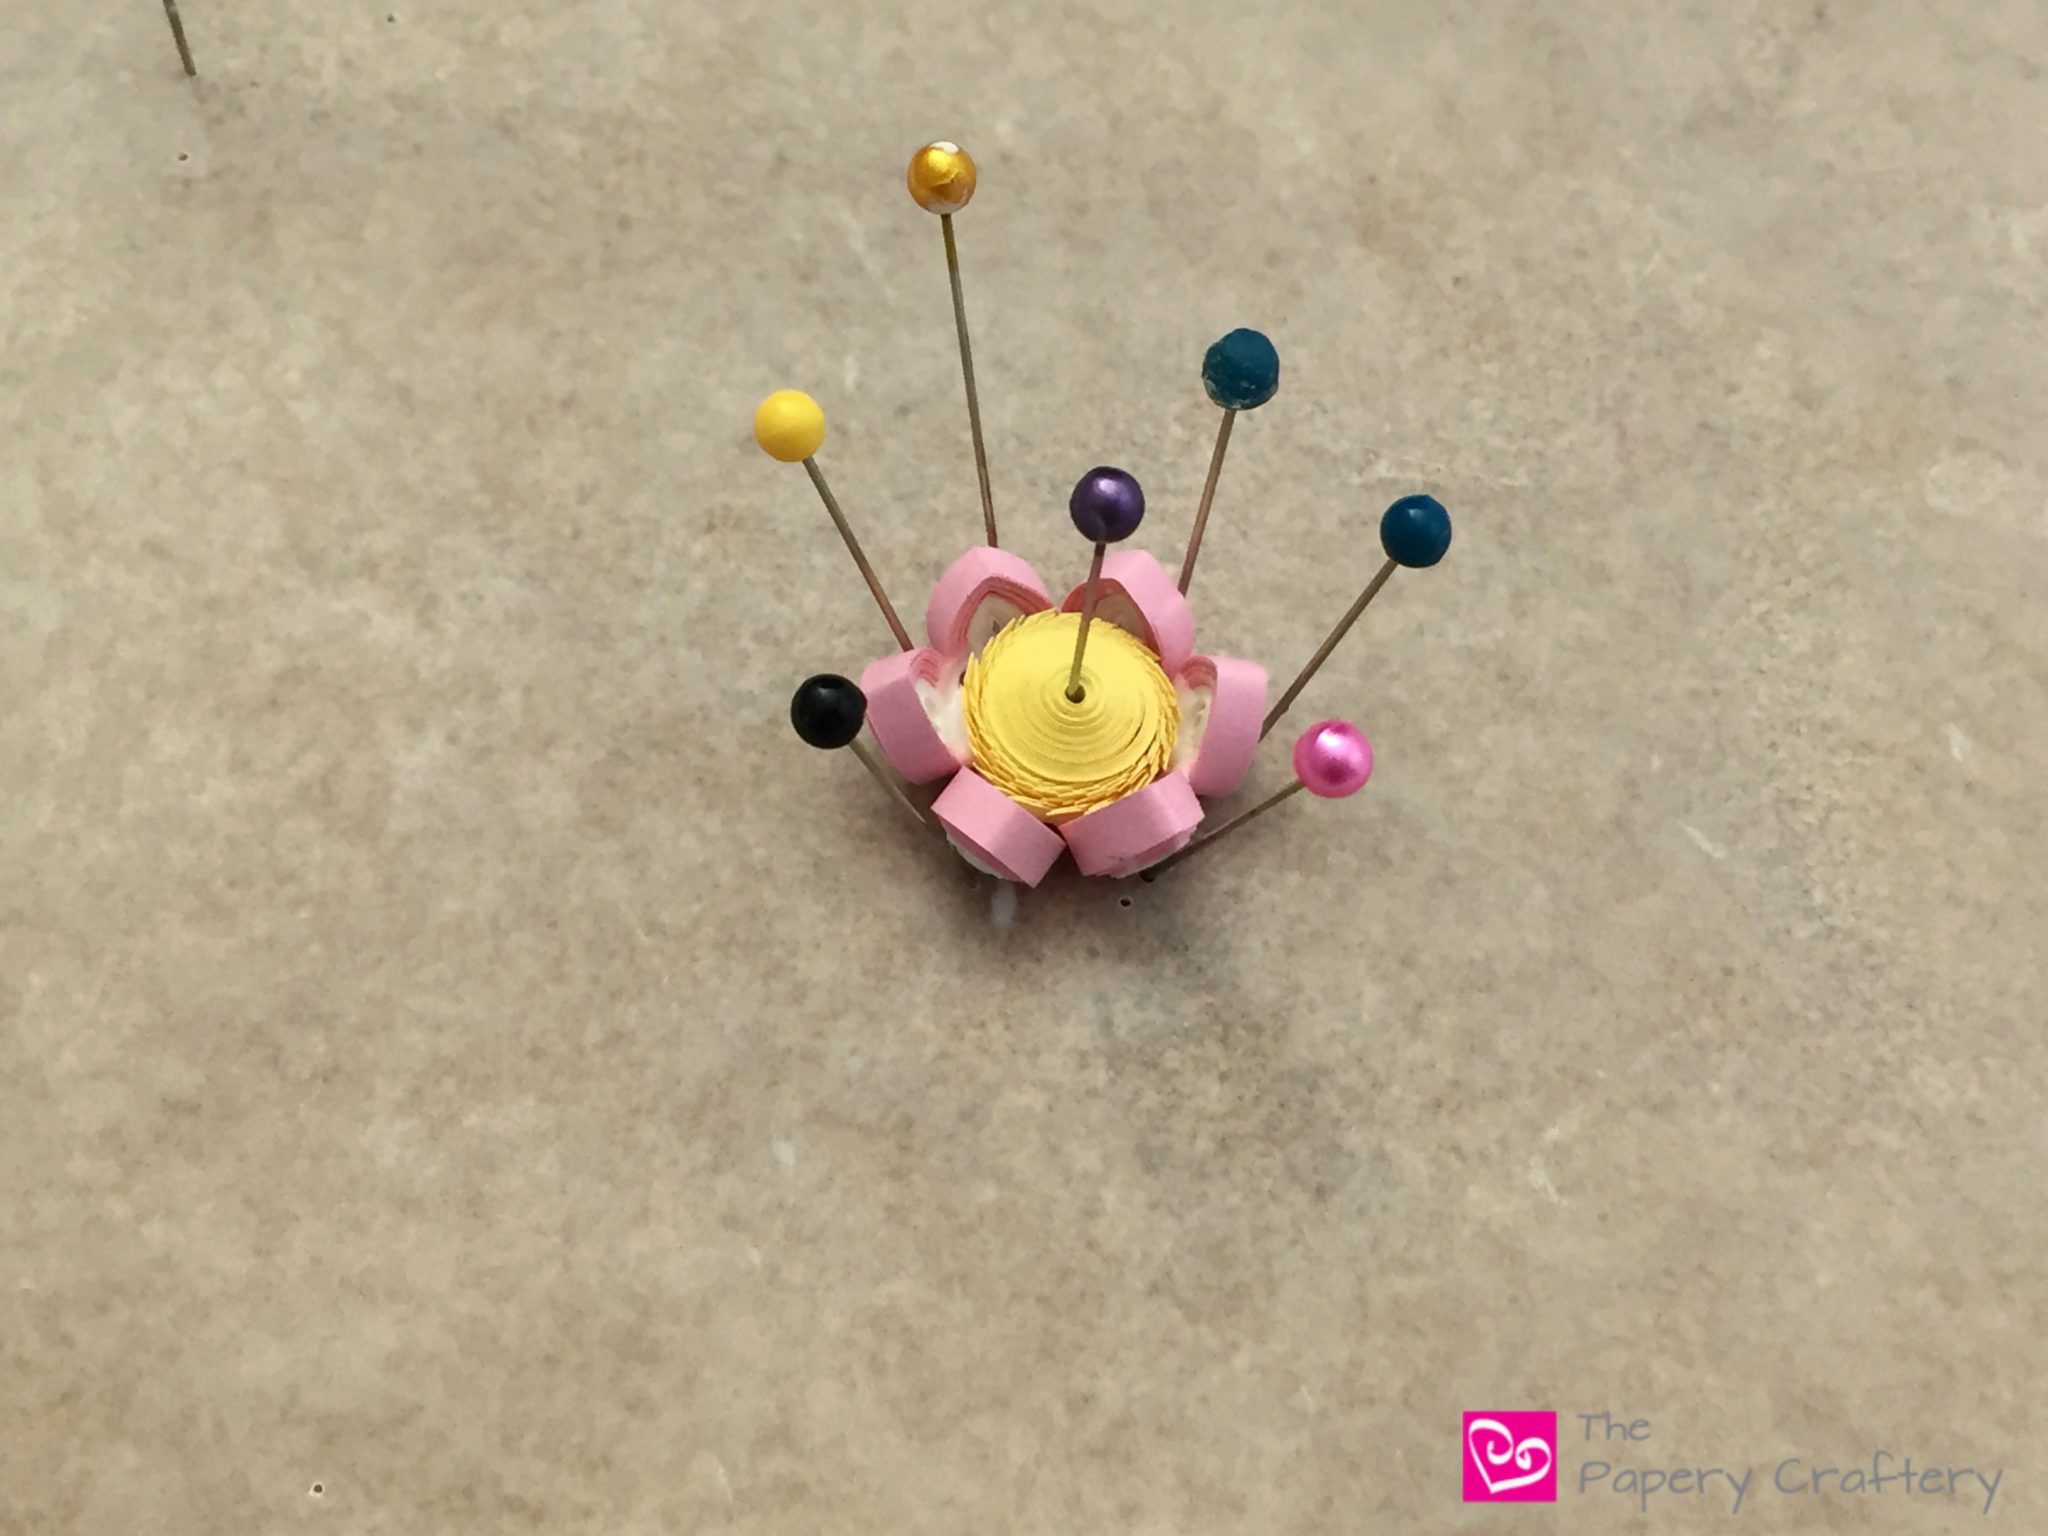
After all your petals are made, start composing the flower.

I like Tacky Glue for crafts like this because of the faster drying time.

It might be helpful if you pin your yellow fringed center in place to keep it from moving around.

Quilling Paper Water Lilies ~ Brush up on your 3D quilling and quilling comb techniques with my latest tutorial || www.ThePaperyCraftery.com

Try gluing the first row so the petals are standing straight up.

Pins can help here, too.

Quilling Paper Water Lilies ~ Brush up on your 3D quilling and quilling comb techniques with my latest tutorial || www.ThePaperyCraftery.com

Once the first layer has dried, the rest of the petals can be glued, as well.

Angle them out more so the flower appears to be opening up.

Quilling Paper Water Lilies ~ Brush up on your 3D quilling and quilling comb techniques with my latest tutorial || www.ThePaperyCraftery.com

Quilling Paper Water Lilies ~ Brush up on your 3D quilling and quilling comb techniques with my latest tutorial || www.ThePaperyCraftery.com


Now for the lily pads!!

I drew up some quick templates to use as a starting point for the lily pads.

They’re a bit more stylized than realistic, but they will work well with the technique I’m going to share.

Just click the image below if you’d like to grab a copy for your own~

Quilling Paper Water Lilies ~ Brush up on your 3D quilling and quilling comb techniques with my latest tutorial || www.ThePaperyCraftery.com

After printing and pinning the lily pad of your choosing to your workboard, grab your quilling comb, needle tool, glue, and your favorite shade of green quilling paper.

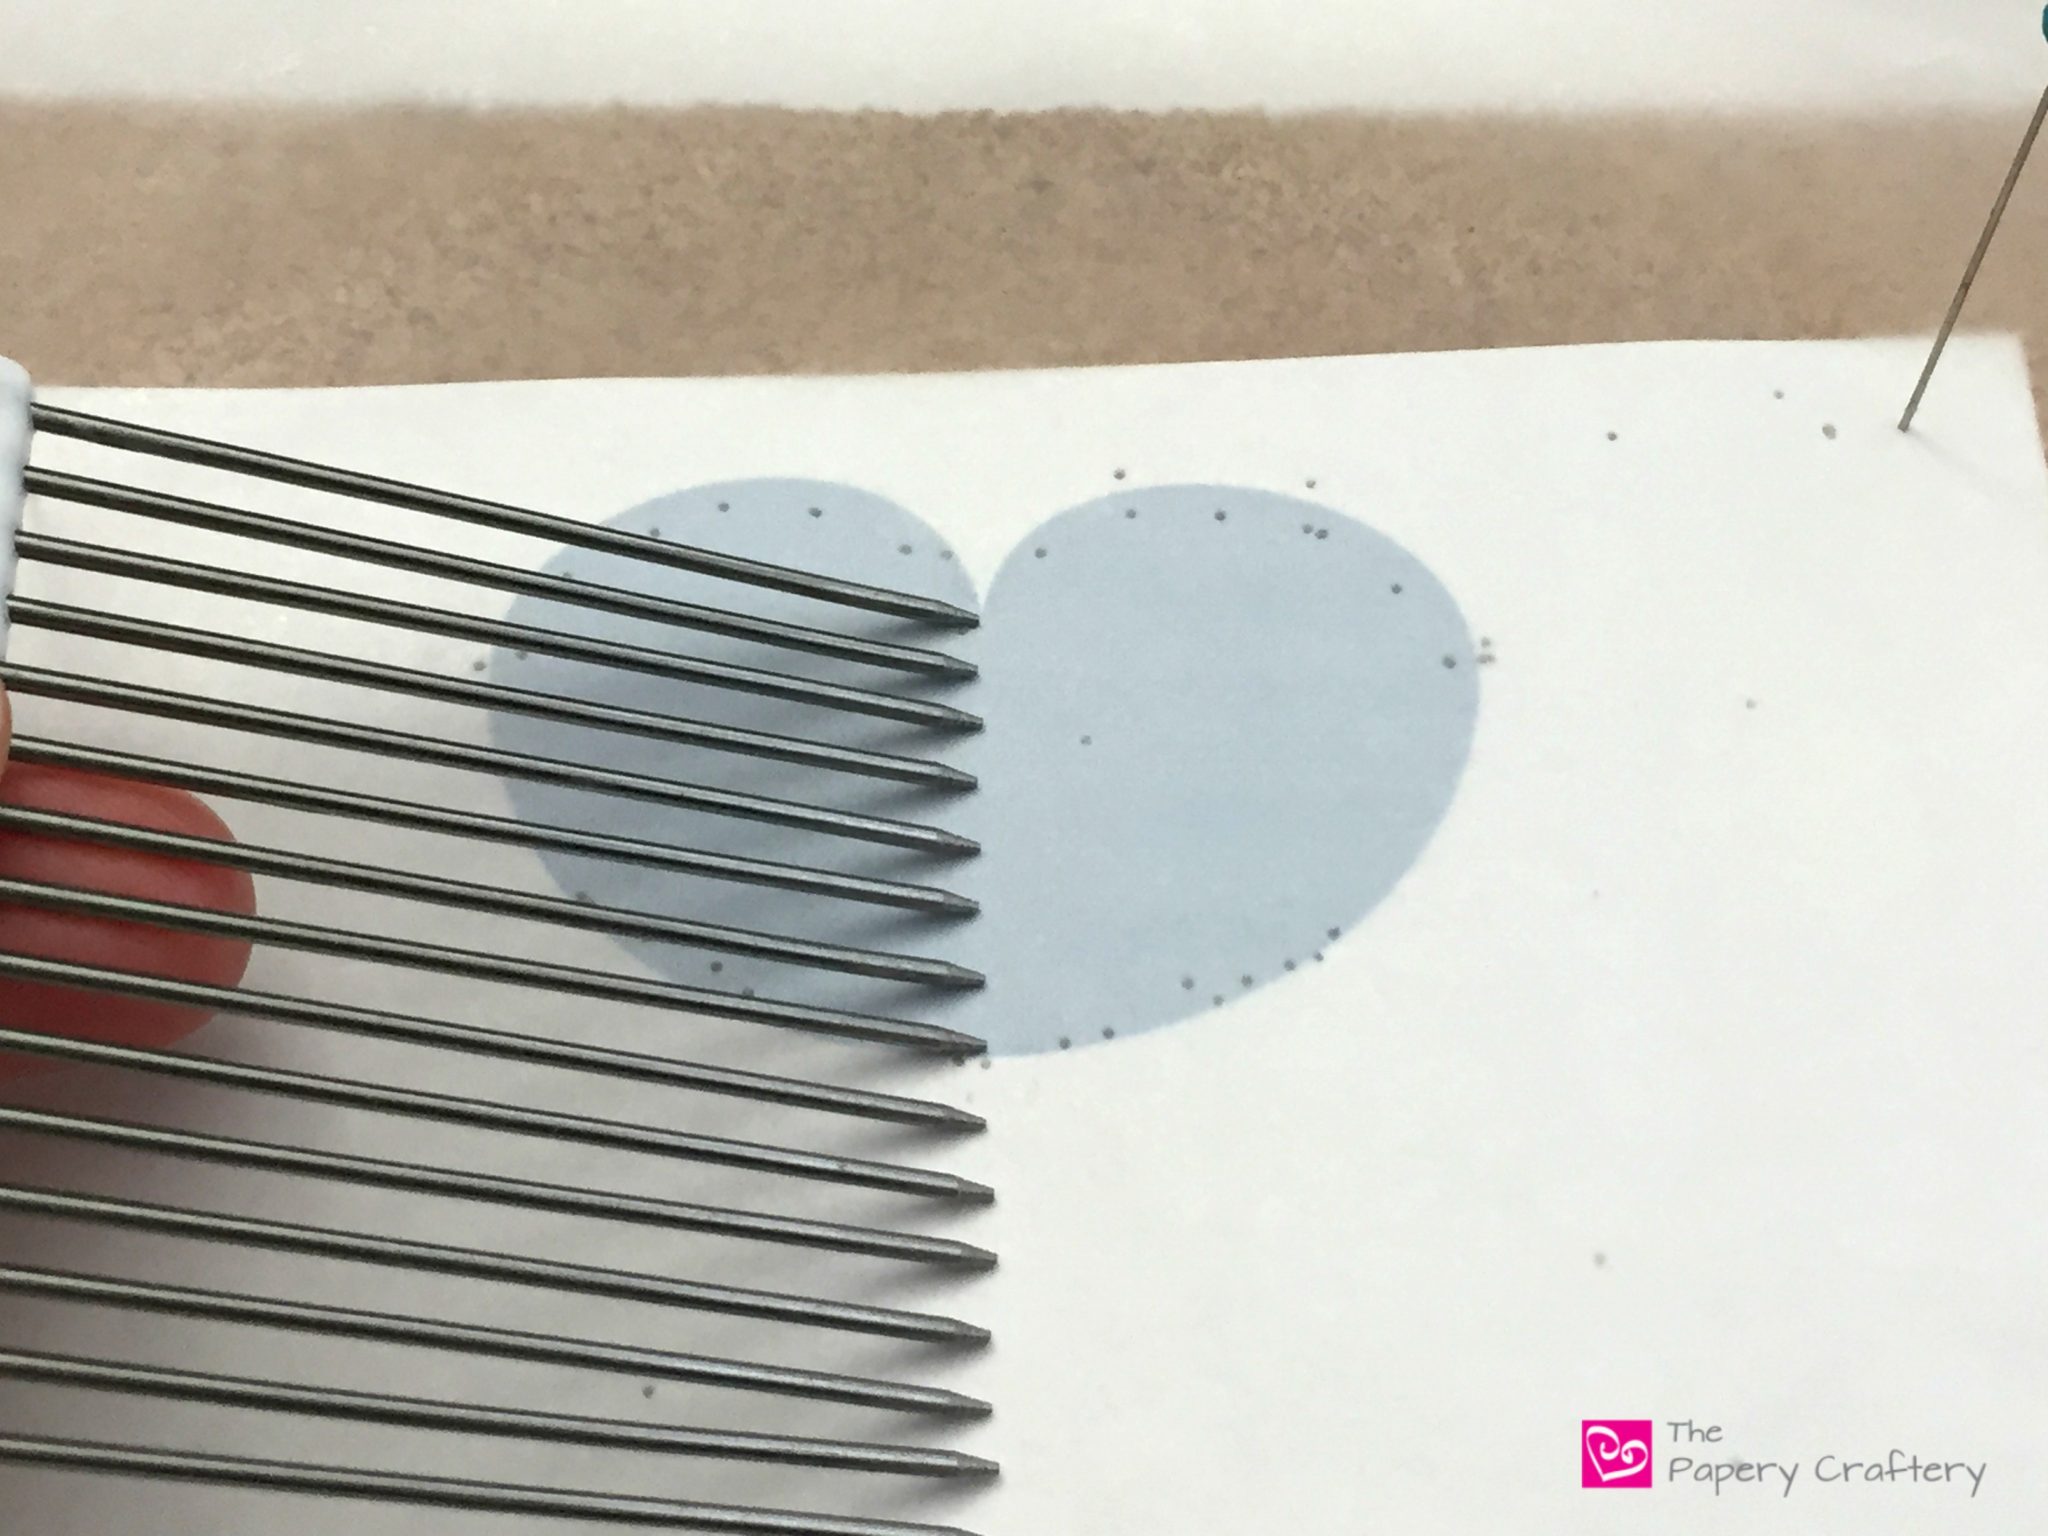
First, hold your quilling comb up to the center of your lily pad.

Now, count the number of teeth that it takes to reach the end of the shape.

This is how many teeth you’ll need to wrap your strip around on your comb to fill in that section of the lily pad.

Quilling Paper Water Lilies ~ Brush up on your 3D quilling and quilling comb techniques with my latest tutorial || www.ThePaperyCraftery.com

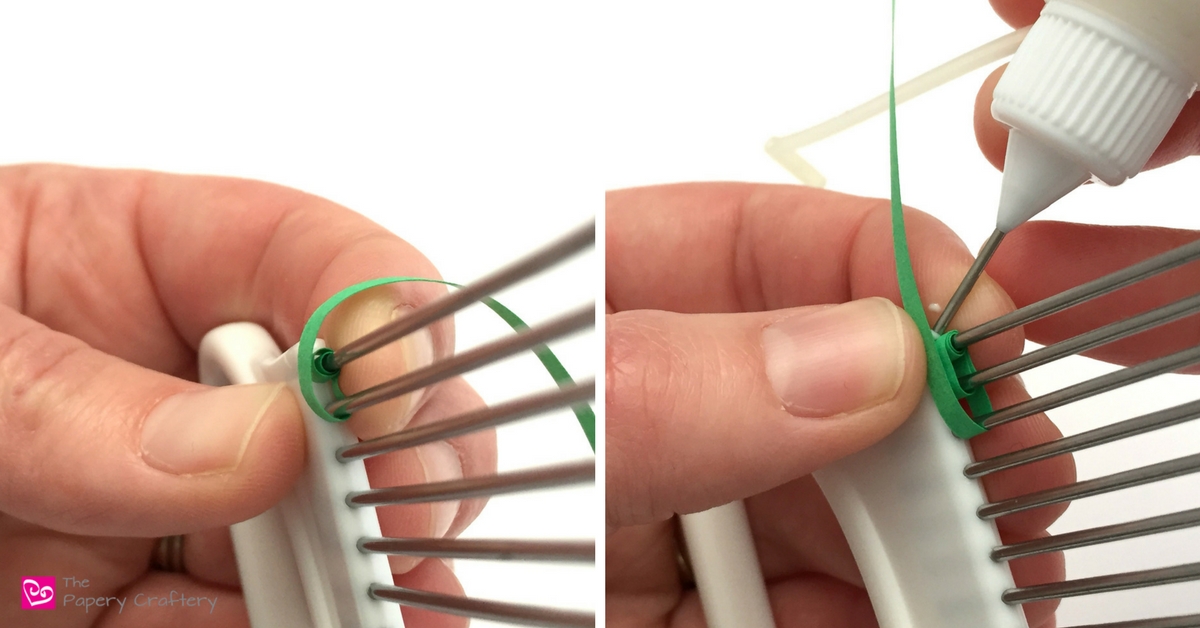
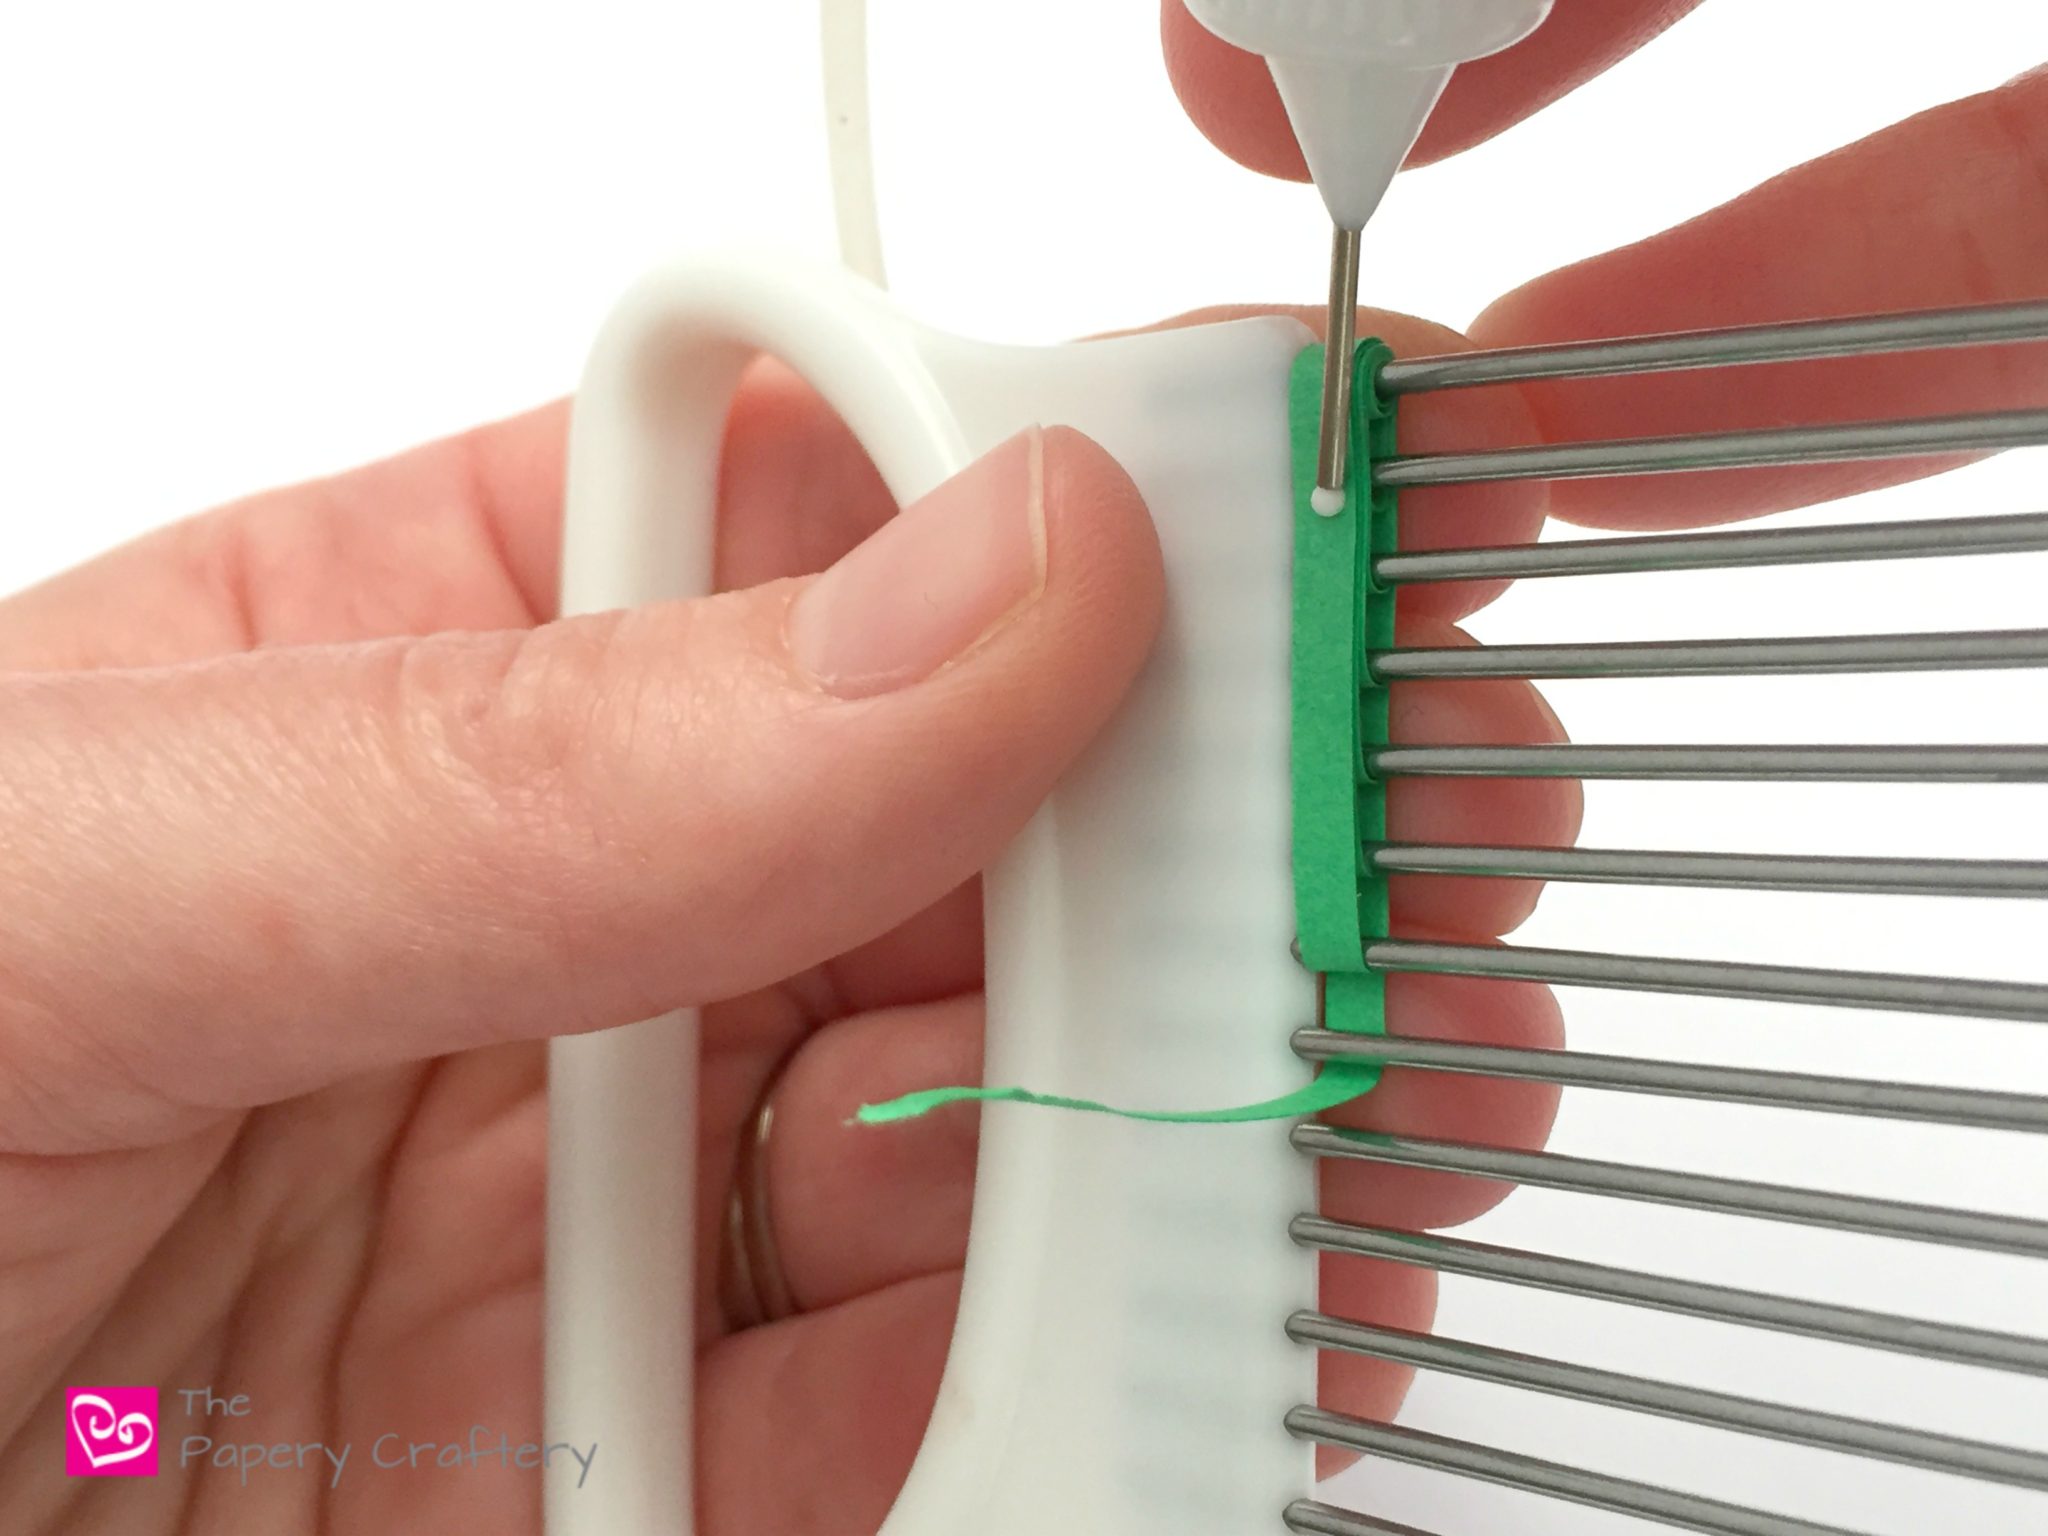
Before you use your comb, roll your strip a little on your needle tool.

Quilling Paper Water Lilies ~ Brush up on your 3D quilling and quilling comb techniques with my latest tutorial || www.ThePaperyCraftery.com

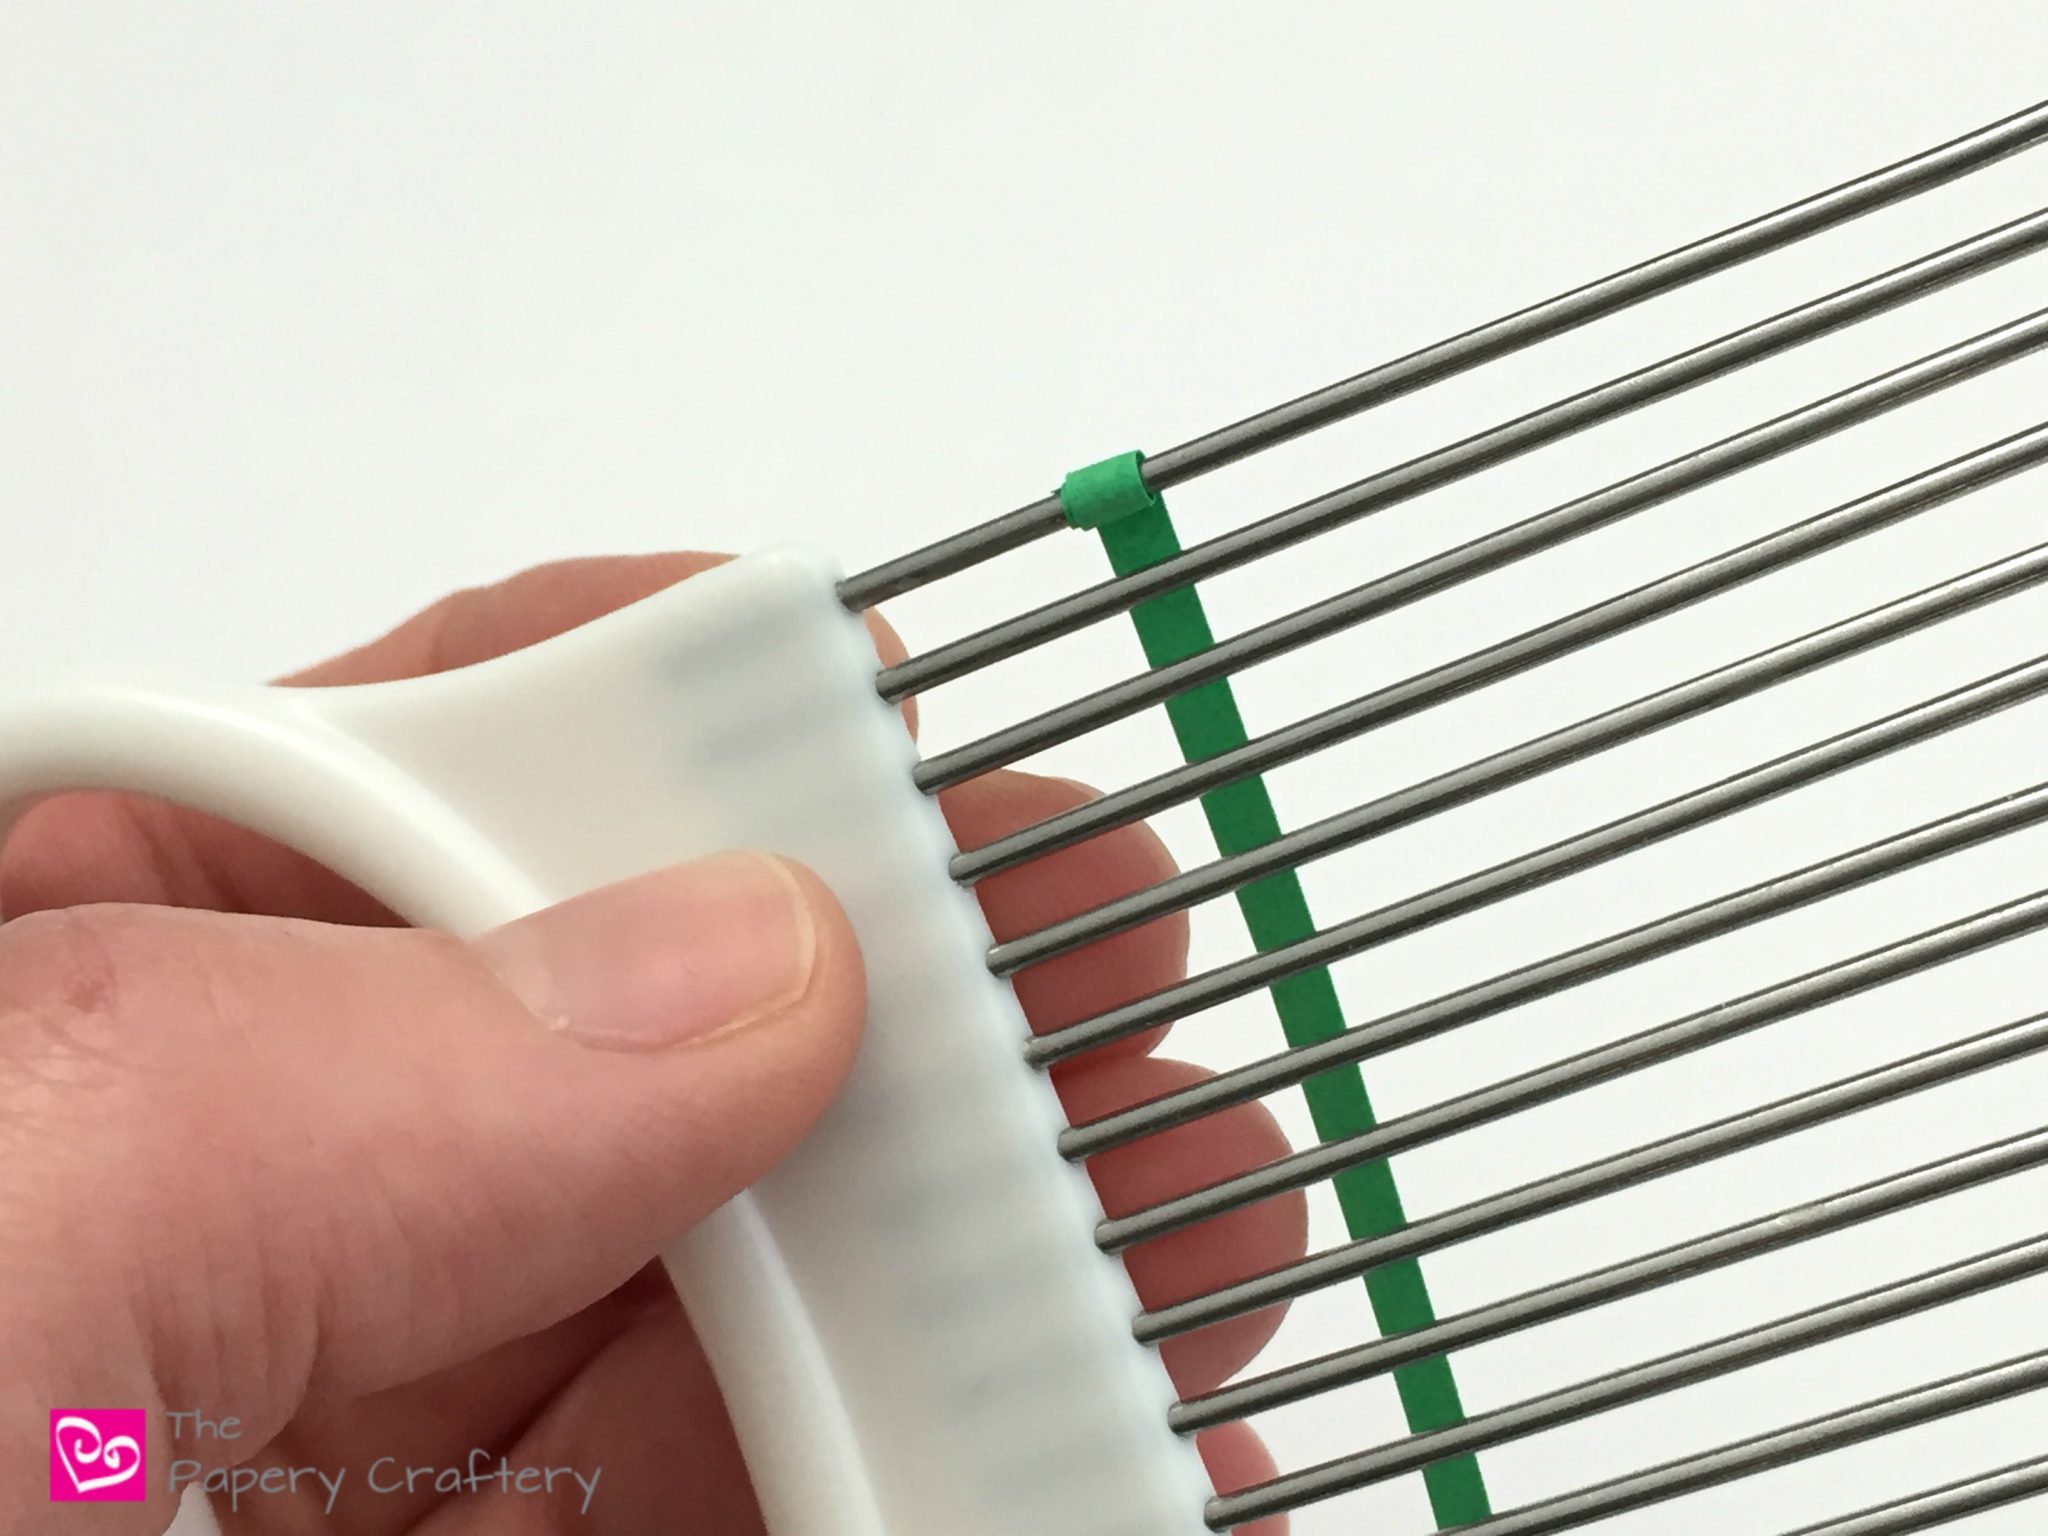
When you remove your strip from your tool, you’ll have a loop to place on the first rung of your quilling comb.

It acts as an anchor to stabilize the quilling paper.

Next, wrap the end of the strip around the next spot on the comb.

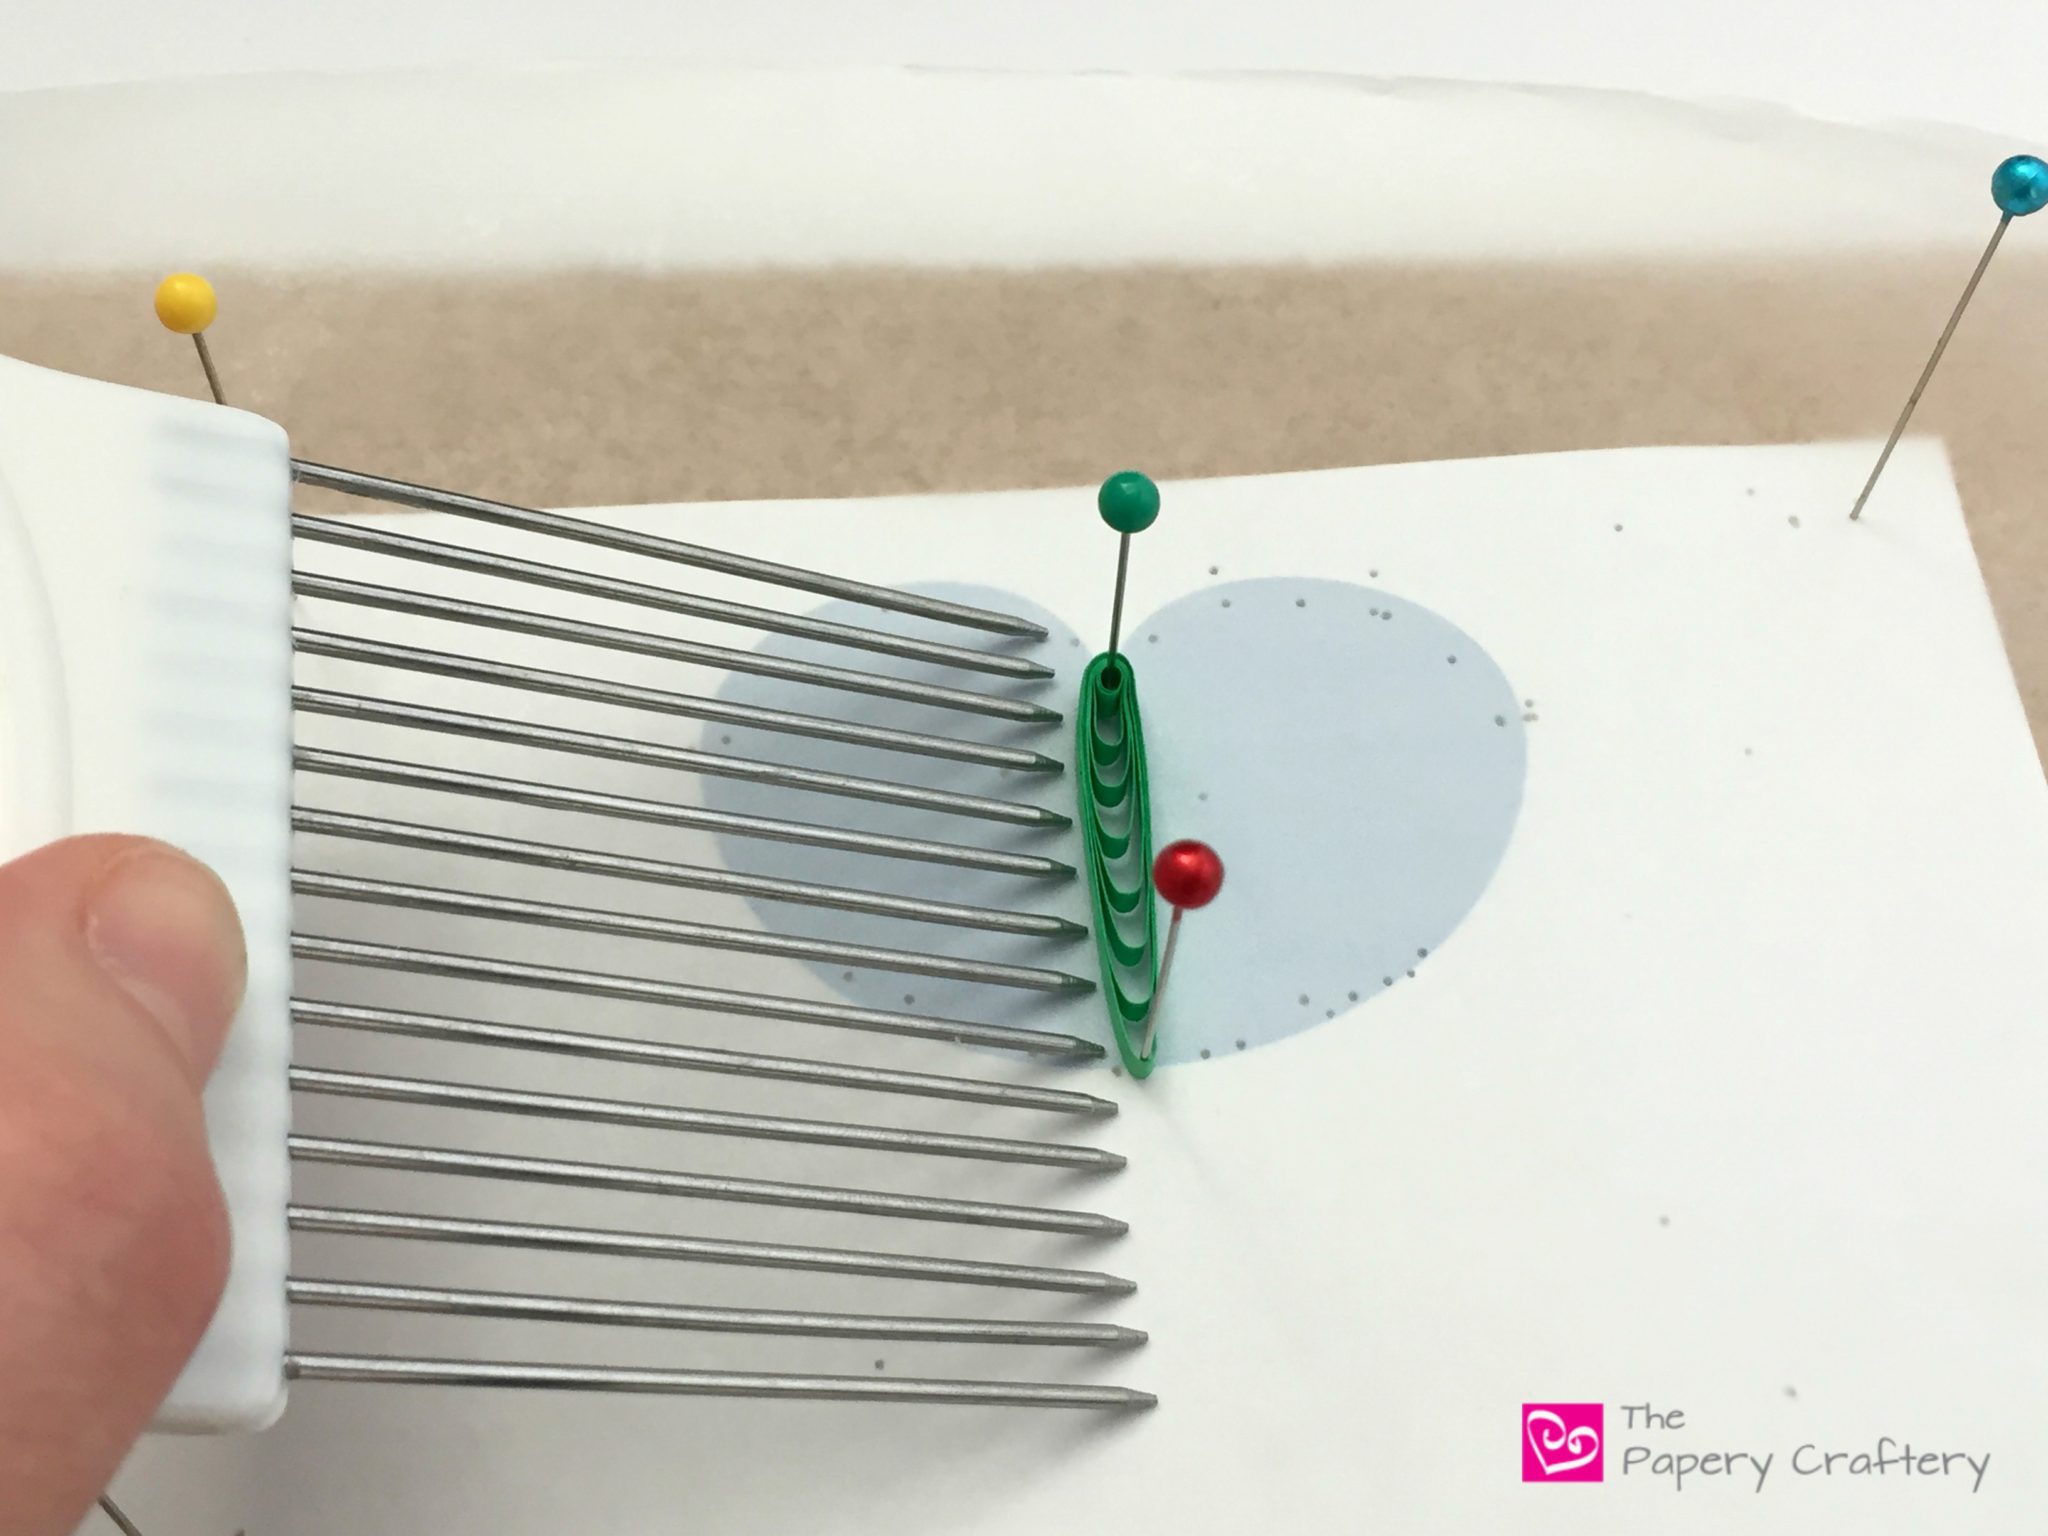
Pull the strip back to the end of the comb again.

Continue in this way, adding an additional tooth on the comb at every pass, until you reach the number that you measured when you lined your comb against the template.

Quilling Paper Water Lilies ~ Brush up on your 3D quilling and quilling comb techniques with my latest tutorial || www.ThePaperyCraftery.com

For example, when I measure with my comb, I need to wrap 8 teeth on my comb to fill in the center of the smallest lily pad.

Bear in mind, the type or brand of comb you use will have different spaces between the teeth, so measure with the tools you have!

Once you have wrapped your strip around the number of teeth that you need for that section, tear off any excess and glue to secure.

Quilling Paper Water Lilies ~ Brush up on your 3D quilling and quilling comb techniques with my latest tutorial || www.ThePaperyCraftery.com

Quilling Paper Water Lilies ~ Brush up on your 3D quilling and quilling comb techniques with my latest tutorial || www.ThePaperyCraftery.com

Line up your looped paper in the center of your template and pin to keep in place.

Continue measuring and wrapping until you fill your lily pad template, adding some glue and using pins, as needed.

TIP: Work from the middle towards the sides to make an even lily pad.

Quilling Paper Water Lilies ~ Brush up on your 3D quilling and quilling comb techniques with my latest tutorial || www.ThePaperyCraftery.com

Quilling Paper Water Lilies ~ Brush up on your 3D quilling and quilling comb techniques with my latest tutorial || www.ThePaperyCraftery.comQuilling Paper Water Lilies ~ Brush up on your 3D quilling and quilling comb techniques with my latest tutorial || www.ThePaperyCraftery.com

Notice that the looped strips start bending towards the center.

This is ideal to fill in the lily pad template completely without spaces between the quilling strips.

Just remember to account for that when measuring with your comb!

When your lily pad is filled, wrap the outer edge with a quilling paper strip a couple times for a finished look.

Quilling Paper Water Lilies ~ Brush up on your 3D quilling and quilling comb techniques with my latest tutorial || www.ThePaperyCraftery.com

After your quilling paper water lilies and lily pads have dried, they’re ready to go!

Quilling Paper Water Lilies ~ Brush up on your 3D quilling and quilling comb techniques with my latest tutorial || www.ThePaperyCraftery.com


Quilling Paper Water Lilies ~ Brush up on your 3D quilling and quilling comb techniques with my latest tutorial || www.ThePaperyCraftery.com

Once again, I apologize for the length of this post, but think of it like a 2 for 1!

Plus, there are plenty of variations to make it your own.

Maybe play with making a dahlia or clematis flower with the same techniques used to make the quilling paper water lilies.

Or change up the shape of your lily pads and add loops of a darker green to make strips of color.

Just play with the techniques and see what you come up with!

And, don’t forget to let me know how it all works out in the comments below!


Print this post

Share this:

  • Click to share on Facebook (Opens in new window)
  • Click to share on Twitter (Opens in new window)
  • Click to share on Pinterest (Opens in new window)
  • Click to print (Opens in new window)

in Quilling, Tutorials # Lily Pad Crafts, Quilling Paper Flowers, Quilling Paper Plants, Water Lily Crafts

Reader Interactions

you may also like
How to Make 3 Quilling Paper Flower Buds
4 Fast Fall Quilling Paper Flowers
Autumn Wreath with Quilling Paper Leaves
Quilling Paper Seahorse

Comments

  1. Pam Davidian says

    April 11, 2018 at 10:11 am

    I love these water lilies! They are so adorable that I can see myself using them in a card for a special friend who loves frogs and lily pads! What paper width did you use? Sometimes I use a width and am not happy with how big the item is when it’s all assembled. I prefer the more delicate look of the lower profile, so just wondering. Perhaps in your future blogs you could include the width of the paper as you do with the lengths? I also checked further back to your paper succulents and I am definitely going to try those. I have older sons that love succulents and these were perfect.

    Thanks again, I look forward to reading your weekly posts!
    Pam

    Reply
    • Meredith says

      April 11, 2018 at 1:37 pm

      Hi Pam! I’m glad you already have a use for this design! Unless I write otherwise, I use 1/8″ strips (mostly because they’re easy to find and I have tons!).

      The finished size of the lily as I made it is about an inch and 3/4 wide. The smallest lily pad on the template is 2 1/2″.

      The lily would be absolutely lovely if made with the smaller 1/16 paper. I would stick with 1/8″ for the center and the fringe, however, to give a stronger starting off point.

      The succulents can be made with thinner paper, too.

      Thanks so much for your questions!

      Reply
  2. Carol W says

    April 11, 2018 at 12:16 pm

    Wow, two major “aha” quilling moments for me and I haven’t even finished reading the post yet! Thanks so much for sharing your tricks of the trade in such clear detail. Drawing out the shape you want to fill and THEN figuring out how many comb teeth to use by –*headsmack*– simply holding the comb up to the shape? Game changer! And anchoring on the comb by first using a tool to roll a tiny bit? *Smack head again.* Can’t wait to put these techniques into use!

    Reply
    • Meredith says

      April 11, 2018 at 1:38 pm

      Carol, you just made my day! I’m so excited to show you something new!

      Reply
  3. Ana Cristina says

    April 11, 2018 at 2:25 pm

    This is so sweet!! The leaves, the flowers, their colors… I love them all!

    Reply
    • Meredith says

      April 11, 2018 at 4:21 pm

      Thanks so much, Ana Cristina!

      Reply
  4. Bronwyn Mitchell says

    April 11, 2018 at 9:15 pm

    Lovely flower and leaf. This may encourage me to use my comb if I can find it!

    Reply
    • Meredith says

      April 12, 2018 at 7:27 am

      Ha! I totally understand. My workspace is a mess right now!

      Reply
  5. LoJa says

    September 9, 2020 at 8:38 am

    This is a perfect project for using my metallic paper!!!! It’s a bit sturdier & it looks beautiful. I made this for my daughter who just finished painting a lily pad canvas. Cute for a picture!! Thanks

    Reply
    • Meredith says

      September 17, 2020 at 9:26 am

      Sounds beautiful!

      Reply

Share your thoughts and leave a comment below! Cancel reply

Primary Sidebar

About Me

Hi there, Paper People! I'm so glad you've stumbled across my corner of the internet. I'll be sharing my favorite quilling tips and tutorials, plus some creative micro-biz pointers, and lots of paper crafting news! Thanks for stopping by!

Looking for a project, technique or tool? Search here!

There’s more on YouTube!

https://youtu.be/35_gat0Gp4w

Top Hits!

Thank you so much for stopping by my site. If you care to throw more support my way so I can continue to make new tutorials, you can do so by buying me a virtual cup of coffee!

Affiliate Policy

Some posts on this blog contain affiliate links.

If you click on the links and make a purchase, I would receive a small compensation to help me finance this site and keep coming up with awesome tutorials and tips! There’s no cost to you and I only ever include links to companies and products that I trust and work with on a regular basis.

All posts with affiliate links are clearly marked.

The Papery Craftery (ThePaperyCraftery.com) blog is a participant in the Amazon Services LLC Associates Program, an affiliate advertising program designed to provide a means for us to earn fees by linking to Amazon.com and affiliated sites.

Cookie Policy
Privacy Policy

I hope you’re inspired by my quilling!

Feel free to use my designs as gifts or for your own personal use. And I’d love any sharing of my photos and projects! All I ask is that all photos remain unaltered and link back to the original post, and please do not attempt to sell my any quilling created from my designs as your own work. Happy Crafting!

Latest on Instagram

thepaperycraftery

thepaperycraftery
It’s time for spring crafting! This week I’m It’s time for spring crafting!  This week I’m sharing 3 ways to make tiny quilling paper flower buds. Perfect to round out your next floral quilling project.  Full video is up now 👆
#quilling #paperflowers #papercrafts #flowers
Quilling paper shamrocks! One of my oldest and v Quilling paper shamrocks!  One of my oldest and very first designs 😍 full how-to’s are up now!  #quilling #papercrafts #paper #stpatricksday
Most of my FAQ’s are about making quilling paper Most of my FAQ’s are about making quilling paper letters - the first of 2 videos with all the tips is up now!  🎥 link in bio 
#quilling #quillingcrafts #paper #monograms #paperletters
Any day I get to pull out my favorite quilling com Any day I get to pull out my favorite quilling comb is a good day  Quilling a paper spider mums full video with all the steps is up on YouTube  🎥 link in bio 
#quilling #quillingcrafts #paper #papercrafts #paperflowers
I know 3D quilling isn’t everyone’s jam, but I I know 3D quilling isn’t everyone’s jam, but I love the magic in creating something realistic out of simple strips of paper 😍  Full video with all the steps is up on YouTube  🎥 link in bio 
#quilling #quillingcrafts #papercraft #blueberries #handmade
Rainy East Coast days call for teeny mushrooms F Rainy East Coast days call for teeny mushrooms  Full video with all the steps is up on YouTube  🎥 link in bio 
#quilling #quillingcrafts #papercrafts #paperart #autumnvibes #handmade
DIY sweet paper cherries 🍒 The full video wit DIY sweet paper cherries 🍒  The full video with all the steps is up on YouTube now  🎥 link in bio 
#quilling #quillingcrafts #papercraft #handmade
The how-to’s on these sweet cherries and blueber The how-to’s on these sweet cherries and blueberries won’t be up on YouTube until Sunday but they’re too cute not to share early 🤩  🎥 link in bio 
#quilling #quillingcrafts #papercrafts #handmade
4 fast fall flowers - use them all together or jus 4 fast fall flowers - use them all together or just choose your favorites 🤩  Full how-to video is up now on YouTube 🎥
#quilling #quillingcrafts #fallcrafts #paperflowers #autumnvibes #linkinbio
Stacks of paper swirls make colorful quilling pape Stacks of paper swirls make colorful quilling paper clouds ☁️ ☁️☁️  Full how-to video is up now on YouTube 🎥
#quilling #quillingcrafts
Wavy flower blossoms come together in minutes 🌸 Wavy flower blossoms come together in minutes 🌸🌸🌸 Couldn’t be easier!  Full how-to video is up now on YouTube 🎥
#quilling #quillingcrafts #paperflowers
Does anyone else have tons of coneflowers piping u Does anyone else have tons of coneflowers piping up in their neighborhood? The colors are 🤩🤩🤩  Full make your own quilling paper coneflower how-to video is up now on YouTube 🎥
#quilling #quillingcrafts
Tiny quilled ladybugs - 2 ways! Full video is up Tiny quilled ladybugs - 2 ways!  Full video is up now on YouTube 🎥
#quilling #quillingcrafts
Simple quilling paper flowers made on a husking bo Simple quilling paper flowers made on a husking board - comes together so quickly!  Full video is up now on YouTube 🎥
#quilling #quillingcrafts #paperflowers
Quilling paper 🤝 Valentine’s Day crafts Hear Quilling paper 🤝 Valentine’s Day crafts  Hearts are one of the simplest quilling shapes to create and I’m sharing 3 ways over on YouTube this week  #quilling #quillingcrafts #quillingforbeginners #papercrafts
There’s still a bit of time to sign up to join m There’s still a bit of time to sign up to join me at the @rebeccajpage Holiday Craft Summit on Monday!  You can learn how to make these mini wreaths and so much more!  See you there!  #quilling #christmascrafts #papercraft 
#holidayseason #holidaycraftsideas
Just over a week until the @rebeccajpage Holiday C Just over a week until the @rebeccajpage Holiday Craft Summit. I’ll be there sharing these mini quilling paper wreaths!  Join me by signing up with the link in my bio 🎄🎄🎄  #quilling #holidaycrafts #christmascrafts #craftersofinstagram #papercrafts
🔔 It’s almost time to ring in the holidays! 🔔 It’s almost time to ring in the holidays!  🔔 I have a playlist on my YouTube channel all about winter and Christmas quilling - featuring these bells, evergreen trees, ornaments, and more!  🔔 Look for the link in my bio  #quilling #papercraft
#christmascrafts #bells
Just making things out of paper over here #quillin Just making things out of paper over here #quilling #papercraft
🎄Big news! I’m so excited to announce that I’m going to be a part of the upcoming @rebeccajpage FREE Holiday Craft summit on November 29 - December 3.  🎄There will be more than 35 crafters sharing holiday gift and decor ideas - I’ll be sharing an exclusive quilling paper wreath project!  🎄Follow the link in my bio for all the details and to sign up 👆  I’ll see you there!  #quilling #papercrafts #christmascrafts
#holidaycrafts
Load More... Follow on Instagram
2021 © Meredith Amand Designs
made by soulmuse