• Skip to main content
  • Skip to primary sidebar

The Papery Craftery

Quilling and Other Fun Paper Things

  • Quilling Basics
  • Quilling
    • Tutorials
    • Free Quilling Templates
    • Quilling Tools and Supplies
    • Papercraft and Quilling Videos
  • Crafts
    • Quilling and Craft Printables
    • Paper Crafting News
    • Other Fun Things
  • Shop My Favorite Supplies
  • About and Disclosures
  • Contact

Using a Quilling Paper Mold

November 16, 2017

I’ve come to a realization recently.

I figured out that as much as I enjoy coming up with quilling paper tutorials for my blog, I’m pretty sure that writing about and reviewing quilling tools comes in a real close second.

I love finding new and efficient ways to create my quilling designs, and there are so many available out there!

While there are some fun gizmos that can be really useful to your quilling, there are also be a bunch that might not be worth your time or money.

This week, though, I’m going recommend one of my favorite tools, and give some tips on using a quilling paper mold.

This post contains affiliate links. If you click on the links below and make a purchase, I may receive a small compensation to help me finance this site and keep coming up with awesome tutorials and tips! There’s no cost to you and I only ever include links to companies and products that I trust and work with on a regular basis. 


How to Use a Quilling Paper Mold for 3D Domes - Start making mini domes and bowls with a mold -- www.thepaperycraftery.com

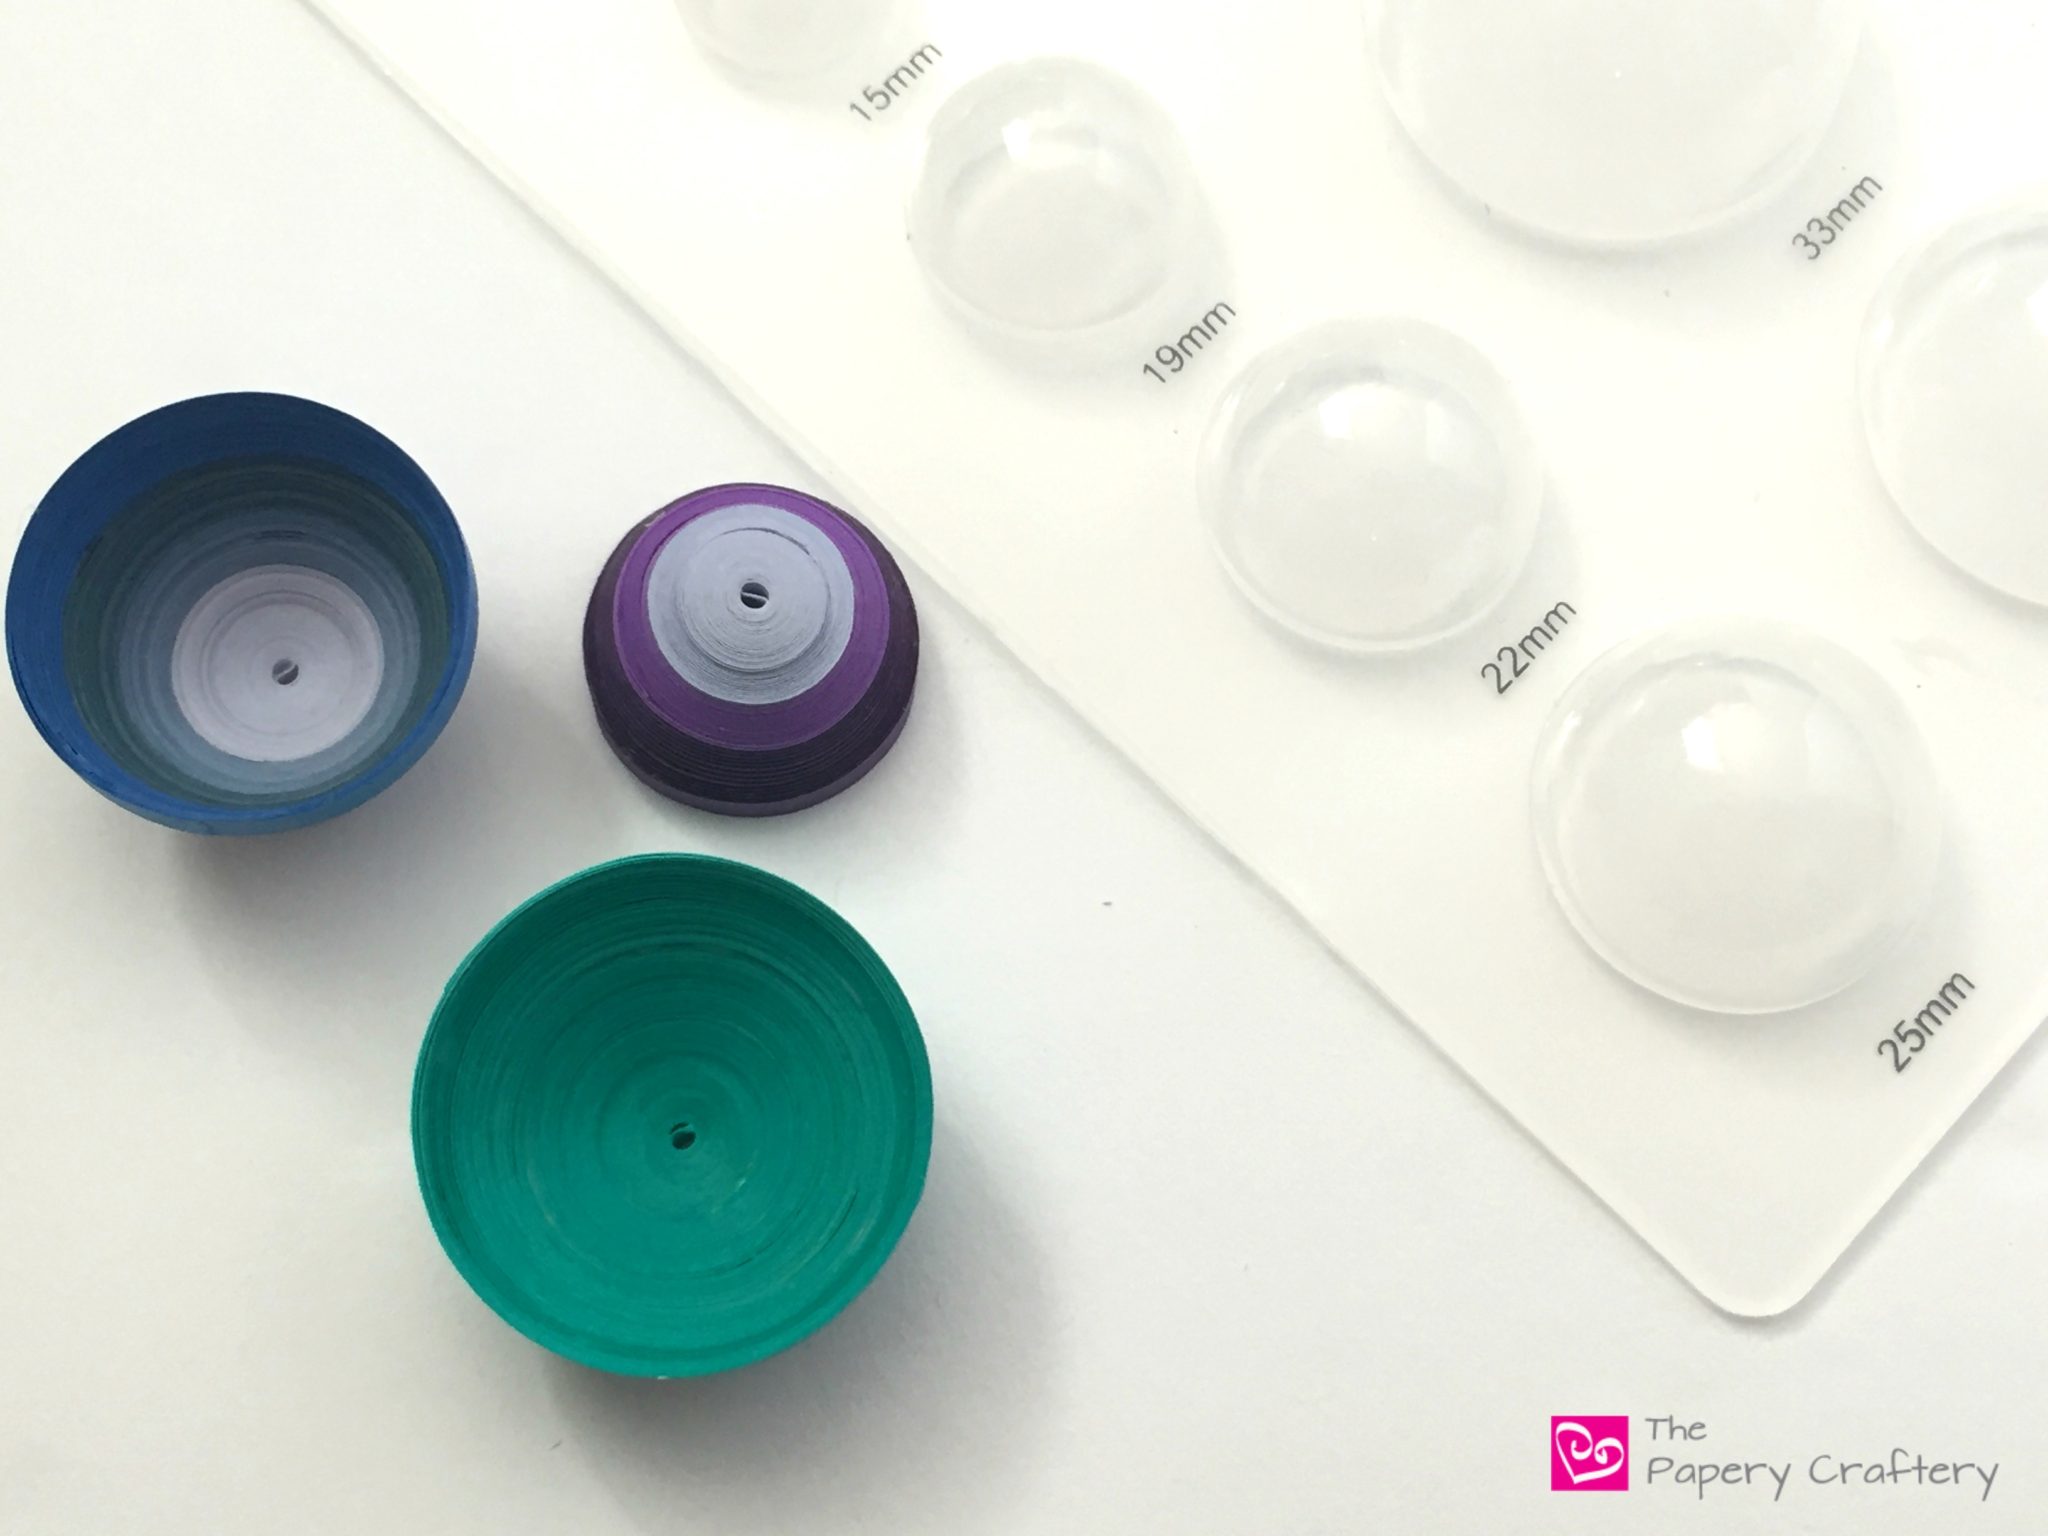
Quilling molds are handy for creating uniform 3-dimensional domes.

Of course, it is totally possible to make domes without a specific tool, but when you’re looking to create many that are the same size, a mold can be really convenient.

The quilling paper mold that I have is pretty simple in design.

It is a thin piece of plastic, about 8 inches tall by about 4 inches wide, and it has 2 rows of raised bubbles of various sizes.

Mine is clear, but I’ve seen them in other colors, too.

How to Use a Quilling Paper Mold for 3D Domes - Start making mini domes and bowls with a mold -- www.thepaperycraftery.com

Using a quilling paper mold isn’t difficult, at all.

Simply roll a tight coil in the color of your choosing. Remember, if you need to, glue some strips end to end to make a larger coil.

When your tight coil is the size you need, place it on top one of the domes.

The size of your coil will correspond to the end size of your dome.

Place your thumb and index finger in the center of your coil.

With even pressure, move your fingers to the outside of the coil while pushing down gently.

How to Use a Quilling Paper Mold for 3D Domes - Start making mini domes and bowls with a mold -- www.thepaperycraftery.com

The coil should form itself to the dome with more or less even spaces between all the rings in your coil.

It might not go all the way to the bottom of the plastic dome shape, but that’s ok.

How to Use a Quilling Paper Mold for 3D Domes - Start making mini domes and bowls with a mold -- www.thepaperycraftery.com

Take your paper off the mold, and just like that, you’ve got a paper dome.

How to Use a Quilling Paper Mold for 3D Domes - Start making mini domes and bowls with a mold -- www.thepaperycraftery.com

To keep your dome in shape, run some white glue all over and spread it around with a thin paintbrush.

TIP: Apply the glue to the side you’re not planning on being visible in your finished design. You never know if your glue is going to dry in a gloppy way and could be noticeable if you don’t plan ahead to hide it.

How to Use a Quilling Paper Mold for 3D Domes - Start making mini domes and bowls with a mold -- www.thepaperycraftery.com


Once you’ve gotten the basics down, have some fun!

Use a few different colors of quilling paper to make some bright stripes ~

How to Use a Quilling Paper Mold for 3D Domes - Start making mini domes and bowls with a mold -- www.thepaperycraftery.com

Or try a lovely ombre effect!

How to Use a Quilling Paper Mold for 3D Domes - Start making mini domes and bowls with a mold -- www.thepaperycraftery.com

Turn your dome into an easy flower pot by pushing the bottom of your dome on a flat surface after it’s molded.

I made a bunch of pots like these for my quilling paper succulents!

How to Use a Quilling Paper Mold for 3D Domes - Start making mini domes and bowls with a mold -- www.thepaperycraftery.com

If you’re looking to make an entire sphere, simply make 2 domes of the same size and glue them together.

I like to run another strip of paper around the seam to make a more finished look.

Check out this post on quilled cherries for more details!

How to Use a Quilling Paper Mold for 3D Domes - Start making mini domes and bowls with a mold -- www.thepaperycraftery.com

I tried to find a link to the exact quilling mold that I’m using, but I can’t seem to find it online anywhere!

But here’s one that is really similar


Here’s one with some cone-shaped molds as well!


How to Use a Quilling Paper Mold for 3D Domes - Start making mini domes and bowls with a mold -- www.thepaperycraftery.com

All in all, I think a quilling mold is a great tool.

I’ve been having a great time incorporating 3-dimensional elements into my quilling lately and when I’m using a quilling paper mold, my domes are much more consistent and even.

Have you ever used a mold in your quilling projects?

How have they worked for you? Do you have any molding tricks you can share?

Leave a comment below!


Print this post

Share this:

  • Click to share on Facebook (Opens in new window)
  • Click to share on Twitter (Opens in new window)
  • Click to share on Pinterest (Opens in new window)
  • Click to email a link to a friend (Opens in new window)
  • Click to print (Opens in new window)

in Quilling, Quilling for Beginners, Quilling Tools and Supplies # quilling paper mold, quilling paper tool review

Reader Interactions

you may also like
How to Make Quilling Paper Bluebells
How to Make 3 Quilling Paper Flower Buds
4 Fast Fall Quilling Paper Flowers
Autumn Wreath with Quilling Paper Leaves

Comments

  1. connie karkenny says

    November 21, 2017 at 3:13 am

    hi love quilling you have great things on your site I just started so I love the way you show how to do things

    Reply
    • Meredith says

      November 21, 2017 at 10:30 am

      Thanks so much Connie! If you ever have any questions or need something explained, please let me know. Happy crafting!

      Reply
  2. Robin says

    February 7, 2018 at 8:05 am

    Thanks for the tutorial. I’ve ruined a few domes with my long fingernails so I have to be very attentive when I’m shaping them. 🙂

    Reply
    • Meredith says

      February 7, 2018 at 8:43 am

      I bet long nails do make domes a little tricky! I’ve used pens and paintbrush handles to push out my centers too, so that could help if you don’t have a mold yet.

      Reply
  3. Jennifer Smith says

    January 14, 2020 at 1:51 pm

    so what do you use the dom for once its made

    Reply
    • Meredith says

      January 15, 2020 at 7:49 pm

      I’ve used them for little flower pots at times, but most often they’re the start of a 3D quilling project of some kind. I’ve made a bunch on this site in the past.

      Reply
  4. Joan Nelson says

    April 25, 2020 at 12:28 pm

    Thanks Meredith. You speak very clearly & your explanations are easy to follow especially when you add those little side notes about ways that things can go wrong!! Thanks again. Love The Paper Craftery.

    Reply
    • Meredith says

      April 25, 2020 at 12:44 pm

      Thank you for the nice words, Joan!!

      Reply
  5. Joyce says

    October 18, 2020 at 1:47 pm

    Thanks for this great site. I am wondering how long your initial paper strip needs to be to create a 12 mm dome.

    Reply
    • Meredith says

      October 19, 2020 at 3:32 pm

      I don’t know that exact measurement offhand, but a 12mm dome is fairly small. I would start with about 30 inches in length and see how that works. You can always add more paper to your tight coils if they’re not big enough.

      Reply
  6. Niki says

    February 21, 2021 at 1:29 pm

    Hi Meredith, I wanted to share my recent attempt at moulding a border, with mixed results!! The plan was to use them on greetings cards. I used cookies cutters and shaped around them holding in place with pins on a cork board, the more intricate shaped one lost definition on one edge, the darker blue one didn’t come out too bad I thought. Have you ever tried anything such as this, any recommendations for better results? I’ve taken pictures but not able to attach to the comment.

    Reply
    • Meredith says

      February 22, 2021 at 9:06 pm

      Great idea! I’ve heard of something similar but never tried it myself.

      Reply

Share your thoughts and leave a comment below!Cancel reply

Primary Sidebar

About Me

Hi there, Paper People! I'm so glad you've stumbled across my corner of the internet. I'll be sharing my favorite quilling tips and tutorials, plus some creative micro-biz pointers, and lots of paper crafting news! Thanks for stopping by!

Looking for a project, technique or tool? Search here!

There’s more on YouTube!

https://youtu.be/kndglSrYWKg

Top Posts & Pages

  • Quilling Paper Sunflowers
    Quilling Paper Sunflowers
  • How to Store Quilling Paper
    How to Store Quilling Paper
  • The 4 Types of Glue Every Quilling Artist Needs
    The 4 Types of Glue Every Quilling Artist Needs
  • Quilling Paper Rainbow Umbrella
    Quilling Paper Rainbow Umbrella
  • How to Make Quilling Paper Swirls
    How to Make Quilling Paper Swirls
  • How To Make Simple Quilling Paper Flowers: Lily of the Valley
    How To Make Simple Quilling Paper Flowers: Lily of the Valley

Thank you so much for stopping by my site. If you care to throw more support my way so I can continue to make new tutorials, you can do so by buying me a virtual cup of coffee!

Affiliate Policy

Some posts on this blog contain affiliate links.

If you click on the links and make a purchase, I would receive a small compensation to help me finance this site and keep coming up with awesome tutorials and tips! There’s no cost to you and I only ever include links to companies and products that I trust and work with on a regular basis.

All posts with affiliate links are clearly marked.

The Papery Craftery (ThePaperyCraftery.com) blog is a participant in the Amazon Services LLC Associates Program, an affiliate advertising program designed to provide a means for us to earn fees by linking to Amazon.com and affiliated sites.

Manage Cookie Preferences

Cookie Settings
Privacy Policy

I hope you’re inspired by my quilling!

Feel free to use my designs as gifts or for your own personal use. And I’d love any sharing of my photos and projects! All I ask is that all photos remain unaltered and link back to the original post, and please do not attempt to sell any quilling created from my designs as your own work. Happy Crafting!

thepaperycraftery

Quilling paper aster flowers The full video with Quilling paper aster flowers  The full video with all the steps is up on my YouTube now 👆follow the link above ⭐️
A quick before and after of the flower project I s A quick before and after of the flower project I shared this week - simple flowers with black stripes!  The full video with all the steps is up on my YouTube now 👆follow the link above 🩷
Queen Anne’s lace flowers with quilling paper | Queen Anne’s lace flowers with quilling paper | Full video is up now with all the details so you can make your own
So tiny and spiky. So tiny and spiky.
Super simple quilling paper seashells | Full video Super simple quilling paper seashells | Full video with all the steps is up now!
Throwback to a project from a couple years back - Throwback to a project from a couple years back - quilling paper dandelions! 
Watch the full video on YT to learn how to make your own 👆  #quilling #paperflowers #crafts
Teeny paper starfish are a great way to practice m Teeny paper starfish are a great way to practice making quilling triangles - 
Watch the full video on YT to learn how to make your own 👆  #quilling #papercrafts #ocean #crafts
Playing with wider paper strips this week to make Playing with wider paper strips this week to make quilled chamomile flowers 
Watch the full video on YT to learn how to make your own 👆  #quilling #paperflowers
This week we’re practicing making cones for thes This week we’re practicing making cones for these sweet little bluebells! 
Watch the full video on YT to learn how to make your own 👆  #quilling #paperflowers #crafts
Mix it up with a little mixed-media quilling! W Mix it up with a little mixed-media quilling! 
Watch the full video to learn all the steps to make your own folk art flowers👆  #quilling #paperflowers
Gift tag idea 💡 make your own quilling paper Ch Gift tag idea 💡 make your own quilling paper Christmas lights! 
Watch the full video to learn all the steps to make your own! 👆  #quilling #papercraft #christmascrafts #cardmaking
This week I’m sharing snow topped evergreen tree This week I’m sharing snow topped evergreen trees made from quilling paper 🎄 
Watch the full video to learn how to make your own with just a few steps! 👆  #quilling #papercrafts #christmascrafts
Mini quilling paper ornaments are up on the YT cha Mini quilling paper ornaments are up on the YT channel now! 
See the full video for all the steps and how-to’s 👆  #quilling #papercrafts #christmascrafts
Tiny quilling snowmen ready to hand over the perfe Tiny quilling snowmen ready to hand over the perfect gift! 
See the full video for all the info and how-to’s 👆  #quilling #papercrafts #christmascrafts
Simple quilling paper pansy flowers! See the fu Simple quilling paper pansy flowers! 
See the full video for all the steps and details on the supplies! Click the link in my bio👆  #quilling #paperflowers #crafting
Have you ever added paint to your quilling? It can Have you ever added paint to your quilling? It can add a bit of depth and detail to your paper flowers! 
See the full video for all the info and how-to’s 👆  #quilling #papercrafts #paperflowers #watercolor
Super quick quilling paper Black Eyed Susans- a co Super quick quilling paper Black Eyed Susans- a couple simple shapes and they come together in no time! 
The full video is up now 👆  #quilling #papercrafts #paperflowers
Big, bright tropical flowers made with a paper cri Big, bright tropical flowers made with a paper crimper and a quilling comb 
The full video is up now 👆  #quilling #papercrafts #paperflowers
How to make quilling paper ice cream cones 🍦 How to make quilling paper ice cream cones 🍦 
The full video is up now 👆  #quilling #papercrafts #crafting
So simple! Learn to make bunches of sweet quilling So simple! Learn to make bunches of sweet quilling paper lilac flowers and leaves ~ 
The full video is up now 👆  #quilling #paperflowers #papercrafts
Load More Follow on Instagram
2021 © Meredith Amand Designs
made by soulmuse