
So, some real talk about my quilling paper journey.
When I first started studying and practicing quilling, I was super intimidated by swirls. Those beautiful, swoopy designs formed from multiple strips of quilling paper.
I didn’t understand how they were made and I thought I never would.
But, I watched a few videos, and one day…click. I got it.
And, of course, they were much easier than I was making them out to be.
So now its time to pass that info on to you and solve the great mystery that is how to make quilling paper swirls.

Like I said above, quilling paper swirls are made from a few strips of quilling paper.
I would say use at least three. For all my examples, I used four. It’s also a good idea to keep the strips you choose to work with all the same length as you begin.

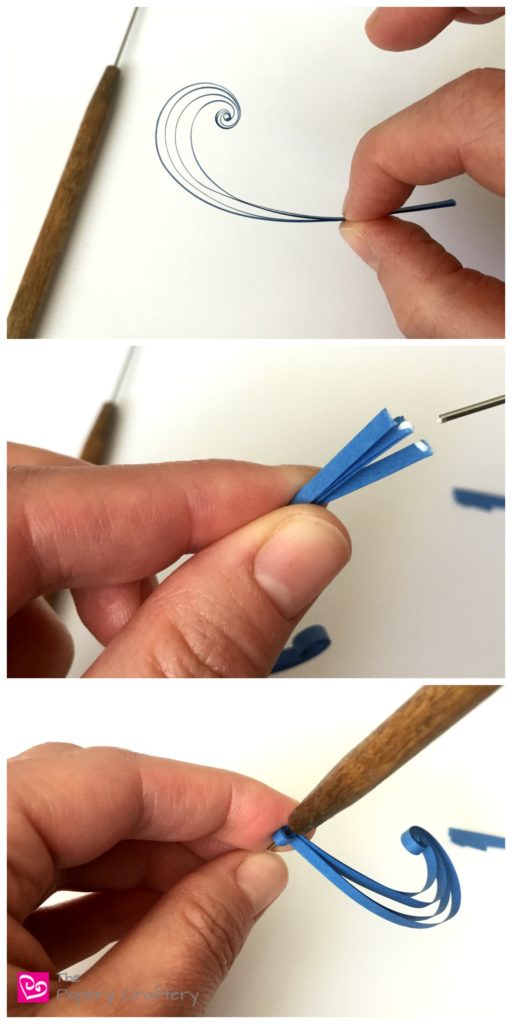
To begin, stack the strips on top of each other. I would recommend using torn edges, as the glue hold better and the center of the swirl will be smoother.
Apply the tiniest amount of glue between the layers of paper, just on the edge of each strip.
Smooth the stack of strips with your fingers to ensure they are straight and haven’t gone crooked when you applied the glue.
As soon as you can, roll the stack around your tool, starting with the end that has been glued. I find that if I start rolling before the glue is dry, my finished swirl looks much more polished.
It is a little different to roll a stack of strips around a tool, as opposed to a single strip. If you’re having trouble getting the paper to go around the tool, try pushing the stack down with your finger. This is the step that takes the most practice. Don’t give up!
TIP: Roll the end of your swirl around a needle tool, or on the outside of a slotted tool. A skewer, pen, or the handle of a tool can be used as well for a larger swirl.
How much of the stack that you roll will depend on your use, but usually, you’ll roll almost the entire length, leaving a small tail.

The simplest type of a quilling paper swirl is just essentially a thicker scroll made by rolling a stack of a few strips together.
After getting the coil to the size and shape you want, apply a little glue between the layers of paper on the tail end.
Then, cut or tear all the strips at the same place, right where the glue ends.
The result is a thin tendril that looks best with a bunch of other swirl work.

Next, open your swirls up a little.
Starting the same way, after rolling your stack of strips, gently hold them by the sides towards the coil end. For a larger swirl, you’d move your hand further away from the coil.
With your other hand, pull each strip slightly to open up the space between each strip in the coil. If you pull too much and are unhappy with the way your swirl looks, push the strip back towards the coil end a bit.
Keep adjusting your strips until the swirl is even and looks the way you want.
Decide how long you’d like your swirl to be and tear each strip, making each a little longer than the last.
Add some glue between each strips and smooth to make a tail.

I think this is one of my favorite techniques in all of quilling! It’s clean and classic, but always a wow!

Now, let’s get fancy!
You can also make your strips into more than one swirl at once!
Start in the same way as the last. Adjust your strips so your swirl looks the way you like.
Apply a tiny bit of glue between each strip in a spot close to the coil, and let dry.
Curl the remaining strips slightly with your tool, in the same way you would curl a ribbon.
Then, simply adjust the strips so they’re spaced evenly as they form a bump below the original coil.
Glue the ends of the strips and smooth.

The variations on this type of swirl are endless!
Make the bump larger, make the coil smaller, whatever you like!

One more swirl to show is really similar to a S scroll, but with more than one strip.
Start with a standard swirl, as shown above.
Tear all the strips straight across in the same length, and add a bit of glue to the very edges.
Last, roll that end in the reverse direction from the first coil.
It really looks more complicated than it is!

There are so many uses for swirls, but a lot of traditional quilling artists use them in their flower work.
I made a broad leaf out of a swirl for my post on how to make a lily of the valley, and I used them to make the leaves of the tulips in next weeks post. Stay tuned!

I hope I solved the mystery of how to make quilling paper swirls.
Once you get the steps down, start mixing up the colors of your strips. That’s when the fun really begins!
Don’t be as terrified as I was! It just takes a little practice.
Leave a comment below and let me know how your quilling paper swirls turn out.


What a beautiful craft. I’ve always wanted to know how to make these. Thank you for this informative post.
Thanks so much! I hope you’ll give quilling a try sometime!
Meredith; this looks all very lovely. I have to admit I didn’t even know paper quillling existed. I will need to try this. So many option. Have bookmarked your site. Thank you for sharing.
That’s wonderful, Marinka! I’m on a mission to spread the word about how great quilling is, and I’m so glad you’re on board! If you ever have any questions, please don’t hesitate to send me an email!
Wow, these are really cool. I have never really heard of quilling paper. I’m fascinated. Thanks for sharing how you do it.
Thanks Ramona! It really is pretty simple. Give it a try!
This is probably the most interesting thing I have come across in awhile! So gorgeous, I would actually consider making some into the flowers (looking forward to your next post!) and putting it in a shadow box frame in my newly decorated office!!! So pretty! Thanks for sharing.
That’s so exciting! I’m thrilled you’re inspired to quill up some flowers. If you need some framing tips, I have a post about it from a while back, too. Feel free to contact me with any questions!
Oh that is awesome, good to know thanks for letting me know!!!
Thank you so much for this lesson.
Thank you, Dayadari, for reading it! I hope its helpful!
I have only tried the simplest quilling techniques. I am so excited to try swirls. I have looked at many of them but I figured it took someone with more talent. In reading this, you make it look do-able. I plan on trying this in the morning. I also want to follow you so I can learn more. Thank you!! Thank you!!!
That’s wonderful, Fae! I’m so glad you’ve decided to try something new. I know you can do it!! Feel free to contact me anytime if you have any questions!
Meredith – thank you for this step by step instructions for swirls. I’m getting my supplies out now – I’ll let you know how it goes.
So glad it’s helpful, Yvonne! I was always so frustrated with swirls, but once you get the feel of them, they’re really fun to make!
Oh my goodness! I am so glad I came across your blog! I have been thinking about taking on this craft for a while now, it’s beautiful! I will definitely be back many times to learn from your expertise.
That’s great news! Quilling is so much fun. Please let me know if you ever have any questions!
This looks so cool! I love how you layered the swirls to make the lilies.
I’m always so impressed with what you create! I love that you create a thicker quill by layer a few together!
I’m so happy I found your page! Although I’ve been papercrafting for a while I’d never tried quilling it looked so complicated but since I found you you’ve made everything look so clear and straight forward with your information and photos. Thank you so much for sharing this craft I’m having great fun!
What wonderful words, Bev, thank you so much! That is exactly what this site is all about. I’m so, so glad you’re gaining some quilling confidence! Reach out anytime with questions and happy crafting!
This was very helpful for me, thank you for sharing!
I’m so glad you found it useful, Diana!
I have tried quilling many times but gave up as I could not understand how to do the the swirls to now. Thank you so much for your post and I see you took the time to answer each person, you are amazing thank u Sheila
What a sweet comment, Sheila! Thank you! I’m glad to help 😊
I have struggled with this type of swirl. You make it look quite simple. Looking forward to trying this technique this weekend. Thank you so much.
You’re so welcome, Jean! Let me know if they give you any trouble!
I am too glad to find your site, this is soo beautifull, I did’nt now how to swirl thanks you so much from Greenland ☺️
So glad you’re here, Hanne! Thanks so much for the kind words.
Thank you for the instructions. I will surely try it out.
Glad to help, let me know if you have any questions, Pilar!
When you say tearing do you actually mean ripping the paper instead of cutting?
I sure do. Cutting the strips leaves a thicker edge that’s harder to glue smoothly. When you rip quilling strips, the ends aren’t as blunt. This makes them easier to glue and results in a much cleaner finished product.
Hi Meredith
I would love to make a wall hanging in a frame.
But at the back of the flowers there are single twills spread apart.
What is the best way to glue them to the background without messing the glue.
As it is a bit award to hold them in place
Thanks sarah
send me a mail pls. explaining how i must do it.
Hi Sarah, thanks for your question!
I actually just wrote a post with some helpful tips about mounting quilling. Just follow that link for a bunch of info. I hope you find it helpful!
Great Site! I tried quilling back in the late 1960s. It was hard going then. We did not have the tools, materials, or resources available today. While recovering from hip replacement surgery this past winter, I tried quilling again. What a difference! You have great picture tutorials on new forms. Keep up the wonderful work.
Nancy K.
Thanks so much, Nancy! I’m glad you’re finding my tutorials helpful and I hope you’ve fully recovered!
Do you always tear the ends for all your swirls? How do you glue the swirl to the paper? Thank you. Your work is beautiful!
I do tear the ends that are going to start the swirl. That is, the ends that are going to be wrapped around the quilling tool. It will roll much smoother that way. The other ends of the paper can be torn or cut, depending on the shape of the swirl. Each example shows how I like to take care of that in the photos. As far as gluing, I like us apply my glue with a needle-nosed bottle thinly all over the underside of the swirl. Then, brush away any excess that shows between the strips with a small brush. I hope that helps!
Thanks – I’ve brought a kit back from Mexico years ago (around 16) and never knew how it worked. The very short instructions are all in Spanish – so it just stayed there. Now, I might just try it!!!
Glad to help! Let me know if you have any questions!
You’re really solving the problem, Meredith! As a perfectionist person, I think I should measure the papers in different length first then stick them together and start to make the coil. All of my mathematical thoughts are truly denied here. And your written tutorial about how to quill this swirl really helps me alot since internet connection in my area doesn’t support youtube channel that much. Once again, thank you and long live crafting!!!
Glad to help, Nora!
Many Thanks Meredith, I love the scroll work! We did a basic quilling class at our Adult School Fall sessionlast week and it was great fun, so for the Spring session I will be sure to share this – everyone will love it!
Great, Alice! I’m glad it will be useful to your group!
Hi Meredith – I enjoy trying to quill, emphasis on trying. Iʻm a little confused by the part of the swirl tutorial that says: “After getting the coil to the size and shape you want, apply a little glue between the layers of paper on the tail end.
Then, cut or tear all the strips at the same place, right where the glue ends.” Why glue it together if youʻre going to tear it above the glue mark? Sorry to not understand, joan
No worries, Joan! That’s what the comment section is for. When you cut or tear away the excess paper from your tail, you’re going to do so after the glued area. In other words, you’ll have your coil, then some paper (as long as you want it to be), then a bit of glue to keep the tail in place, then cut. I hope that clears it up a little!
Thanks Meredith! Sometimes I way overthink the simplest things…..
Thank you so very much for this site! It is better than any book and it’s free, which to me, an older person with a very limited income, is so wonderful and kind of you to offer!
My pleasure, Wendy! I’m glad you’re enjoying it!
Yes, what these other ladies said! Thank you!
I do have one question… as for the glues that you use in your quilling, is it special, or is it just that the type of dispenser has got to be the needle tip type, and you can use any old glue? I’ve been using an Elmer’s Craft Bond that comes in a tube with a small hole at its tip. If I can use less glue, it would be quite an advantage to round up to the dispensers I see advertised everywhere online. I have gallons of regular ol Elmer’s White Glue, if that’s all I need ~ appreciate your time!
I usually use Elmer’s. I just like to pour some into a needle nosed bottle, then use that to dispense as I work. I do have a post all about glue on my site, but I do use Elmer’s the most often!
Carolyn, thanks for this I have been interested in quilling and now I’m addicted. Want to learn to do these swirls now I will practice practice practice. Love it !!
So glad to help, Carolyn!
Decided to take up quilling during self isolating lockdown and I am enjoying the new to me craft.. your tutorials are great, thank you so much.
So glad to be able to help, Janice!
Thank yo so much for this. You’ve made what looks so complicated so achievable. Ive taken up quilling through lockdown, as something different to put on the front of my handmade cards. This has helped me so much
So glad to help!
Thank you for sharing your techniques. Do have a question, do u spray anything over ur project when u r finished, to preserve ur creation . If so what do u use?
I personally don’t seal my quilling, but a lot of people choose to. I always send people to the site HoneysQuilling.com for info on sealants because they’ve tried a lot of different products and have lots of reviews.