• Skip to main content
  • Skip to primary sidebar

The Papery Craftery

Quilling and Other Fun Paper Things

  • Quilling Basics
  • Quilling
    • Tutorials
    • Free Quilling Templates
    • Quilling Tools and Supplies
    • Papercraft and Quilling Videos
  • The Crafty Life
    • Crafting Printables
    • Paper Crafting News
    • Other Fun Things
  • Shop My Favorite Supplies
  • About & Disclosures
    • Privacy Policy
    • Cookie Policy
  • Contact

Quilling Paper Mittens

January 31, 2018

Mittens have been on my mind a lot lately.

Two little kids plus lots of chilly days equals tons of time squeezing tiny wiggling hands into mittens.

And, since I’m always looking for ways to dress up my walls, it dawned on me that mittens would make an adorable addition to my winter home decor.

This week, I’m sharing a tutorial on how to make quilling paper mittens.

This post contains affiliate links. If you click on the links below and make a purchase, I may receive a small compensation to help me finance this site and keep coming up with awesome tutorials and tips! There’s no cost to you and I only ever include links to companies and products that I trust and work with on a regular basis. 


Quilling Paper Mittens ~ Make your own winter home decor with these simple mitten templates || www.ThePaperyCraftery.com

These little darlings are totally customizable.

But I’ve done the hard work for you already by designing the basic shape.

First, print out this mitten template.

Quilling Paper Mittens ~ Customizable winter quilling home decor || www.thepaperycraftery.com

Each sheet has two pairs of mittens.

You can choose to do a pair or a solo one.

As is, the finished size of each mitten is about 3 1/2″ tall by 3″ wide.

Quilling Paper Mittens ~ Make your own winter home decor with these simple mitten templates || www.ThePaperyCraftery.com

After printing, place the mitten of your choice on top of your quilling workboard, and cover with a sheet of wax paper.

The waxed paper will allow you to easily remove your work when you’re all done.

Quilling Paper Mittens ~ Make your own winter home decor with these simple mitten templates || www.ThePaperyCraftery.com

Art Kits Delivered | Learn to Make Art!

This mitten project is a great practice for on-edge quilling.

I know, there are a lot of techniques for on-edge, but I’m going to demo the way I’ve been doing it for years.

It’s simple and quick and uses the supplies I already have on hand.

To make the outer edge more secure, I make double-thickness quilling strips.

I’ve found the simplest way to make these is to fold a long strip of quilling paper in half. Run a thin line of glue down one half and press together.

Once dry, the result is a strip that is quite a bit sturdier and holds up nicely to outline work.

Quilling Paper Mittens ~ Make your own winter home decor with these simple mitten templates || www.ThePaperyCraftery.com

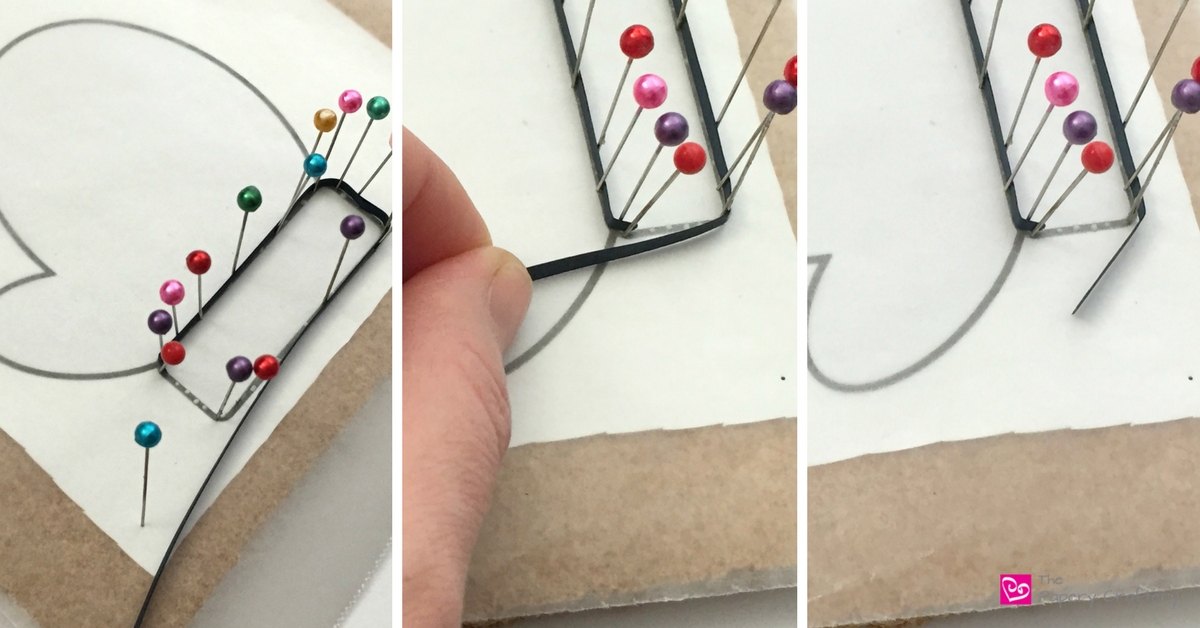
I like to fold one end of my thick strips slightly and start working on a corner, when possible.

Apply a dot of glue right over a corner on the outline of the mitten.

Place your bent end on the corner and pin into place.

Let that dry for a moment and you’ll have a sturdy anchor to continue on.

If you haven’t done it yet, now is the time to invest in a needle-nosed glue bottle. It will make all the difference in the ease of your edge work, as you can just use teeny drops of glue as you go.

Quilling Paper Mittens ~ Make your own winter home decor with these simple mitten templates || www.ThePaperyCraftery.com

Add a dot of glue every so often along the rest of the outline, using straight pins to keep the quilling strip in line.

TIP: Pins can be useful on corners and straight lines too. Try adding pins to both sides of a strip to keep it in line!

As you get to the end of a section, tear the strip and secure it with glue.

Quilling Paper Mittens ~ Make your own winter home decor with these simple mitten templates || www.ThePaperyCraftery.com

I started with the base of the design, but the edge of the top section can be done exactly the same way.

Quilling Paper Mittens ~ Make your own winter home decor with these simple mitten templates || www.ThePaperyCraftery.com

Once you’re happy with your edge work,  it’s time to work on filling in your quilling paper mittens!

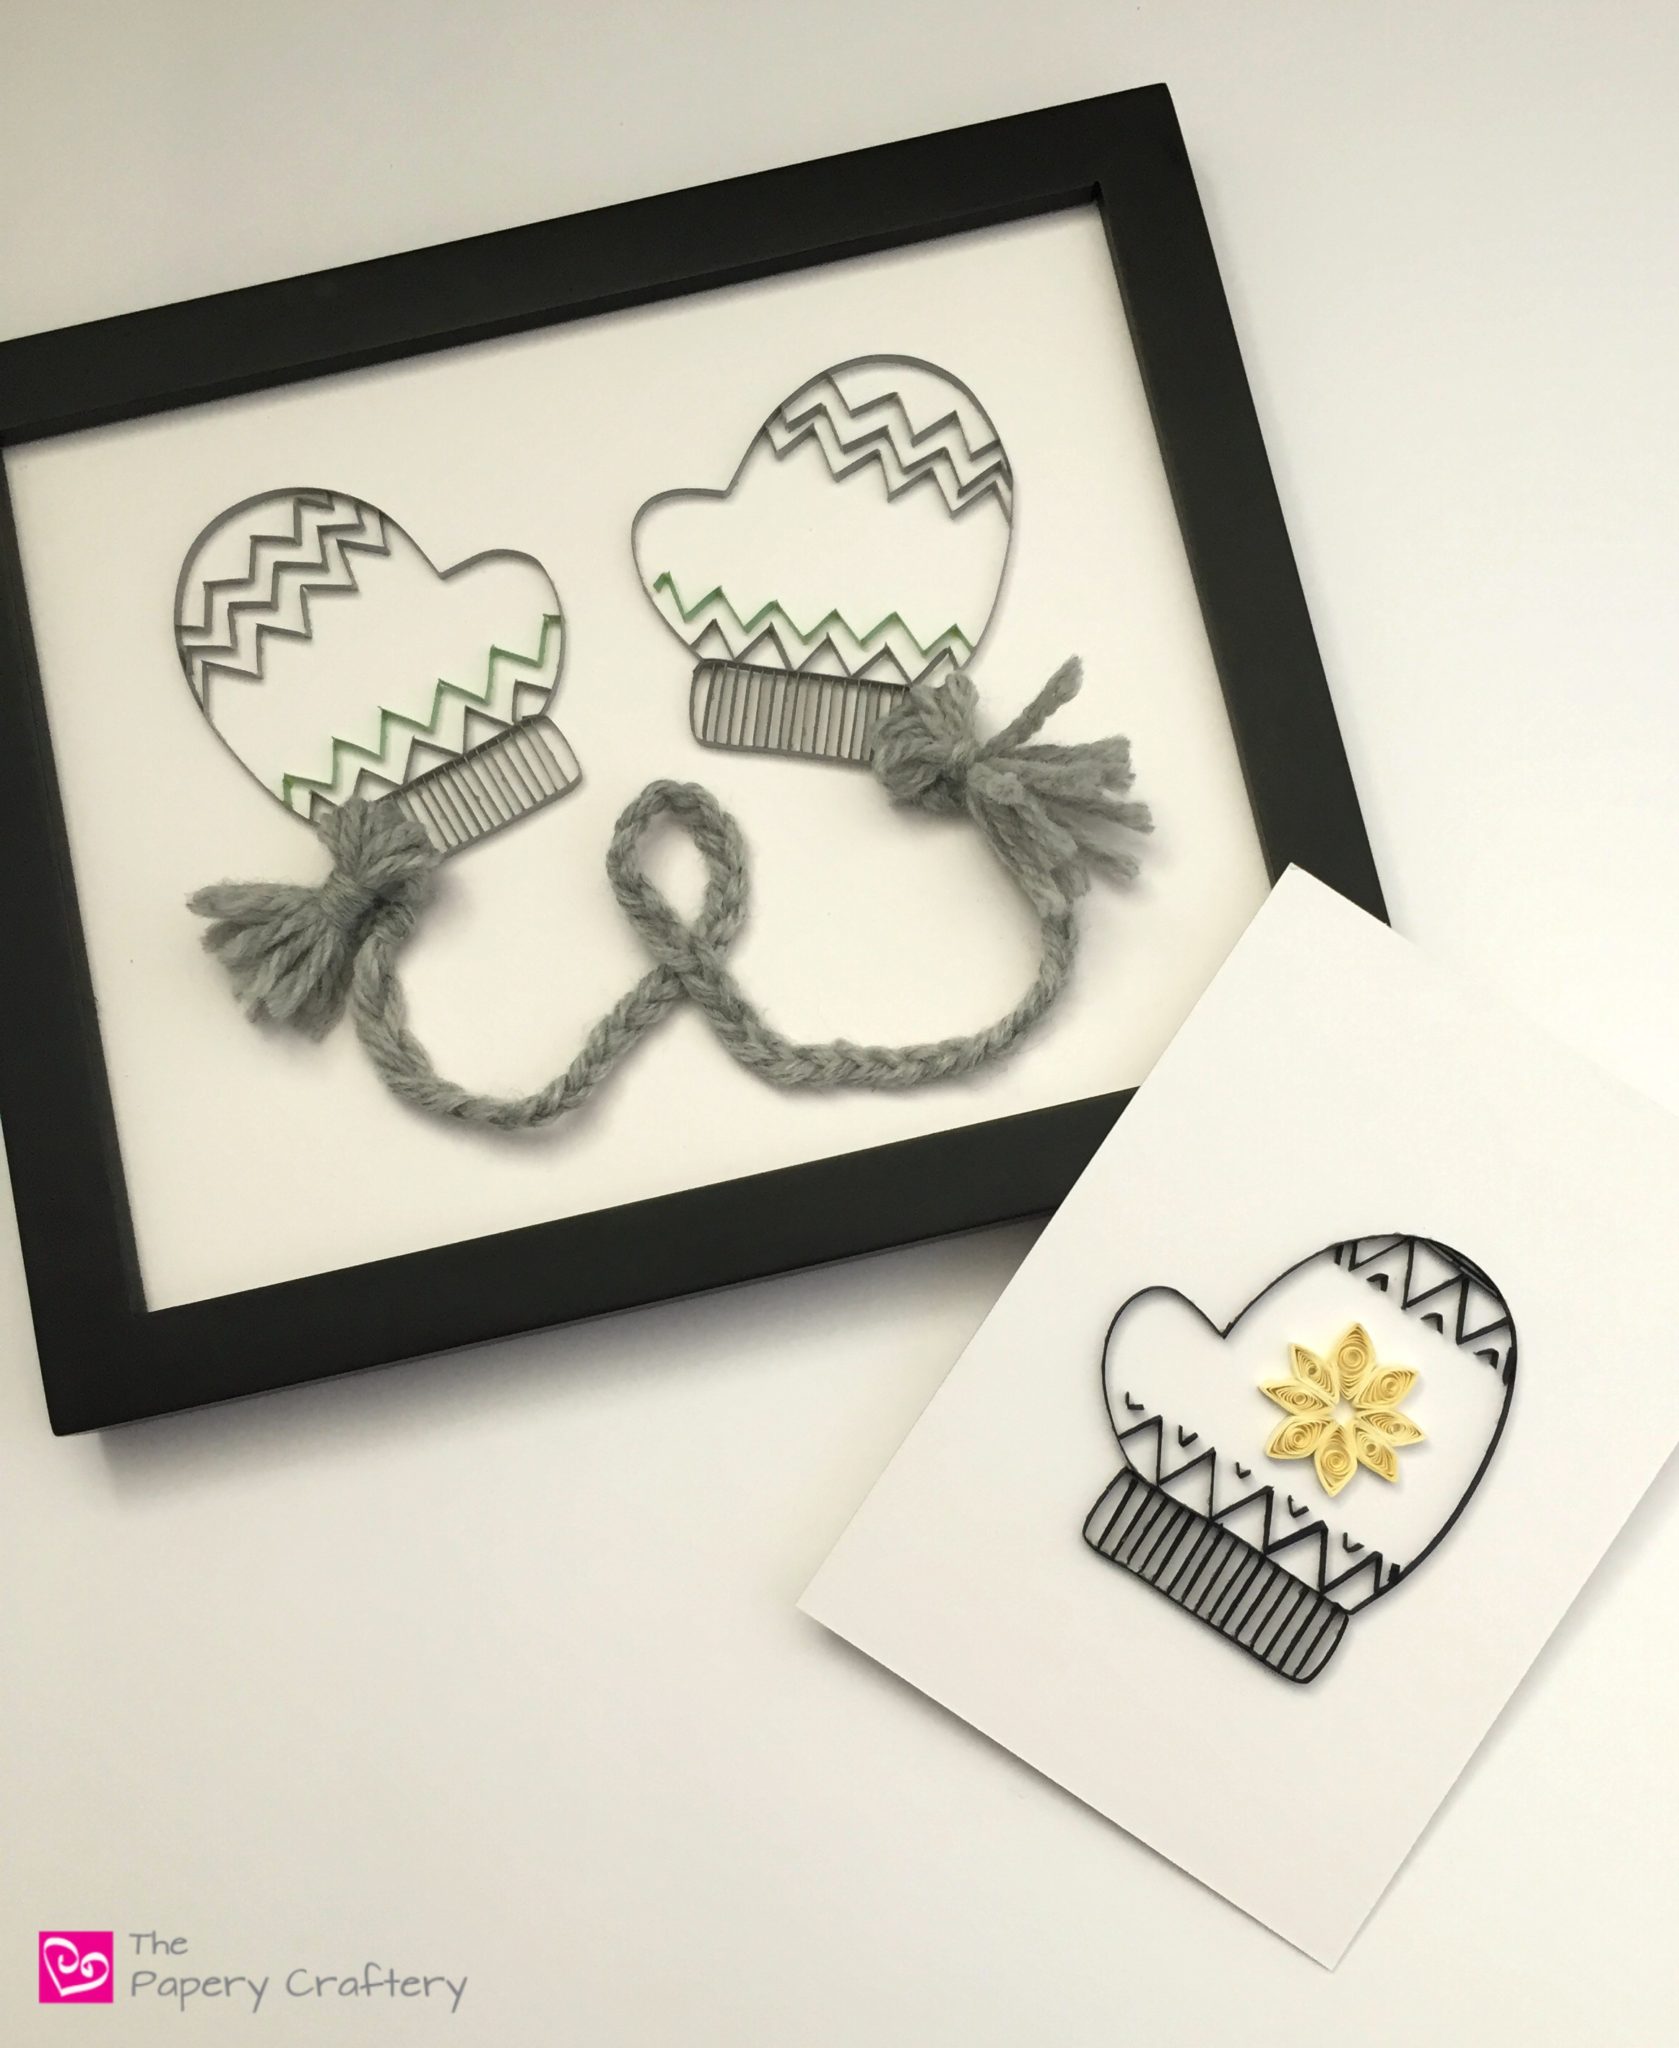
I went with really classic Norwegian knitting-inspired designs of snowflakes and v-shaped dots.

The cuff of the mitten was filled with straight lines to make it look like it is ribbed.

TIP: It is really helpful to sketch your design on the template itself. But if you forget until after the edge is done, no worries! You should be able to gently lift the entire waxed paper sheet up, and have the edge of the mitten stay put. Draw what you need, then line your mitten back up and pin the paper in the corners again.

Quilling Paper Mittens ~ Make your own winter home decor with these simple mitten templates || www.ThePaperyCraftery.com

Fill in your mitten as you like.

Stripes or dots would be fun, too!

Quilling Paper Mittens ~ Make your own winter home decor with these simple mitten templates || www.ThePaperyCraftery.com

When all your elements have dried, take out any pins left, and remove your quilling from your workboard.

I find it helpful to gently slide my needle tool between the quilling and the waxed paper to loosen any glue that may cause it to stick.

Using a small pair of scissors, snip those little glue dots off carefully.

Apply an extremely thin line of glue to the bottom of your mitten, and mount for framing.

I strongly recommend mounting to a thicker surface, like this mat board.

Quilling Paper Mittens ~ Make your own winter home decor with these simple mitten templates || www.ThePaperyCraftery.com

I love the mitten alone or in a pair like these sweet gray and pale green chevron lines.

To make it extra special, I also experimented with adding some quick yarn tassels, and a braided string to connect them.

Quilling Paper Mittens ~ Make your own winter home decor with these simple mitten templates || www.ThePaperyCraftery.com

Quilling Paper Mittens ~ Make your own winter home decor with these simple mitten templates || www.ThePaperyCraftery.com

These quilling paper mittens were really fun to make.

I loved coming up with ways to translate knit designs into paper.

I think I’ll make a few more of these to hang in our mudroom for the rest of the winter.

How will you design your quilling paper mittens? Tell me your plans in the comments below!


Print this post

Share this:

  • Click to share on Facebook (Opens in new window)
  • Click to share on Twitter (Opens in new window)
  • Click to share on Pinterest (Opens in new window)
  • Click to print (Opens in new window)

in Quilling, Tutorials # quilling paper mittens, winter home decor, Winter Quilling

Reader Interactions

you may also like
4 Fast Fall Quilling Paper Flowers
Autumn Wreath with Quilling Paper Leaves
Quilling Paper Seahorse
Quilling Paper Rainbow Umbrella

Comments

  1. Tanya Gordon says

    February 15, 2018 at 7:36 am

    I’ve been quilling for years and have avoided doing any edge work. Thanks to you, I now have the knowledge to be able to start some new projects! I really appreciate you taking the time to teach an old dog some new tricks. I do have one question though. What is the best size of paper to edge with? 1/4″, 3/8″, or can you even do this with 1/8″ paper?

    Reply
    • Meredith says

      February 15, 2018 at 8:08 am

      Great question, Tanya! I think that many quillers would tell you to use wider paper because it’s usually stronger and easier to control. But in an effort to avoid buying new paper just for edge work, I make double thick strips, like I demoed in this post. I also like having my entire piece being the same height, so I use 1/8” for the entire thing. It never hurts to experiment with what is right for you, though!

      Reply
      • Tanya Gordon says

        February 15, 2018 at 8:19 am

        Thank you so much, Meredith! I was just going through my paper thinking that I was going to have to buy all new paper for a couple of projects I have planned. Now I know I have the right paper after all… because it’s all the right paper! Thanks again! 🙂

        Reply

Share your thoughts and leave a comment below! Cancel reply

Primary Sidebar

About Me

Hi there, Paper People! I'm so glad you've stumbled across my corner of the internet. I'll be sharing my favorite quilling tips and tutorials, plus some creative micro-biz pointers, and lots of paper crafting news! Thanks for stopping by!

Looking for a project, technique or tool? Search here!

There’s more on YouTube!

https://youtu.be/2sGniUktNe4

Top Hits!

Thank you so much for stopping by my site. If you care to throw more support my way so I can continue to make new tutorials, you can do so by buying me a virtual cup of coffee!

Affiliate Policy

Some posts on this blog contain affiliate links.

If you click on the links and make a purchase, I would receive a small compensation to help me finance this site and keep coming up with awesome tutorials and tips! There’s no cost to you and I only ever include links to companies and products that I trust and work with on a regular basis.

All posts with affiliate links are clearly marked.

The Papery Craftery (ThePaperyCraftery.com) blog is a participant in the Amazon Services LLC Associates Program, an affiliate advertising program designed to provide a means for us to earn fees by linking to Amazon.com and affiliated sites.

Cookie Policy
Privacy Policy

I hope you’re inspired by my quilling!

Feel free to use my designs as gifts or for your own personal use. And I’d love any sharing of my photos and projects! All I ask is that all photos remain unaltered and link back to the original post, and please do not attempt to sell my any quilling created from my designs as your own work. Happy Crafting!

Latest on Instagram

Most of my FAQ’s are about making quilling paper Most of my FAQ’s are about making quilling paper letters - the first of 2 videos with all the tips is up now!  🎥 link in bio 
#quilling #quillingcrafts #paper #monograms #paperletters
Any day I get to pull out my favorite quilling com Any day I get to pull out my favorite quilling comb is a good day  Quilling a paper spider mums full video with all the steps is up on YouTube  🎥 link in bio 
#quilling #quillingcrafts #paper #papercrafts #paperflowers
I know 3D quilling isn’t everyone’s jam, but I I know 3D quilling isn’t everyone’s jam, but I love the magic in creating something realistic out of simple strips of paper 😍  Full video with all the steps is up on YouTube  🎥 link in bio 
#quilling #quillingcrafts #papercraft #blueberries #handmade
Rainy East Coast days call for teeny mushrooms F Rainy East Coast days call for teeny mushrooms  Full video with all the steps is up on YouTube  🎥 link in bio 
#quilling #quillingcrafts #papercrafts #paperart #autumnvibes #handmade
DIY sweet paper cherries 🍒 The full video wit DIY sweet paper cherries 🍒  The full video with all the steps is up on YouTube now  🎥 link in bio 
#quilling #quillingcrafts #papercraft #handmade
The how-to’s on these sweet cherries and blueber The how-to’s on these sweet cherries and blueberries won’t be up on YouTube until Sunday but they’re too cute not to share early 🤩  🎥 link in bio 
#quilling #quillingcrafts #papercrafts #handmade
2021 © Meredith Amand Designs
made by soulmuse