• Skip to main content
  • Skip to primary sidebar

The Papery Craftery

Quilling and Other Fun Paper Things

  • Quilling Basics
  • Quilling
    • Tutorials
    • Free Quilling Templates
    • Quilling Tools and Supplies
    • Papercraft and Quilling Videos
  • Crafts
    • Quilling and Craft Printables
    • Paper Crafting News
    • Other Fun Things
  • Shop My Favorite Supplies
  • About and Disclosures
  • Contact

Quilling Paper Poinsettia Flowers

December 7, 2017

This year, I had so many ideas of quilling tutorials to write for the holiday season!

After spending some quality time with my calendar and realizing exactly how little time I had left before Christmas, I had to narrow that list down quite a bit.

But the one idea that I couldn’t let go of was making some quilling paper poinsettia flowers.

So I decided to jazz them up by making the poinsettia with one of my favorite tools, the quilling comb!

This post contains affiliate links. If you click on the links below and make a purchase, I may receive a small compensation to help me finance this site and keep coming up with awesome tutorials and tips! There’s no cost to you and I only ever include links to companies and products that I trust and work with on a regular basis.


Quilling Paper Poinsettia Flowers _ Use a quilling comb to make traditional holiday blooms! __ www.thepaperycraftery.com

To start, gather supplies!

I used my workboard, a needle tool, some white glue in a needle-nose squeeze bottle, and the quilling paper of your choice.

This deep crimson is my go-to red, and I also used some pale yellow.

The only other tool you will need is a quilling comb. Also sometimes called an onion holder, a quilling comb has a plastic handle with many metal pins pointing out.

It is used to make multiple loops from a single quilling strip at a time.

In a pinch, you can use a regular hair comb or a plastic hair pick. But I’ve found a real quilling comb had smaller teeth and is easier to get the paper to do what you’re looking for.

Quilling Paper Poinsettia Flowers _ Use a quilling comb to make traditional holiday blooms! __ www.thepaperycraftery.com

The first step to making a quilling paper poinsettia flower is to roll one end of a strip of quilling paper on your needle tool a couple times.

Don’t worry about how long of a strip to use at this point. I would use an entire strip to start with, as its easier to manage longer strips on the comb.

Quilling Paper Poinsettia Flowers _ Use a quilling comb to make traditional holiday blooms! __ www.thepaperycraftery.com

Gently slip the coil off your needle tool, and place it on one of the middle pins of your comb.

This gives your strip a nice place to start on your comb, but I like to hold it still with a finger to make sure it doesn’t unravel as I move the rest of the strip around the pins.

Make sure the tail of your strip is towards the back of the comb.

Pull it through to the front right after the next pin.

Quilling Paper Poinsettia Flowers _ Use a quilling comb to make traditional holiday blooms! __ www.thepaperycraftery.com

Now, this is where it might get tricky, so just bear with me.

The main idea is to loop the tail of the strip around the pins of your comb, moving one pin out from the center on each side as you go.

So, after bringing your strip back up to the front in the last step, pull it around one pin from the center on the other side and to the back again.

Next, continue by bringing the strip back to the front, but around one pin further out from the center.

Making another loop, bring it to the back around one more pin on the other side.

Bring the strip back to the front and make one last loop in the same way.

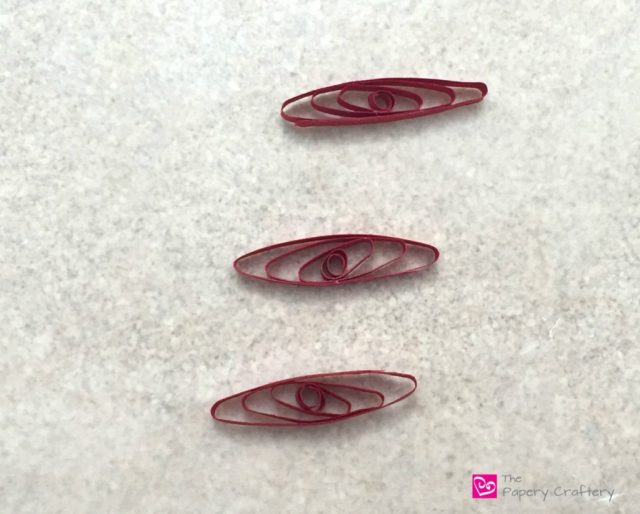
At this point, the quilling paper strip should be looped around 3 pins on either side of the center loop that you started with.

I know this sounds complicated, but follow the photos and you’ll get the hang of it quickly!

Quilling Paper Poinsettia Flowers _ Use a quilling comb to make traditional holiday blooms! __ www.thepaperycraftery.com

When you’ve finished your loops, tear off the rest of your strip leaving just enough to glue on the outside.

This will be enough to keep your loops together!

Quilling Paper Poinsettia Flowers _ Use a quilling comb to make traditional holiday blooms! __ www.thepaperycraftery.com

Repeat these steps 2 more times.

These 3 are going to be one petal of your flower.

(Fun fact: Apparently, the colorful parts of a poinsettia plant are really a type of leaf, but for simplicity’s sake, I’m going to keep calling them petals. Forgive me, flower experts! )

Quilling Paper Poinsettia Flowers _ Use a quilling comb to make traditional holiday blooms! __ www.thepaperycraftery.com

To form the petal, apply a very thin line of glue to the long edge of comb loops and stack them together.

Hold all three between your hands and pinch both ends to a point.

Quilling Paper Poinsettia Flowers _ Use a quilling comb to make traditional holiday blooms! __ www.thepaperycraftery.com

I think it’s a good idea to wrap each petal in a matching strip of paper to make the edges look more finished.

Quilling Paper Poinsettia Flowers _ Use a quilling comb to make traditional holiday blooms! __ www.thepaperycraftery.com

Each flower uses two layers of petals.

The larger petals are made in the same exact way as the ones above, but instead of looping around 3 pins on either side of the center loop, you’ll want to loop around 4.

Quilling Paper Poinsettia Flowers _ Use a quilling comb to make traditional holiday blooms! __ www.thepaperycraftery.com

When all your petals are formed, glue the 5 small ones together and the 5 larger ones, as well.

Quilling Paper Poinsettia Flowers _ Use a quilling comb to make traditional holiday blooms! __ www.thepaperycraftery.com

While they dry, roll 7 tight coils from 1″ strips of pale yellow paper.

Quilling Paper Poinsettia Flowers _ Use a quilling comb to make traditional holiday blooms! __ www.thepaperycraftery.com

With a small dot of glue, place the small petals on top of the larger petals.

Be sure to stagger them so they’re not all pointing in the same direction.

Add the yellow coils to the center.

Quilling Paper Poinsettia Flowers _ Use a quilling comb to make traditional holiday blooms! __ www.thepaperycraftery.com

There are a few other common shades of poinsettia flowers, like pale pink and white.

There’s even some lovely pastel green varieties!

Quilling Paper Poinsettia Flowers _ Use a quilling comb to make traditional holiday blooms! __ www.thepaperycraftery.com

These quilling paper poinsettia flowers would work great on holiday cards.

Or maybe scattered along a table for a touch of color!

For instructions on making the leaves I used in these photos, check out this post on quilling greenery.

Quilling Paper Poinsettia Flowers _ Use a quilling comb to make traditional holiday blooms! __ www.thepaperycraftery.com

But I think the best part is that they can be used after the holidays too!

These big blooms are perfect for brightening up a space during the gloomy winter months!

Go ahead and grab a quilling comb.

I promise you’ll really enjoy the lacy texture of these flowers!


Print this post

Share this:

  • Click to share on Facebook (Opens in new window)
  • Click to share on Twitter (Opens in new window)
  • Click to share on Pinterest (Opens in new window)
  • Click to email a link to a friend (Opens in new window)
  • Click to print (Opens in new window)

in Quilling, Tutorials # quilling paper christmas decorations, quilling paper poinsettia flowers, quilling winter decorations

Reader Interactions

you may also like
How to Make Quilling Paper Bluebells
How to Make 3 Quilling Paper Flower Buds
4 Fast Fall Quilling Paper Flowers
Autumn Wreath with Quilling Paper Leaves

Comments

  1. Aunt Tee says

    December 7, 2017 at 12:19 pm

    Thank you! Great tutorial. I’ll be making these for sure

    Reply
    • Meredith says

      December 7, 2017 at 12:23 pm

      That’s wonderful! Please check back in and let me know how it goes!

      Reply
  2. cecilia vargas bencci says

    October 16, 2019 at 11:55 pm

    Gracias muy hermosa y su tutorial hace fácil hacerlas

    Reply
    • Meredith says

      October 17, 2019 at 8:47 pm

      De nada. ¡Estoy tan contento de que encuentres mis instrucciones fáciles de seguir!

      Reply
  3. Jim Wilson says

    December 12, 2020 at 4:17 pm

    Did you do a tutorial on making the green leaves shown with the poinsettias?

    Reply
    • Meredith says

      December 14, 2020 at 12:22 pm

      I sure have! They are one of the leaves included in this post 👉 5 More Types of Quilling Paper Greenery.

      Reply
  4. Helene says

    December 8, 2022 at 6:20 pm

    So very pretty and uncomplicated. Thanks so much for the tutorial!

    Reply
    • Meredith says

      December 21, 2022 at 10:37 am

      Thank you!

      Reply
  5. Jennifer Hautle says

    December 21, 2022 at 9:11 am

    You said that this poinsettia pattern is great for making cards. How big does it turn out to be?

    Reply
    • Meredith says

      December 21, 2022 at 10:36 am

      It will depend a bit on the size of your quilling comb and how far apart the teeth on it are, but the large ones I make are about 4 inches across.

      Reply

Share your thoughts and leave a comment below!Cancel reply

Primary Sidebar

About Me

Hi there, Paper People! I'm so glad you've stumbled across my corner of the internet. I'll be sharing my favorite quilling tips and tutorials, plus some creative micro-biz pointers, and lots of paper crafting news! Thanks for stopping by!

Looking for a project, technique or tool? Search here!

There’s more on YouTube!

https://youtu.be/kndglSrYWKg

Top Posts & Pages

  • Quilling Paper Sunflowers
    Quilling Paper Sunflowers
  • How to Store Quilling Paper
    How to Store Quilling Paper
  • The 4 Types of Glue Every Quilling Artist Needs
    The 4 Types of Glue Every Quilling Artist Needs
  • Quilling Paper Rainbow Umbrella
    Quilling Paper Rainbow Umbrella
  • How to Make Quilling Paper Swirls
    How to Make Quilling Paper Swirls
  • How To Make Simple Quilling Paper Flowers: Lily of the Valley
    How To Make Simple Quilling Paper Flowers: Lily of the Valley

Thank you so much for stopping by my site. If you care to throw more support my way so I can continue to make new tutorials, you can do so by buying me a virtual cup of coffee!

Affiliate Policy

Some posts on this blog contain affiliate links.

If you click on the links and make a purchase, I would receive a small compensation to help me finance this site and keep coming up with awesome tutorials and tips! There’s no cost to you and I only ever include links to companies and products that I trust and work with on a regular basis.

All posts with affiliate links are clearly marked.

The Papery Craftery (ThePaperyCraftery.com) blog is a participant in the Amazon Services LLC Associates Program, an affiliate advertising program designed to provide a means for us to earn fees by linking to Amazon.com and affiliated sites.

Manage Cookie Preferences

Cookie Settings
Privacy Policy

I hope you’re inspired by my quilling!

Feel free to use my designs as gifts or for your own personal use. And I’d love any sharing of my photos and projects! All I ask is that all photos remain unaltered and link back to the original post, and please do not attempt to sell any quilling created from my designs as your own work. Happy Crafting!

thepaperycraftery

Quilling paper aster flowers The full video with Quilling paper aster flowers  The full video with all the steps is up on my YouTube now 👆follow the link above ⭐️
A quick before and after of the flower project I s A quick before and after of the flower project I shared this week - simple flowers with black stripes!  The full video with all the steps is up on my YouTube now 👆follow the link above 🩷
Queen Anne’s lace flowers with quilling paper | Queen Anne’s lace flowers with quilling paper | Full video is up now with all the details so you can make your own
So tiny and spiky. So tiny and spiky.
Super simple quilling paper seashells | Full video Super simple quilling paper seashells | Full video with all the steps is up now!
Throwback to a project from a couple years back - Throwback to a project from a couple years back - quilling paper dandelions! 
Watch the full video on YT to learn how to make your own 👆  #quilling #paperflowers #crafts
Teeny paper starfish are a great way to practice m Teeny paper starfish are a great way to practice making quilling triangles - 
Watch the full video on YT to learn how to make your own 👆  #quilling #papercrafts #ocean #crafts
Playing with wider paper strips this week to make Playing with wider paper strips this week to make quilled chamomile flowers 
Watch the full video on YT to learn how to make your own 👆  #quilling #paperflowers
This week we’re practicing making cones for thes This week we’re practicing making cones for these sweet little bluebells! 
Watch the full video on YT to learn how to make your own 👆  #quilling #paperflowers #crafts
Mix it up with a little mixed-media quilling! W Mix it up with a little mixed-media quilling! 
Watch the full video to learn all the steps to make your own folk art flowers👆  #quilling #paperflowers
Gift tag idea 💡 make your own quilling paper Ch Gift tag idea 💡 make your own quilling paper Christmas lights! 
Watch the full video to learn all the steps to make your own! 👆  #quilling #papercraft #christmascrafts #cardmaking
This week I’m sharing snow topped evergreen tree This week I’m sharing snow topped evergreen trees made from quilling paper 🎄 
Watch the full video to learn how to make your own with just a few steps! 👆  #quilling #papercrafts #christmascrafts
Mini quilling paper ornaments are up on the YT cha Mini quilling paper ornaments are up on the YT channel now! 
See the full video for all the steps and how-to’s 👆  #quilling #papercrafts #christmascrafts
Tiny quilling snowmen ready to hand over the perfe Tiny quilling snowmen ready to hand over the perfect gift! 
See the full video for all the info and how-to’s 👆  #quilling #papercrafts #christmascrafts
Simple quilling paper pansy flowers! See the fu Simple quilling paper pansy flowers! 
See the full video for all the steps and details on the supplies! Click the link in my bio👆  #quilling #paperflowers #crafting
Have you ever added paint to your quilling? It can Have you ever added paint to your quilling? It can add a bit of depth and detail to your paper flowers! 
See the full video for all the info and how-to’s 👆  #quilling #papercrafts #paperflowers #watercolor
Super quick quilling paper Black Eyed Susans- a co Super quick quilling paper Black Eyed Susans- a couple simple shapes and they come together in no time! 
The full video is up now 👆  #quilling #papercrafts #paperflowers
Big, bright tropical flowers made with a paper cri Big, bright tropical flowers made with a paper crimper and a quilling comb 
The full video is up now 👆  #quilling #papercrafts #paperflowers
How to make quilling paper ice cream cones 🍦 How to make quilling paper ice cream cones 🍦 
The full video is up now 👆  #quilling #papercrafts #crafting
So simple! Learn to make bunches of sweet quilling So simple! Learn to make bunches of sweet quilling paper lilac flowers and leaves ~ 
The full video is up now 👆  #quilling #paperflowers #papercrafts
Load More Follow on Instagram
2021 © Meredith Amand Designs
made by soulmuse