Learn how to make use of old glass jars to turn your 3D quilling into quilling paper evergreen snow globes!
This post contains affiliate links. If you click on the links below and make a purchase I may receive a small compensation to help me finance this site and keep coming up with awesome tutorials and tips! There’s no cost to you and I only ever include links to companies and products that I trust and work with on a regular basis.

This weeks tutorial is more of an idea than a complete project.
I came up with it while trying to figure out what I could do with the large amount of empty jars that I have sitting around my house.
I wanted to use some in a quilling project, and snow globes with large 3D evergreen trees is what I came up with. Of course, they’re not snow globes in the traditional sense. There is no water involved. Obviously that wouldn’t work with the paper.
Yet, they have the feel of snow globes, especially when adding snowy elements.
But we’ll get to that part later on.
First, the supplies for the trees.
You’ll need some basic quilling supplies, like a needle tool and white glue, green quilling strips, Kraft paper, and any small jar with a lid. A hot glue gun will also be really handy for this one.
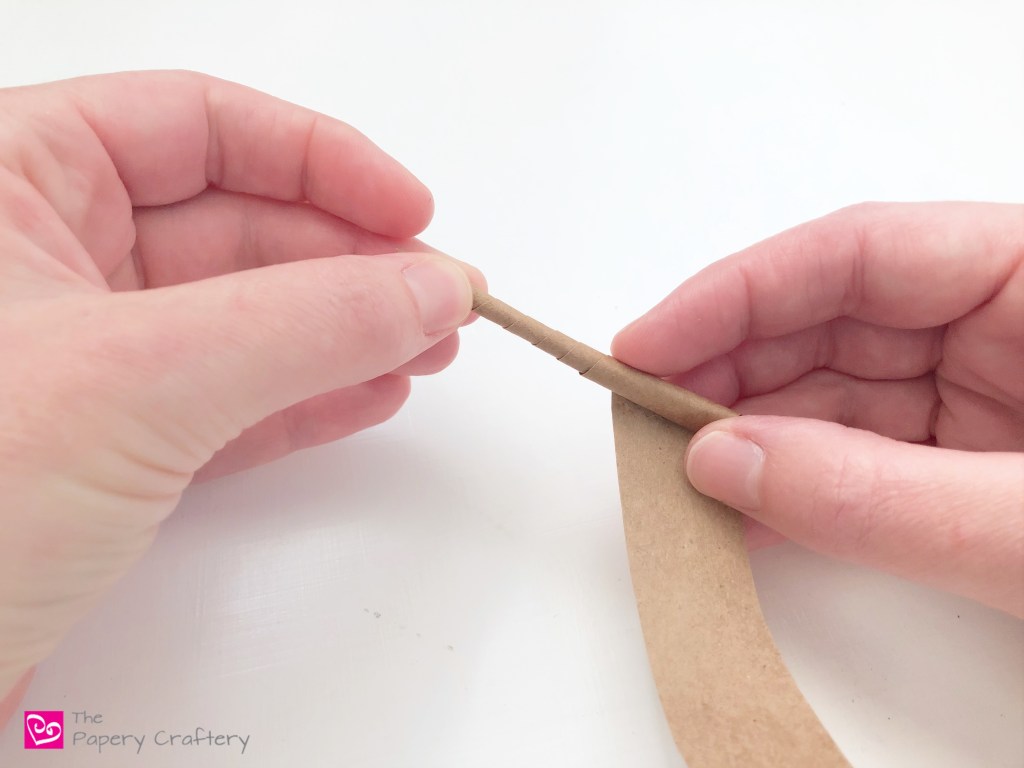
For the trunk of the evergreen tree, roll a kraft paper strip into a long cone.
I didn’t have any kraft paper on hand, so I cut up a brown paper shopping bag into 6-inch pieces that were about an inch wide.

It might be helpful to soften up your paper at first, by running your quilling tool along the length before you attempt to roll it.

Then, starting at one corner, roll the strip so it overlaps a bit.
Glue the end to set the shape. I also like to brush a bit of glue on the outside of the cone to really make sure it stays in place.


After your trunk has dried, measure the length against the jar you’re planning to use for your snow globe.
That way you’ll know the finished evergreen tree won’t be too tall.

Trim excess off and secure to the inside of the lid of the jar.
This is where the hot glue will be helpful, so you don’t have to hold the trunk in place the entire drying time.

Now, set your trunk aside and get started making the evergreen boughs.
The branches that make the bulk of these quilling paper evergreen snow globes are going basic paper swirls. If you’re not familiar with how to make quilled swirls, I have a this long post to help you learn the how-tos.
This project will definitely give you loads of swirl practice.
Each swirl will be made from 4 strips of quilling paper. I’m using Leaf Green by Craft Harbor Paper (formerly Lake City Craft) in this post.


Each evergreen tree will have about 20 swirls.
After some playing around, I found that if I used 3 sizes of swirls, my trees looked more realistic.
For the largest and
The smallest boughs were made using 1 ½” strips with a very small swirl.
Don’t worry about making the swirls the exact size that I’m making here.
The important thing is that some are larger and some are small.

Now, these swirls will be a little too long for your tree.
I found it helpful to tear a bit of the

Once the swirls are made, it’s time to start building the tree.
Attach 3 of the largest swirls at the base of the trunk. Be sure to evenly space them apart.


Then, add 3 more on the trunk in spaces between.

Next, add 6 medium-sized swirls.
Do your best to stagger the swirls so they’re not all lining up in a row.
It’s ok if some brown from the trunk peeks through, though. It will look more natural that way.
Fill in the top with smaller swirls.

Different sized jars will have slightly different sized trees.
But they’re all made with the same basic steps.

For a quick snow-covered ground, pull apart some cotton balls to line the bottom of the lid.
I had some polyfill left over from some old sewing projects and that worked great, too. It’s super fluffy!
You can also decorate your trees with garland made from quilled spirals.
If you really want to trim your tree, think about using some of the elements from my mini evergreen post from last winter. I think the little red bows would look darling!

I had a bunch of ideas for adding falling snow.
You could use a light mist of spray glue and dust on glitter. Or brush the tips of the evergreen with glitter glue or white glue, then dip in glitter.
I really liked the look of glitter glue on the outside of the jar.
My big plan was to add some faux snow pellets, but when I was creating these quilling paper evergreen snow globes, the snow wasn’t in stores yet.
I think that would really bump up the snowiness!

For a melting snow look, I also sprinkled some moss with glitter.
The glitter isn’t showing in the photos, but I think this just might be my favorite tree anyway!


All in all, I think this is a fun project that has loads of possibilities.
Once you’re happy with your snow globes, line them up on a window sill or on a mantle.
They may not have any water in them, but these snow globes are a unique way to add some quilling to your holiday and winter decor!


Just beautiful!
Thank you, Holly!
Good idea and it looks good too. I am toying with idea of doing them in sand as i live in Australia. There is no harm in trying and see what it looks like
I love the creativity! Let me know how they turn out!
Many thanks for all your hard work !
You’re very welcome! Thank you for taking a look 🙂
Muito interessante este modelo de quilling – uma alternativa aos globos de neve e água.árvore. Gostei muito de ideia que acho muito inovadora, grata pela sua partilha. abraço amigo.
Estou feliz que tenha gostado deles!